Configuring network agents
Network agents are deployed within the internal network to allow SSL certificate auto-installation on servers and allow network discovery tasks to scan internal networks. Once a server has been added to a network agent, the network agent will discover all server nodes and associated certificates.
Network agents can be configured for discovery or certificate installation in the following ways:
-
Local — A network agent is installed on the same host as the web server. The network agent uses local commands to interact with the server software/configuration.
-
Remote — A single network agent is installed on a central server and configured with the server details of the other servers on your network. The network agent uses remote connections requiring authentication to interact with the server software and configuration.
Network agent connection types are limited as outlined in the following table.
| Server Vendor | Agent Installation on Windows OS | Agent Installation on Linux OS | Agent Installation on Docker |
|---|---|---|---|
Apache 2.4 |
Remote auto-installation |
Local/Remote auto-installation |
Remote auto-installation |
Tomcat 7.x, 9.x |
Local/Remote auto-installation |
Local/Remote auto-installation |
Remote auto-installation |
Microsoft IIS 10 |
Local/Remote auto-installation |
Remote auto-installation |
Remote auto-installation |
F5 BIG-IP 15.1, 16.1, 17.1 |
Remote auto-installation |
Remote auto-installation |
Remote auto-installation |
Adding servers to a network agent
Server requirements
To add Microsoft IIS servers to a network agent, the following requirements must be satisfied:
-
User is part of local Administrators Group
To add Apache servers to a network agent, the following requirements must be satisfied:
-
Local:
-
The sectigo-network-agent service has, by default, all required permissions to manage an Apache web server.
-
-
Remote:
-
The account specified for remote access must have permissions on the remote Apache web server to do the following:
-
Execute
apachectl -
Read and write site configuration files in
ServerRoot -
Write certificate files to a remote certificates directory (
default /var/sectigo-network-agent-certs)
-
-
(SSH Key authentication only) On network agent versions 4.0 or earlier, the SSH key must be
PKCS #1format in aPEMfile
-
To add Apache Tomcat servers to a network agent, the following requirements must be satisfied:
-
Local:
-
The sectigo-network-agent service has, by default, all required permissions to manage an Apache Tomcat web server.
-
-
Remote:
-
The account specified for remote access must have permissions on the remote Apache Tomcat web server to do the following:
-
Start and stop the Apache Tomcat service
-
Read and write site configuration files in the Tomcat installation folder
-
Write JKS certificate files to the Tomcat installation folder
-
-
(SSH Key authentication only) On network agent versions 4.0 or earlier, the SSH key must be
PKCS #1format in aPEMfile
-
To add F5 BIG-IP servers to a network agent, the following requirements must be satisfied:
-
User must have the Administrator role with CLI enabled in the F5 BIG-IP application
Add servers
-
Navigate to .
-
Select your agent and click Edit to open the Edit Network Agent window.
-
Select the Servers tab and click the Add icon.
-
Provide a server name and select Microsoft IIS 10.
-
Select a Connection type.
As of version 5.0, network agents use PowerShell for certificate installation, except for (Legacy) connection types, which still use native Windows executables.-
Local
-
Local (legacy)
-
Remote (WinRM)
-
Enter the Host name/IP address of the remote server.
It is not recommended to enter an IP address since it cannot be used with Kerberos authentication. -
Enter the port of the remote server.
-
Provide your authentication details.
Username/Password
-
Provide the username for accessing the server.
-
Provide the password for accessing the server.
Credential in Agent Store
-
Provide the store name where the credentials are stored.
-
Provide the credential ID for finding login credentials of the server.
-
CyberArk Vault — The ID is a set of key value pairs, separated by semicolons, that would typically go in a query parameter string used to retrieve a specific credential from the CyberArk Central Credential Provider.
The ID format should be similar to the following:
<param1>=<value>;<param2>=<value>;...
-
HashiCorp Vault — The ID is the path of the required secret in HashiCorp vault. This path is relative to the
--rootpathspecified when adding the credential store. -
Delinea Secret Server — The ID is the unique
Secret IDof the Delinea secret. -
Local credential store — The ID is the unique identifying string of the credential in the local credential store.
-
-
-
Click Save.
-
-
Remote (SSH)
-
Enter the Host name/IP address of the remote server.
-
If the remote SSH server isn’t using the standard port, change the Port from 22.
-
Provide your authentication details.
Username/Password
-
Provide the username for accessing the server.
-
Provide the password for accessing the server.
SSH Key on Agent
-
If required, change the username.
-
Provide the path to SSH key on the network agent server.
-
Provide the key file passphrase.
Credential in Agent Store
-
Provide the store name where the credentials are stored.
-
Provide the credential ID for finding login credentials of the server.
-
CyberArk Vault — The ID is a set of key value pairs, separated by semicolons, that would typically go in a query parameter string used to retrieve a specific credential from the CyberArk Central Credential Provider.
The ID format should be similar to the following:
<param1>=<value>;<param2>=<value>;...
-
HashiCorp Vault — The ID is the path of the required secret in HashiCorp vault. This path is relative to the
--rootpathspecified when adding the credential store. -
Delinea Secret Server — The ID is the unique
Secret IDof the Delinea secret. -
Local credential store — The ID is the unique identifying string of the credential in the local credential store.
-
-
-
Click Save.
-
-
Remote (legacy)
-
Enter the Host name/IP address of the remote server.
It is not recommended to enter an IP address since it cannot be used with Kerberos authentication. -
Provide your authentication details.
Username/Password
-
Provide the username for accessing the server.
-
Provide the password for accessing the server.
Credential in Agent Store
-
Provide the store name where the credentials are stored.
-
Provide the credential ID for finding login credentials of the server.
-
CyberArk Vault — The ID is a set of key value pairs, separated by semicolons, that would typically go in a query parameter string used to retrieve a specific credential from the CyberArk Central Credential Provider.
The ID format should be similar to the following:
<param1>=<value>;<param2>=<value>;...
-
HashiCorp Vault — The ID is the path of the required secret in HashiCorp vault. This path is relative to the
--rootpathspecified when adding the credential store. -
Delinea Secret Server — The ID is the unique
Secret IDof the Delinea secret. -
Local credential store — The ID is the unique identifying string of the credential in the local credential store.
-
-
-
Click Save.
-
-
-
Click Save.
-
Navigate to .
-
Select your agent and click Edit to open the Edit Network Agent window.
-
Select the Servers tab and click the Add icon.
-
Provide a server name and select Apache 2.4.
-
(Optional) Enter the path of
apachectl.This can be left blank if the application is available in the path.
-
Select a Connection type.
-
Local
-
Remote (SSH)
-
Enter the Host name/IP address of the remote server.
-
If the remote SSH server isn’t using the standard port, change the Port from 22.
-
If required, change the path to the location where the certificates will be stored.
-
Provide your authentication details.
Username/Password
-
Provide the username for accessing the server.
-
Provide the password for accessing the server.
SSH Key on Agent
-
If required, change the username.
-
Provide the path to SSH key on the network agent server.
-
Provide the key file passphrase.
Credential in Agent Store
-
Provide the store name where the credentials are stored.
-
Provide the credential ID for finding login credentials of the server.
-
CyberArk Vault — The ID is a set of key value pairs, separated by semicolons, that would typically go in a query parameter string used to retrieve a specific credential from the CyberArk Central Credential Provider.
The ID format should be similar to the following:
<param1>=<value>;<param2>=<value>;...
-
HashiCorp Vault — The ID is the path of the required secret in HashiCorp vault. This path is relative to the
--rootpathspecified when adding the credential store. -
Delinea Secret Server — The ID is the unique
Secret IDof the Delinea secret. -
Local credential store — The ID is the unique identifying string of the credential in the local credential store.
-
-
-
-
-
Click Save.
-
Navigate to .
-
Select your agent and click Edit to open the Edit Network Agent window.
-
Select the Servers tab and click the Add icon.
-
Provide a server name and select Apache Tomcat 7.x, 9.x.
-
(Optional) Enter the path to the Tomcat installation.
This can be left blank on Linux if the default install location was used.
-
Select a Connection type.
-
Local
-
Local (legacy)
-
Remote (WinRM)
-
Enter the Host name/IP address of the remote server.
It is not recommended to enter an IP address since it cannot be used with Kerberos authentication. -
Enter the port of the remote server.
-
Provide your authentication details.
Username/Password
-
Provide the username for accessing the server.
-
Provide the password for accessing the server.
Credential in Agent Store
-
Provide the store name where the credentials are stored.
-
Provide the credential ID for finding login credentials of the server.
-
CyberArk Vault — The ID is a set of key value pairs, separated by semicolons, that would typically go in a query parameter string used to retrieve a specific credential from the CyberArk Central Credential Provider.
-
The ID format should be similar to the following:
<param1>=<value>;<param2>=<value>;...
-
HashiCorp Vault — The ID is the path of the required secret in HashiCorp vault. This path is relative to the
--rootpathspecified when adding the credential store. -
Delinea Secret Server — The ID is the unique
Secret IDof the Delinea secret. -
Local credential store — The ID is the unique identifying string of the credential in the local credential store.
-
-
Click Save.
-
-
Remote (SSH)
-
Enter the Host name/IP address of the remote server.
-
If the remote SSH server isn’t using the standard port, change the Port from 22.
-
Provide your authentication details.
Username/Password
-
Provide the username for accessing the server.
-
Provide the password for accessing the server.
SSH Key on Agent
-
If required, change the username.
-
Provide the path to SSH key on the network agent server.
-
Provide the key file passphrase.
Credential in Agent Store
-
Provide the store name where the credentials are stored.
-
Provide the credential ID for finding login credentials of the server.
-
CyberArk Vault — The ID is a set of key value pairs, separated by semicolons, that would typically go in a query parameter string used to retrieve a specific credential from the CyberArk Central Credential Provider.
The ID format should be similar to the following:
<param1>=<value>;<param2>=<value>;...
-
HashiCorp Vault — The ID is the path of the required secret in HashiCorp vault. This path is relative to the
--rootpathspecified when adding the credential store. -
Delinea Secret Server — The ID is the unique
Secret IDof the Delinea secret. -
Local credential store — The ID is the unique identifying string of the credential in the local credential store.
-
-
-
-
-
Click Save.
-
Navigate to .
-
Select your agent and click Edit to open the Edit Network Agent window.
-
Select the Servers tab and click the Add icon.
-
Provide a server name and select F5 BIG-IP.
Only remote auto-installation is supported on F5 BIG-IP. Remote installation is performed using the F5 REST API. -
Enter the Host name/IP address of the remote server.
-
If the remote F5 server isn’t using the standard port, change the Port from 443.
-
Provide your authentication details.
Username/Password
-
Provide the username for accessing the server.
-
Provide the password for accessing the server.
Credential in Agent Store
-
Provide the store name where the credentials are stored.
-
Provide the credential ID for finding login credentials of the server.
-
CyberArk Vault — The ID is a set of key value pairs, separated by semicolons, that would typically go in a query parameter string used to retrieve a specific credential from the CyberArk Central Credential Provider.
The ID format should be similar to the following:
<param1>=<value>;<param2>=<value>;...
-
HashiCorp Vault — The ID is the path of the required secret in HashiCorp vault. This path is relative to the
--rootpathspecified when adding the credential store. -
Delinea Secret Server — The ID is the unique
Secret IDof the Delinea secret. -
Local credential store — The ID is the unique identifying string of the credential in the local credential store.
-
-
-
Click Save.
Once added, the server state is displayed as Init (initialized) until the network agent can validate the connection. Once the connection has been validated, the server state changes to Active.
Viewing Server Nodes
A server node is an instance of a server that handles web server operations and may have SSL enabled.
To view server nodes, navigate to , select your agent, and click Nodes.
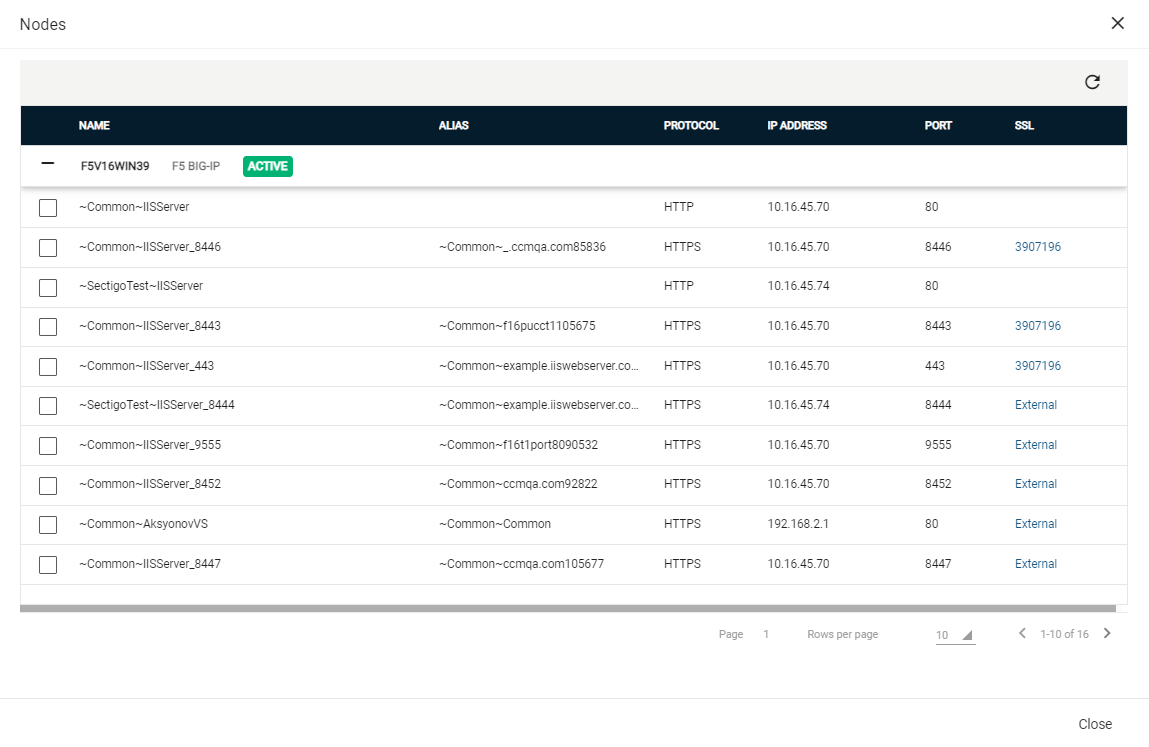
Each server is displayed as a collapsible heading that shows the name of the server, the vendor, and the server state.
| Column Name | Description |
|---|---|
Name |
The name of the node. |
Alias |
The alias for the node (if available). |
Protocol |
Whether the node is connected through HTTP or HTTPS. |
IP Address |
The IP Address of the node. |
Port |
The port used to connect to the node. |
SSL |
The order number of the certificate associated with the node. Discovered certificates that have not been assigned to an organization or department are displayed as External. |
| Click the value in the SSL column for any given node to view or manage the associated SSL certificate. |