Configuring Firewall & CDN
Set up the Firewall & CDN
-
Navigate to your website’s comprehensive view.
-
Click Setup Wizard.
-
Click Firewall Activation.
-
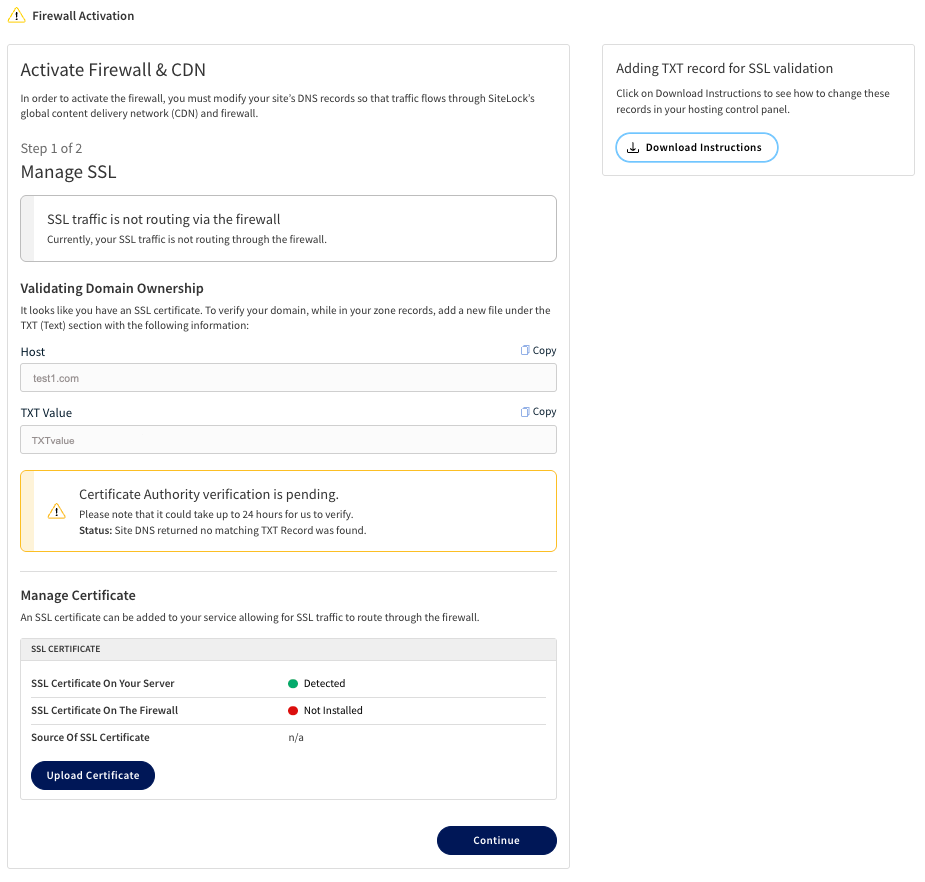
Validate Domain Ownership.
This step is only required if you want a network-level certificate on the WAF. -
Under Validate Domain Ownership, copy the Host and CNAME value/TXT value.
-
Paste the information in your domain’s DNS zone.
-
Click Verify Domain Ownership.
-
-
Under Manage SSL, review the Current Status of your SSL certificates.
-
(Optionally) Upload a new SSL certificate.
-
Click Upload Certificate.
-
In the pop-up window, upload the SSL certificate.
-
If your certificate requires a private key, under Private Key, upload the private key file. .
-
If your certificate’s file format is
.pfx, enter the Passphrase for the certificate. -
Click Submit.
-
-
Click Continue.
-
Update DNS Records.
-
Using the list under Remove these DNS records, remove the listed DNS records from your domain’s DNS zone.
-
Using the list under Add these DNS records, add the listed DNS records to your domain’s DNS zone.
-
Click I’ve completed these steps after completing the DNS updates.
-
It may take up to 24 hours for domain verification and DNS changes to propagate across the internet. Once DNS changes have propagated, the Firewall & CDN will be active for your website.
Navigate to the Firewall & CDN settings page
-
Navigate to your site’s comprehensive view.
-
Click the Settings tab.
-
From the left-hand navigation menu, click Firewall.
-
From the menu, select an option to open the corresponding settings page.
The available options are:
-
General Settings
-
Proactive Settings
-
Responsive Settings
-
Performance
-
Authentication Settings
-
-
Navigate to your site’s comprehensive view.
-
Click Security Report.
-
Scroll down to Firewall & CDN.
-
Click Details to access the Firewall & CDN page.
-
In the top-right corner, click Change Settings.
-
From the menu, select an option to open the corresponding settings page.
The available options are:
-
General Settings
-
Proactive Settings
-
Responsive Settings
-
Performance
-
Authentication Settings
-
Managing FFirewall & CDN settings
Customize general settings
-
Navigate to the General Settings page for Firewall & CDN.
-
Under Traffic Routing, select one of the following options to manage how traffic is routed for your website:
-
Route my traffic via SiteLock’s network — Route traffic through SiteLock’s network, which provides the benefits of the Firewall & CDN service.
-
Enable CDN for acceleration — Route traffic via SiteLock’s Content Delivery Network (CDN).
-
Enable Firewall for protection — Enable SiteLock’s Firewall.
-
-
Bypassing SiteLock’s Network — Temporarily bypass SiteLock’s network to disable the Firewall & CDN service.
-
-
Under DNS Settings, review the Original DNS and SiteLock DNS records.
-
Under SSL Configuration Status, review the status of the SSL certificates for your server and firewall.
-
(Optionally) Upload a new SSL certificate.
-
Click Upload Certificate.
-
In the pop-up window, under SSL Certificate, upload the SSL certificate file.
-
If your certificate requires a private key, under Private Key, upload the private key file.
-
If your certificate’s file is in
.pfxformat, enter the Passphrase for the certificate. -
Click Submit.
-
-
Under Site IP Address, review the current IP address where your website traffic is routed.
-
(Optionally) Change the IP address.
-
Click Change IP.
-
Under New IP address, enter the new IP address to route traffic to.
-
Click Save Changes to apply the new IP address.
-
-
Customize cache purging.
-
Under Purge Cache, select one of the following options to clear cached content:
-
Purge all cache — Clear all cached content, which can be useful if significant changes to the site have been made and the user wants to ensure visitors see the latest version.
-
Purge specific resource — Clears cache for URL patterns that match the specified pattern.
-
-
For Purge specific resource, select a pattern from the dropdown menu and enter the specific URL or part of a URL that matches the selected pattern.
-
Click Purge Cache Now to clear the cache based on the selected option.
-
Customize proactive settings
-
Navigate to the Proactive Settings page for Firewall & CDN.
-
Customize Blocked Countries.
-
Under Blocked Countries, use the following options to customize the list of blocked countries that are prevented from accessing your website:
-
Import CSV — Block multiple countries at the same time by uploading a .csv file listing the countries to block.
-
Export CSV — Export the list of blocked countries to a .csv file.
-
Reset — Remove all blocked countries from the list.
-
Drop-down menu — Select specific countries to block from the list or by searching the country name.
-
-
Click Save Changes to apply any changes made to the list of blocked countries.
-
-
Customize Blocked URLs.
-
To remove a URL from the list, click the trash icon next to the URL.
-
To add a new URL to the list, click Add New URL and enter the required information in the fields provided.
The following information may be required:
-
Pattern — Select a pattern from the dropdown menu.
-
Value — Enter the specific URL or part of a URL that matches the selected pattern.
-
-
Click Add New URL to add the URL to the list of blocked URLs.
-
-
Customize Blocked IPs.
-
To remove an IP address from the list, click the x icon next to the IP address.
-
To remove all blocked IP addresses, click Reset.
-
To add a new IP address, range, or subnet to the list of blocked IPs, click on the field containing the list of blocked IPs and enter the IP address, range, or subnet to block.
-
Click Save Changes to apply any changes made to the list of blocked IPs.
-
-
Customize Whitelisted IPs.
-
To remove an IP address from the list, click the x icon next to the IP address.
-
To remove all whitelisted IP addresses, click Reset.
-
To add a new IP address, range, or subnet to the list of whitelisted IPs, click on the field containing the list of whitelisted IPs and enter the IP address, range, or subnet to allow.
-
Click Save Changes to apply any changes made to the list of whitelisted IPs.
-
Customize responsive settings
-
Navigate to the Responsive Settings page for Firewall & CDN.
-
Click on the Action menu under each type of threat to select the specific rules for that threat.
The following table describes the available options for each type of threat.
Threat Action Malicious script access attempts on your server
-
Quarantine the script — Isolate the script to prevent it from executing.
-
Ignore — Do not take any action against malicious script access attempts.
-
Only track and report attempts — Monitor and log the attempts without taking any action.
Bad or suspicious bots
-
Block bad bots, challenge suspected bots — Block known bad bots and display a CAPTCHA challenge to suspected bots.
-
Challenge all bad and suspected bots — Display a CAPTCHA challenge to both bad and suspected bots.
-
Block bad bots — Block access for known bad bots.
-
Ignore — Do not take any action against bad or suspected bots.
Illegal resource access attempts/ Remote file inclusions/ SQL injection attempts/ Cross site scripting attempts
-
Block just the attack — Block the specific attack attempt.
-
Block the attack, and all future visits by the same user agent — Block the attack and prevent future visits from the same user agent.
-
Block the attack, and all future visits from the same IP — Block the attack and prevent future visits from the same IP address.
-
Ignore — Do not take any action against these types of attacks.
-
Only track and report attempts — Monitor and log the attempts without taking any action.
-
-
Click on the Exceptions menu under each type of threat to open the table of exceptions.
-
Add a new exception.
-
Under Type, select the type of threat for which you want to add an exception.
-
Under Value, enter the specific value for the exception based on the selected type and action.
-
Click Add to add the exception to the list.
-
-
Use the x icon next to a value to remove it from the list of exceptions.
Customize performance settings
-
Navigate to the Performance page for Firewall & CDN.
-
Purge cache.
-
Under Purge Cache, select the desired option to clear cached content.
-
Purge all cache — Clear all cached content, which can be useful if significant changes to the site have been made and the user wants to ensure visitors see the latest version.
-
Purge specific resource — Clears cache for specific files.
-
-
Click Purge Cache Now to clear the cache based on the selected option.
-
-
Customize advanced caching rules.
-
Review the list of Always cache URLs and Never cache URLs.
-
To remove a URL from the list, click the trash icon next to the URL.
-
To add a new URL to the list, click Add New URL and enter the required information in the fields provided.
The following information may be required:
-
Pattern — Select a pattern from the dropdown menu.
-
Value — Enter the specific URL or part of a URL that matches the selected pattern.
-
TTL — Enter the Time to Live (TTL) value for the cached URL.
-
TTL Unit — Select the unit of time for the TTL value (for example, seconds, minutes, hours).
-
-
-
Select the desired Cache Mode.
-
Cache static and dynamic content — Cache both static (for example, images, CSS) and dynamic content (for example, HTML generated by a server).
-
Cache static content only — Cache only static content, which is less likely to change frequently.
-
Disable caching — Turn off caching entirely, which might be useful during development or troubleshooting.
-
-
Under Content Delivery Network (CDN), customize the settings based on the information provided in the following table:
Setting Description Async Validation
Allow the CDN to serve content while validating the cache in the background, which can improve load times for visitors.
Content minification
Minify specific types of resources to reduce file size and improve load times.
The following options are available:
-
Minify JavaScript — Remove unnecessary characters from JavaScript files.
-
Minify CSS — Remove unnecessary characters from CSS files.
-
Minify static HTML — Remove unnecessary characters from HTML files.
Image Compression
Reduce the size of image files to improve load times while maintaining acceptable quality.
The following options are available:
-
Compress PNG — Reduce the size of .png images.
-
Compress JPEG — Reduce the size of .jpeg images.
-
Aggressive compression — Apply more aggressive compression techniques to further reduce image size, potentially at the cost of some quality.
-
Progressive image rendering — Load images progressively, which can improve the perceived load time as images appear to load faster.
-
-
On the fly compression — Text files (JS, CSS, HTML) are gzipped before being transferred to reduce loading times.
TCP pre-pooling
Establish TCP connections in advance to reduce latency for visitors.
Comply with no-cache and max-age directives in client requests
Respect caching directives specified by the client to ensure proper cache behavior.
Comply with Vary User-Agent
Cache different versions of content based on the user-agent header.
Use shortest caching duration in case of conflict
Select the shortest caching duration when there are conflicting cache settings.
Prefer "last modified" over eTag
Select the last modified header instead of eTag for cache validation.
Disable client-side caching
Prevent the client from caching content locally.
Also cache 3xx responses
Cache 301, 302, 303, 307, and 308 response headers containing the target URI.
3xx caching can only be triggered through HTTP response headers or caching rules.
-
-
Click Save Changes to apply any changes made to the performance settings.
Customize authentication settings
-
Navigate to the Authentication page for Firewall & CDN.
-
Under Users, review the list of users who have access to protected pages.
-
To remove a user, click the x icon next to the user’s information.
-
To add a new user, click Add New User and enter the required information:
-
Name
-
Email
-
Phone Number
-
-
Click Add New User to add the user to the list of users with access to protected pages.
-
Under Pages/URL, review the list of protected pages/URLs.
-
To remove a page/URL, click the x icon next to the URL information.
-
To add a new page/URL, click Add New URL and enter the required information:
-
Pattern — Select a pattern from the dropdown menu.
-
Value — Enter the specific URL or part of a URL that matches the selected pattern.
-
-
Click Add New URL to add the page/URL to the list of protected pages.