Setup Wizard
This page describes how to use the wizard to setup FTP, FTPS, or SFTP access to your web hosting account.
This access is used for SMART File Scan, SMART Database Scan, File Backup, and Database Backup.
SFTP is recommended for enhanced security.
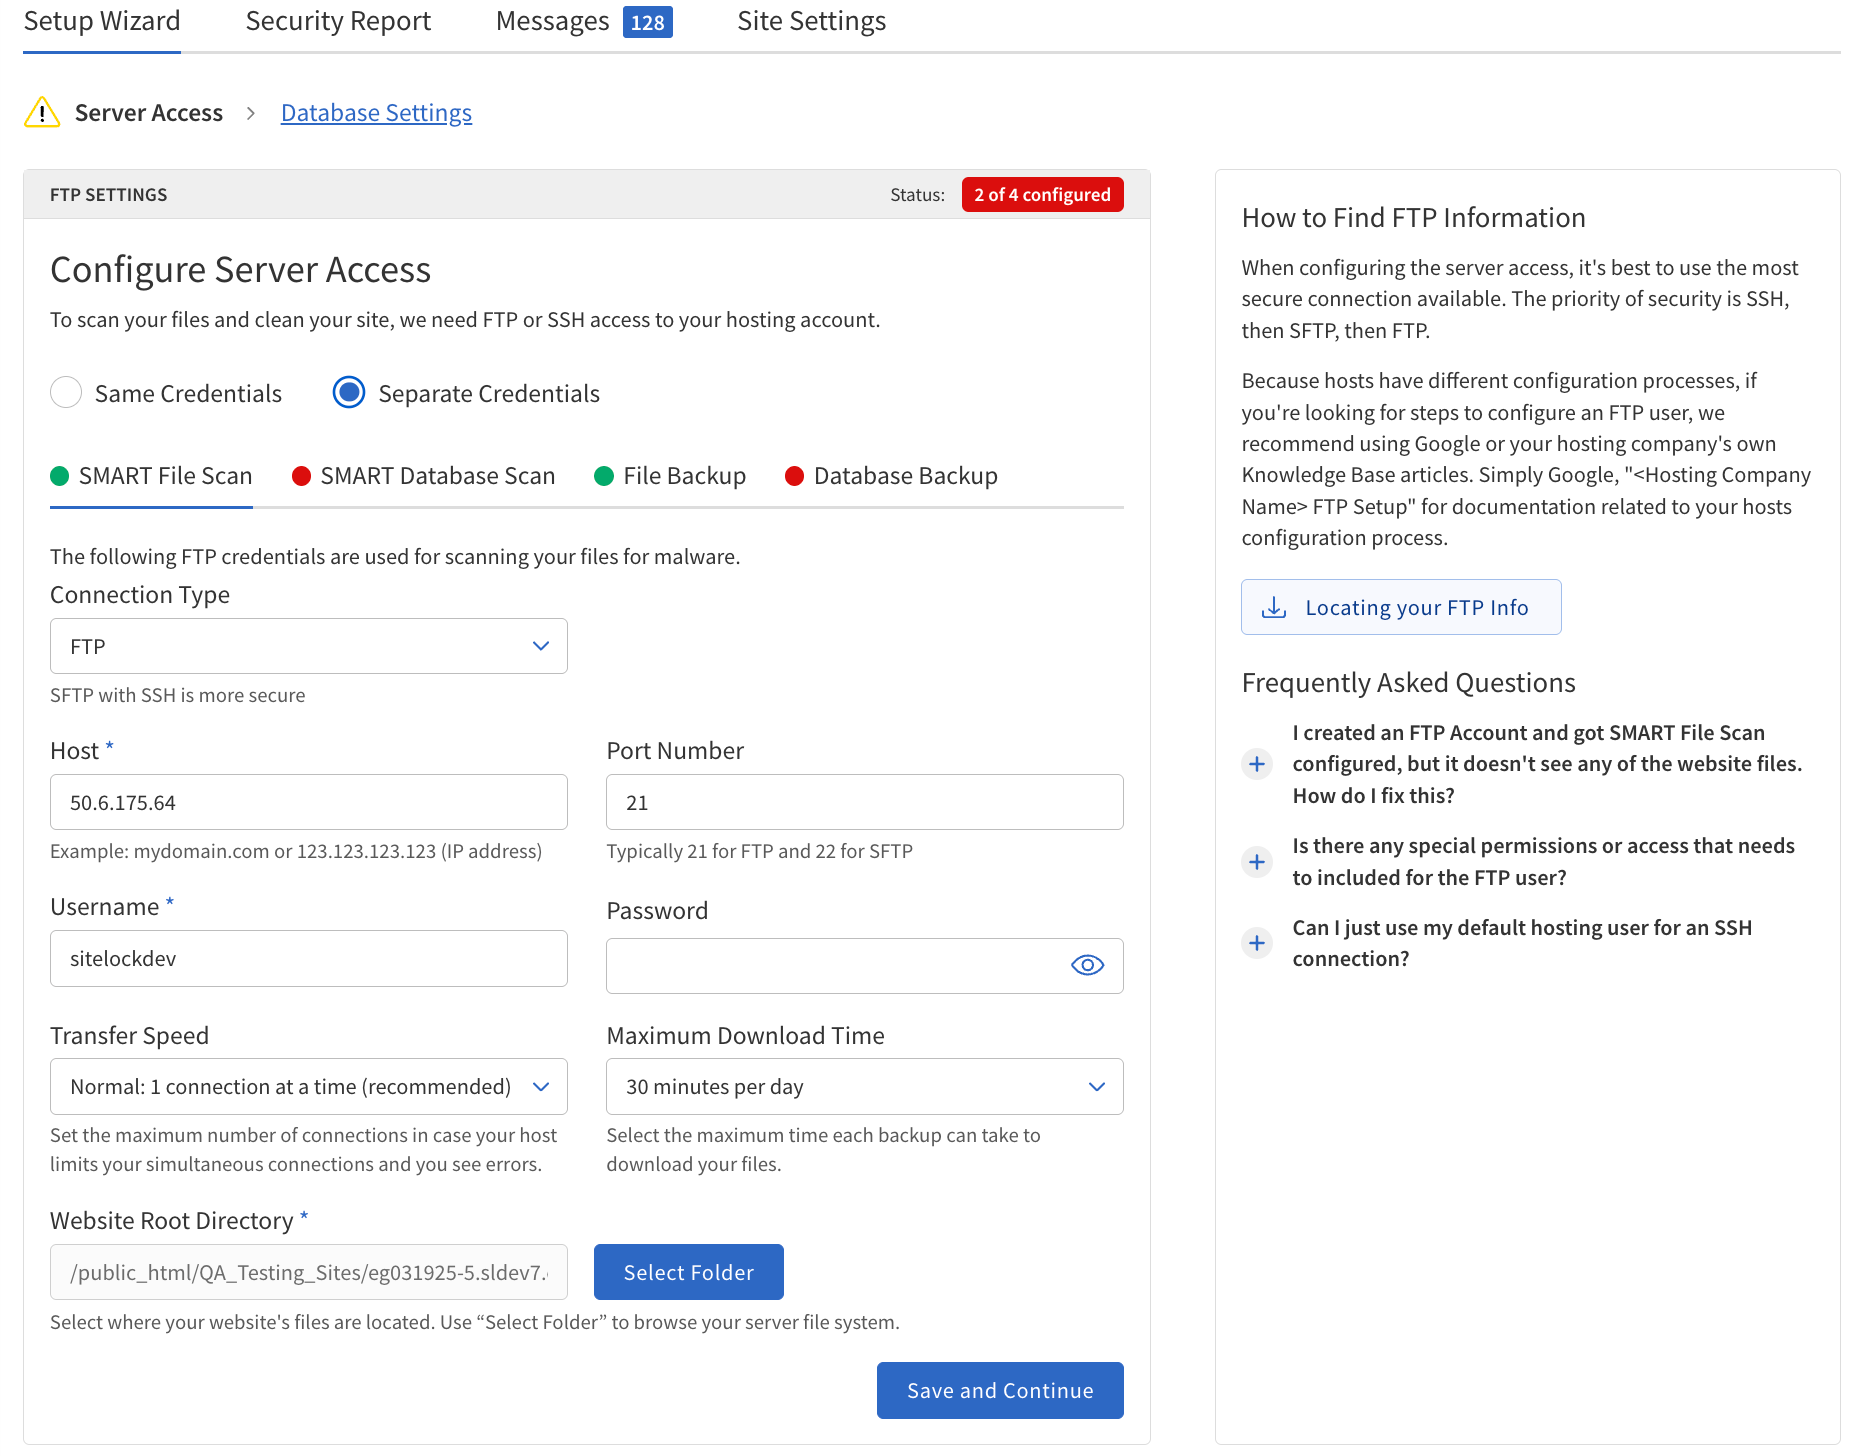
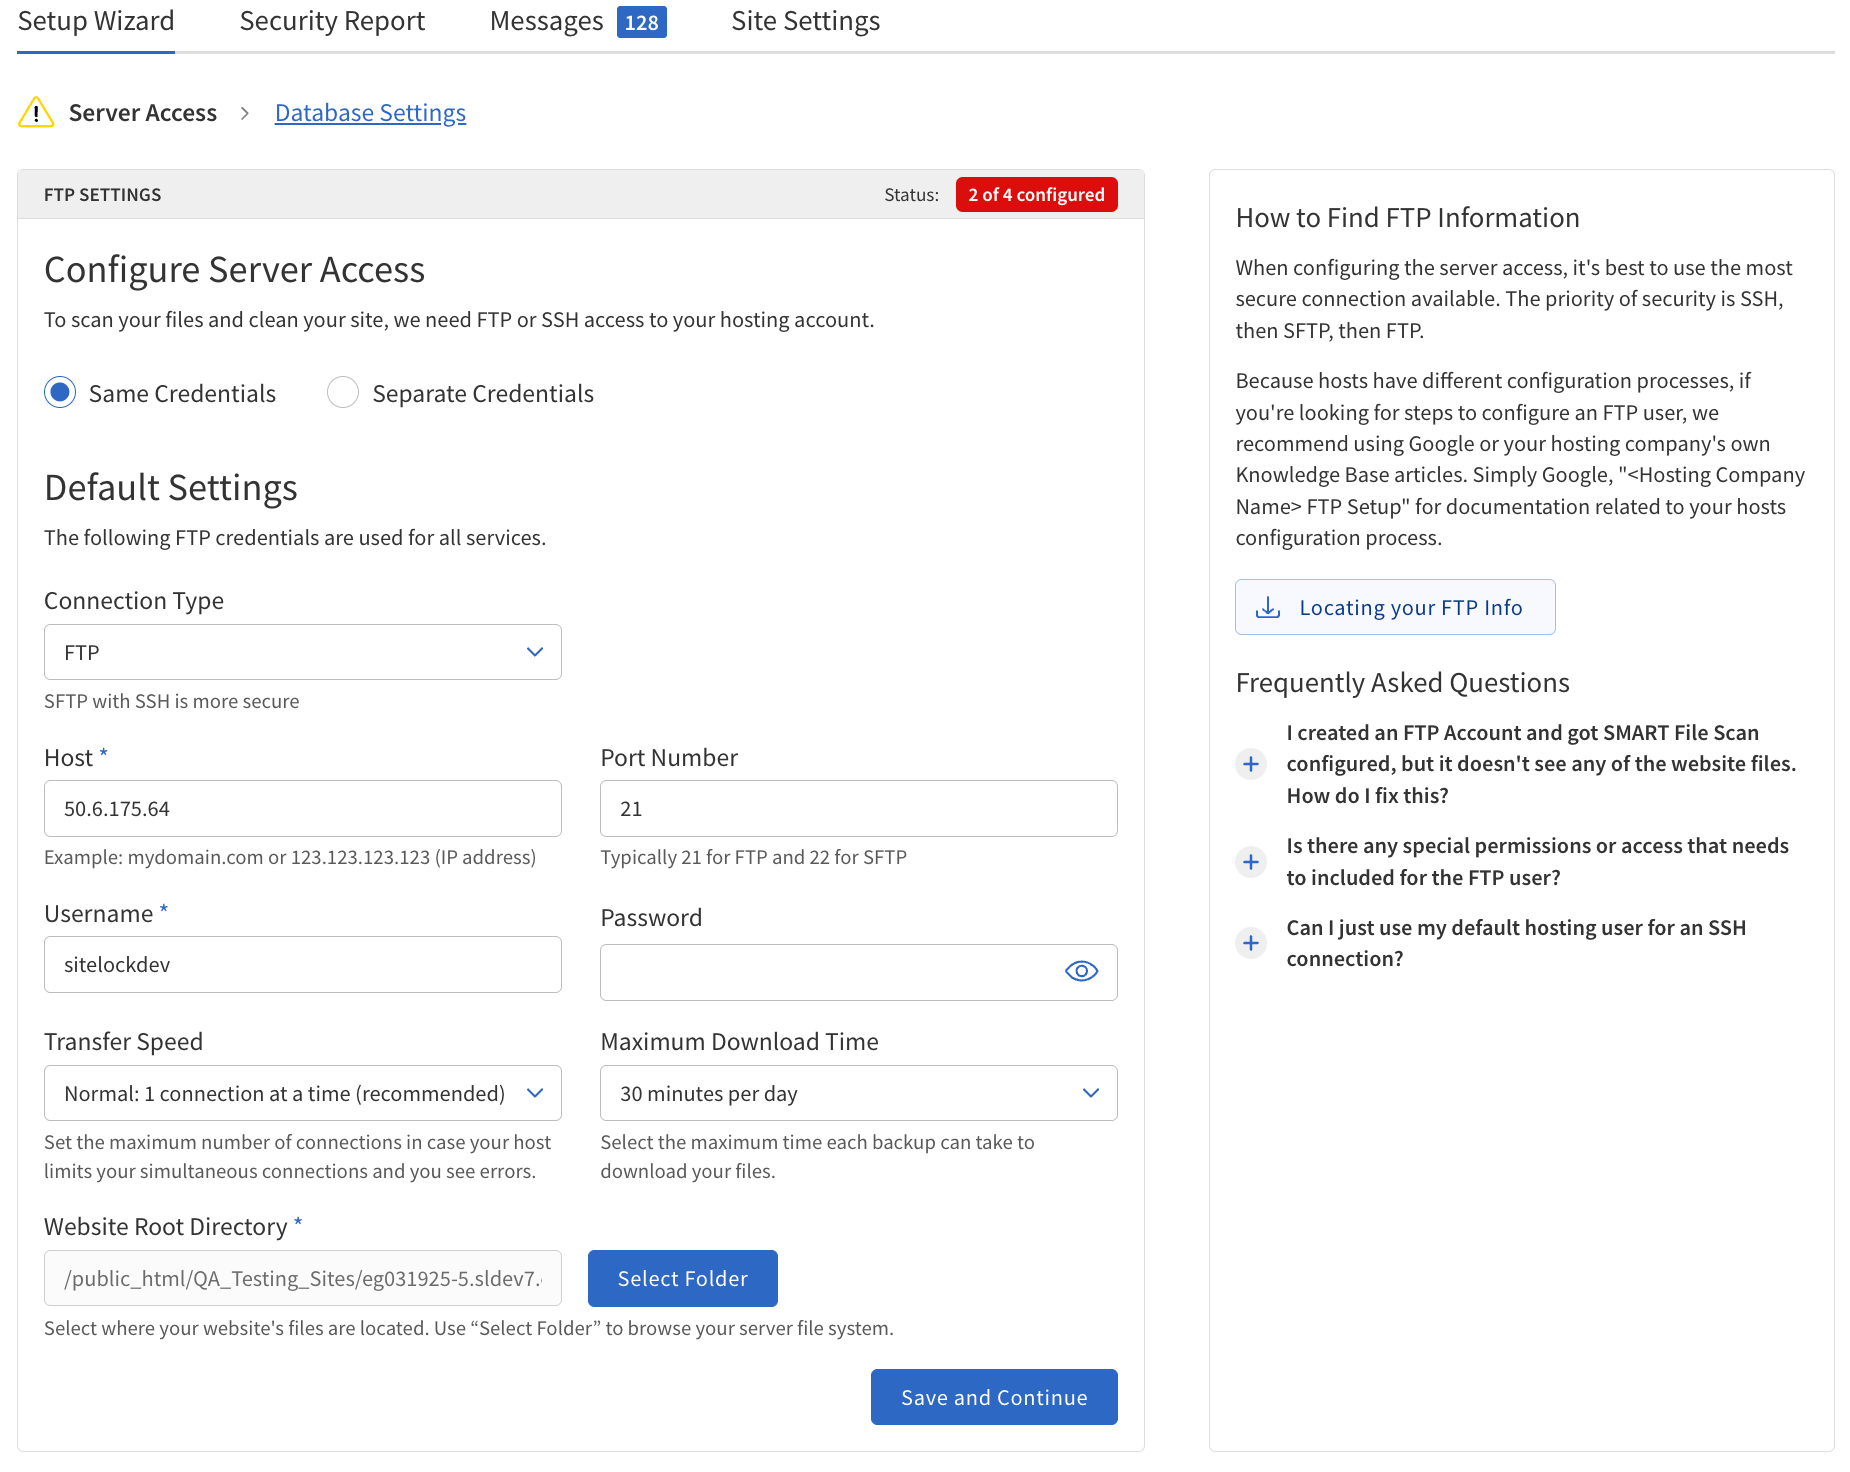
Configure Server Access
Select the Same Credentials setting to supply connection credentials for all four features (SMART File Scan, SMART Database Scan, File Backup, and Database Backup) or select Separate Credentials to supply connection credentials for each feature individually.
-
Navigate to .
-
In the Server Access section, choose whether to use Same Credentials for all services or Separate Credentials for each.
-
Select the connection protocol —
FTP,FTPS, orSFTP. SFTP is recommended for security. -
Enter the following information:
-
Host — The domain name or IP address of your server (e.g.,
mydomain.comor123.123.123.123). -
Port Number — The port for your chosen protocol (e.g., 21 for
FTP, 22 forSFTP, or a custom port). -
Username — The username for server authentication.
-
Password/SSH Key — The password or SSH key for authentication. If using
SFTP, you may need to upload a provided public key to your server. -
Transfer Speed — Select the desired transfer speed (1 = normal, 2 = fast, 3 = fastest).
-
Maximum Download Time — Set the maximum time allowed for downloads (30, 60, 90, or 120 minutes).
-
Website Root Directory — The directory where your website files are stored (e.g.,
/public_html).
-
-
Click Save and Continue.
Each field is required unless otherwise noted.
After entering the information, click Save and Continue to proceed.
Provide FTP, FTPS, or SFTP information to access hosting accounts.
This access is used for SMART File Scan, SMART Database Scan, File Backup, and Database Backup.
SFTP is recommended for enhanced security.
To supply connection credentials for all four features (SMART File Scan, SMART Database Scan, File Backup, and Database Backup) at once, select Same Credentials. To provide separate credentials for each service, select Separate Credentials.
Same or Separate Credentials
Same Credentials
The following table describes the details of the SMART File Scan section.
| Field | Description | ||
|---|---|---|---|
Connection Type |
This setting determines the protocol used to connect to the server.
|
||
Host |
The server address, which can be a hostname or an IP address. Example: |
||
Port Number |
The port used to connect to the server:
|
||
Username |
The database username required to access the server. |
||
Password/SSH Key |
The password or SSH key for authentication.
|
||
Transfer Speed |
|
||
Maximum Download Time |
|
||
Website Root Directory |
The root directory of the website files. Example: |
Separate Credentials
Configure each service individually if you have different credentials or hosting environments for each feature.
SMART File Scan
The following table describes the details of the SMART File Scan section.
| Field | Description | ||
|---|---|---|---|
Connection Type |
This setting determines the protocol used to connect to the server.
|
||
Host |
The server address, which can be a domain name or an IP address. Example: |
||
Port Number |
The port used to connect to the server.
|
||
Username |
The database username required to access the server. |
||
Password/SSH Key |
The password or SSH key for authentication.
|
||
Transfer Speed |
|
||
Maximum Download Time |
|
||
Website Root Directory |
The root directory of the website files. Example: |
SMART Database Scan
The following table describes the details of the SMART Database Scan section.
| Field | Description |
|---|---|
Connection Type |
This setting determines the protocol used to connect to the server.
|
Host |
The server address: domain name or IP address. Example: |
Port Number |
The port used to connect to the database. This is the port number of the MySQL server. Typically, |
Username |
The database username required to access the database. |
Password/SSH Key |
The password or SSH key for authentication. |
Website Root Directory |
The root directory of the website files. Example: |
File Backup
The following table describes the details of the File Backup section.
| Field | Description | ||
|---|---|---|---|
Connection Type |
This setting determines the protocol used to connect to the server.
|
||
Host |
The server address, which can be a domain name or an IP address. Example: |
||
Port Number |
The port used to connect to the server.
|
||
Username |
The database username required to access the server. |
||
Password/SSH Key |
The password or SSH key for authentication.
|
||
Transfer Speed |
|
||
Maximum Download Time |
|
||
Website Root Directory |
The root directory of the website files. Example: |
Database Backup
The following table describes the details of the Database Backup section.
| Field | Description | ||
|---|---|---|---|
Connection Type |
This setting determines the protocol used to connect to the server.
|
||
Host |
The server address, which can be a domain name or an IP address. Example: |
||
Port Number |
The port used to connect to the server.
|
||
Username |
The database username required to access the server. |
||
Password/SSH Key |
The password or SSH key for authentication.
|
||
Transfer Speed |
|
||
Maximum Download Time |
|
||
Website Root Directory |
The root directory of the website files. Example: |
Database Settings
The Database Settings Wizard guides configuration of SMART Database Scan and Database Backup.
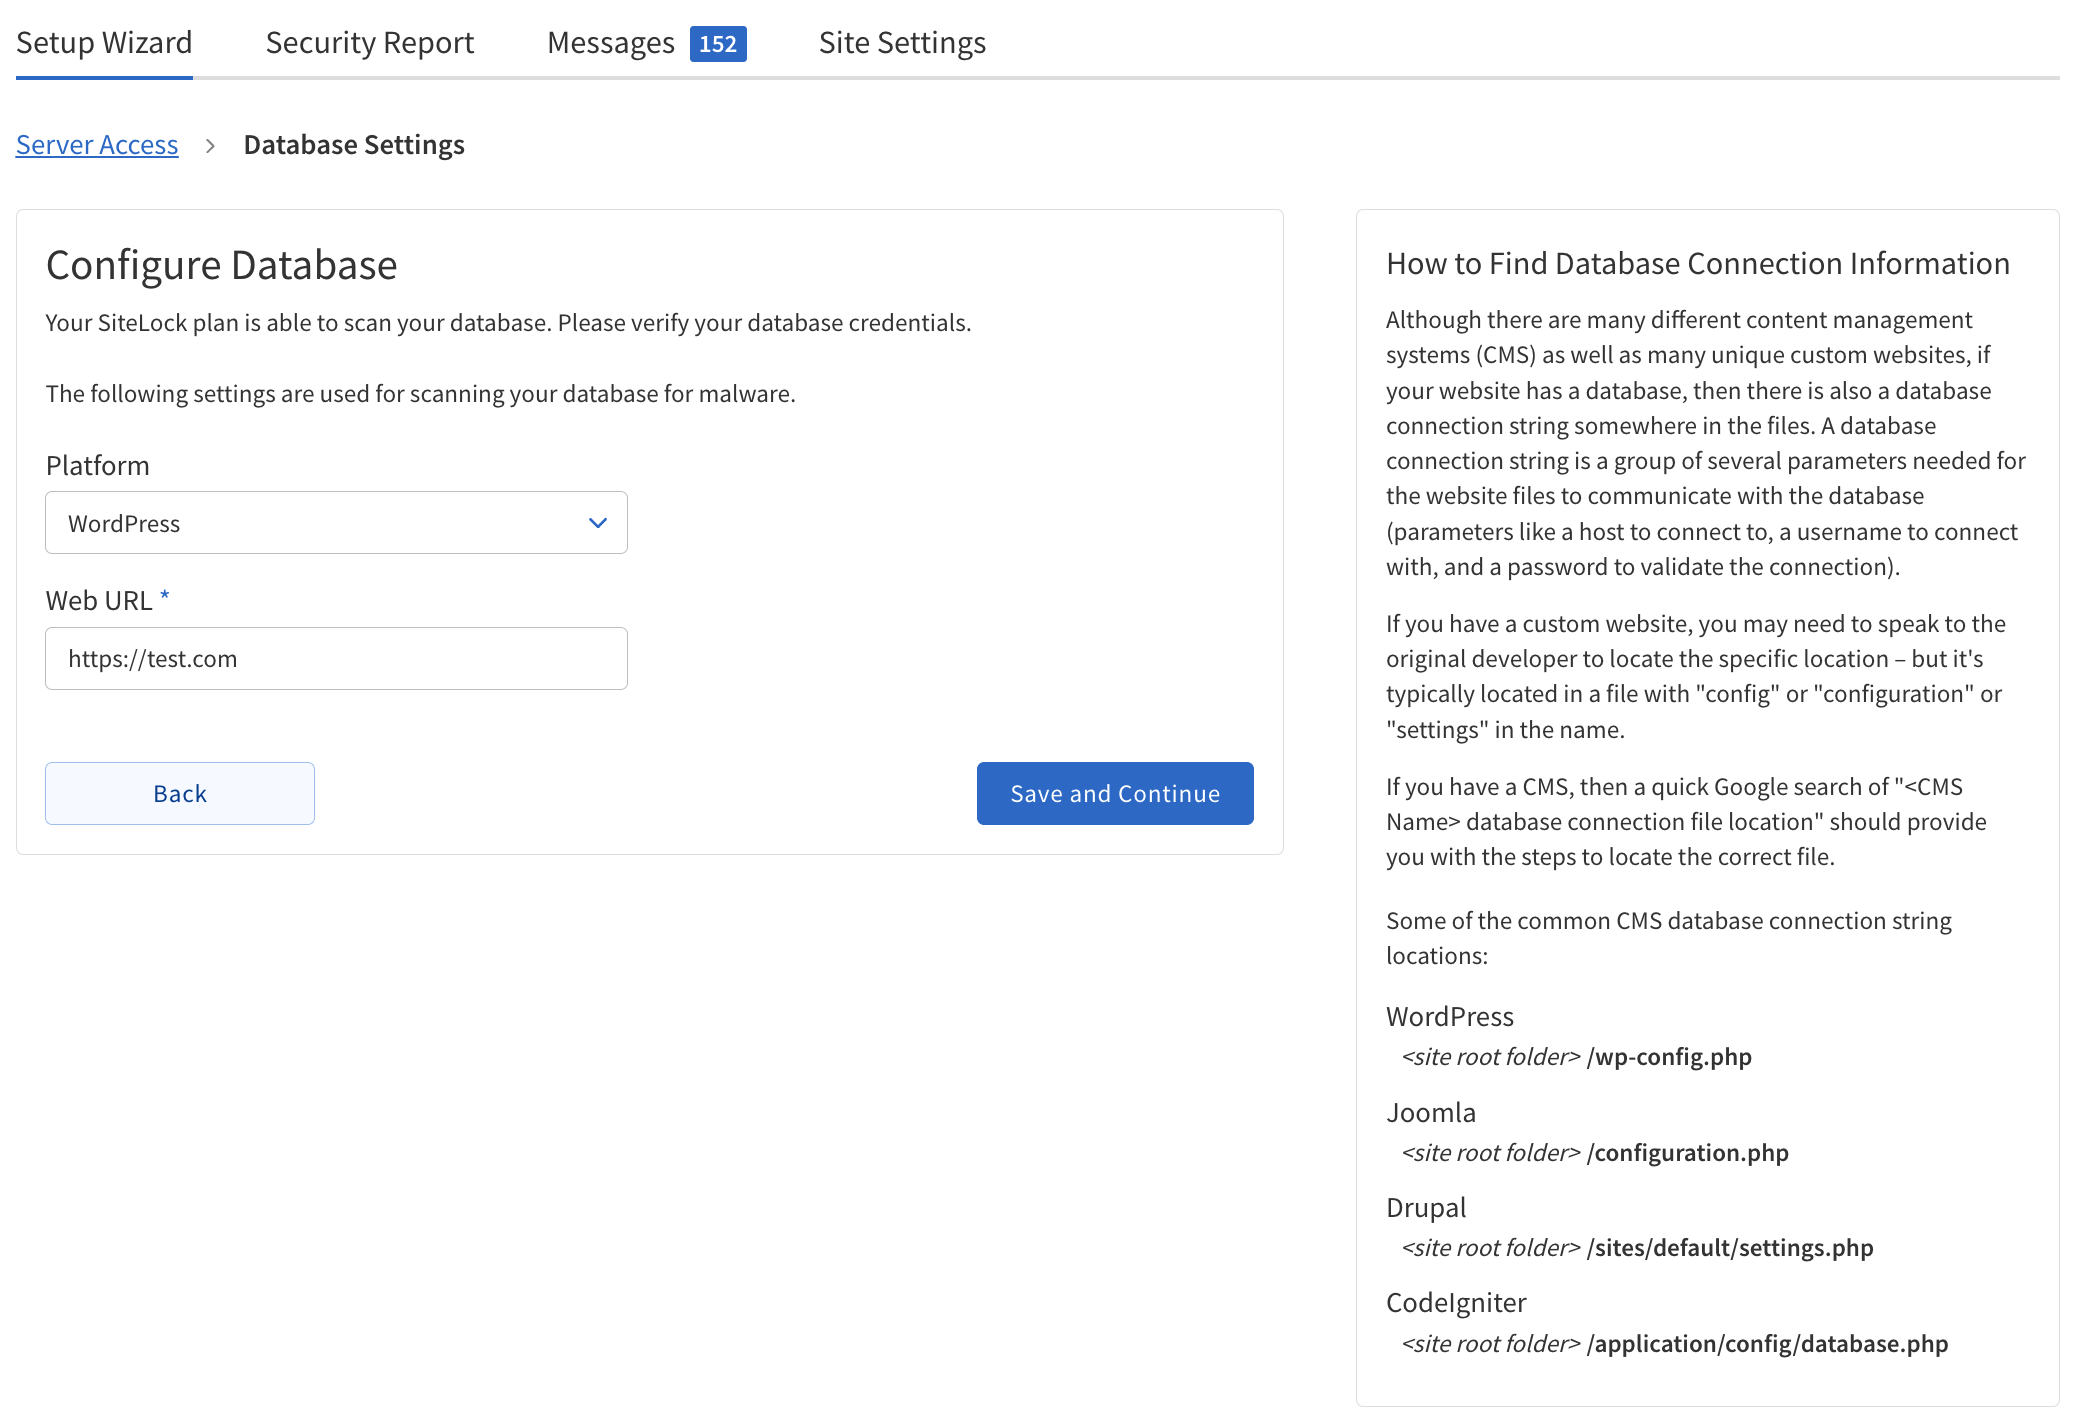
SMART Database Scan
The following table describes the details of the SMART Database Scan section.
| Field | Description |
|---|---|
Platform |
Select the platform the website is using:
|
Web URL |
The URL of the website. Example: |
Host |
The server address, which can be a domain name or an IP address. Example: |
Port Number |
The port used to connect to the database. This is the port number of the MySQL server. Typically, |
Username |
The database username required to access the database. |
Password |
The password required for database access. |
Database Name |
The name of the database to be scanned. |
Functionality |
Status Indicators: Each tab has a status indicator:
|
Database Backup
The following table describes the details of the Database Backup section.
| Field | Description |
|---|---|
Database Backup Frequency |
Select how often to back up the database:
|
Web URL |
The URL of the website. Example: |
Host |
Typically, localhost. The server address where the MySQL server operates. Example: |
Port Number |
The port used to connect to the database. Typically, |
Username |
The database username required to access the database. |
Password |
The password required for database access. |
Database Name |
The name of the database to be backed up. |
Functionality |
Status Indicators: Each tab has a status indicator:
|
Select schemas to back up
If your database contains multiple schemas, choose which ones you want to include in the backup. This allows you to back up only the necessary parts of your database, reducing storage usage and backup time. Use the checkboxes or selection list provided to select one or more schemas before proceeding.
Firewall & CDN Activation
Firewall & CDN Activation Wizard guides configuration and activation of SiteLock’s Firewall & CDN for enhanced website security and performance.
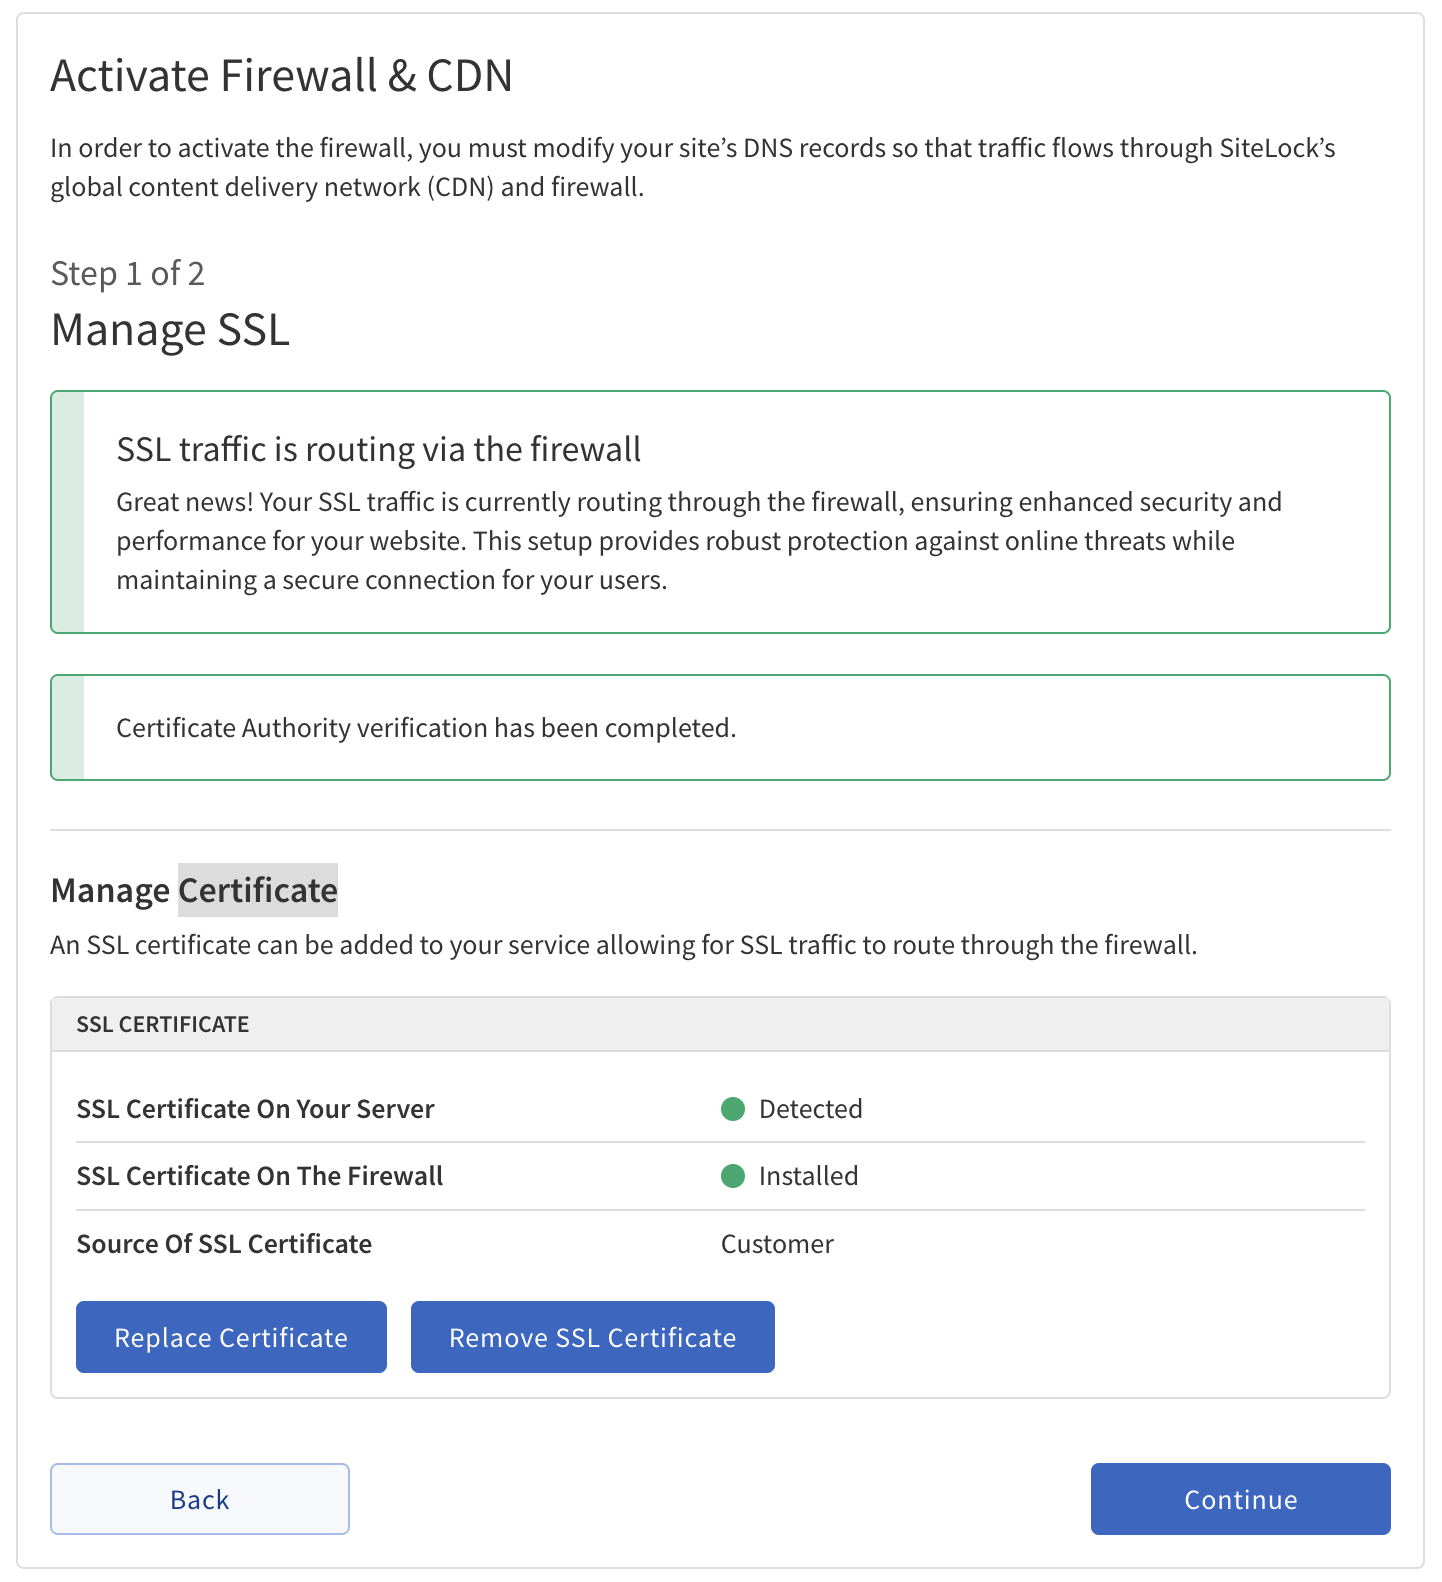
Step 1: Manage SSL
| Field | Action | ||
|---|---|---|---|
Manage SSL |
|
||
Validate Domain Ownership |
Add a new TXT record in the DNS zone with the following details:
|
||
Manage Certificate |
Current Status:
|
||
Optional |
|
Step 2: Update DNS Records
-
Remove the following DNS records:
-
Type: A | Name: @ | Value:
123.123.123.123| Status: Pending -
Type: A | Name: www | Value:
123.123.123.123| Status: Pending
-
-
Add the following DNS records:
-
Type: A | Name: @ | Value:
45.60.22.174 -
Type: A | Name: www | Value:
45.60.22.174 -
Type: CNAME | Name: www | Value (points to):
xxxxx.sitelockcdn.net
-
After updating these DNS records, it may take up to 24 hours for changes to propagate across the internet.