Security Scans
The Security Scans page describes the reports generated by SiteLock’s different scans as they check your site for vulnerabilities and threats.
Webpage Scan
The Webpage Scan analyzes the publicly accessible pages of your website to detect malware and malicious links. This scan does not require access to your server or database.
To run a Webpage Scan:
-
Log in to your SiteLock Dashboard.
-
Navigate to Security Scans.
-
Locate the Webpage Scan panel.
-
If applicable, click Scan Now to initiate a scan, or View Details to review the latest scan results.
The scan will automatically check your website at scheduled intervals. You can view the results and details in the dashboard.
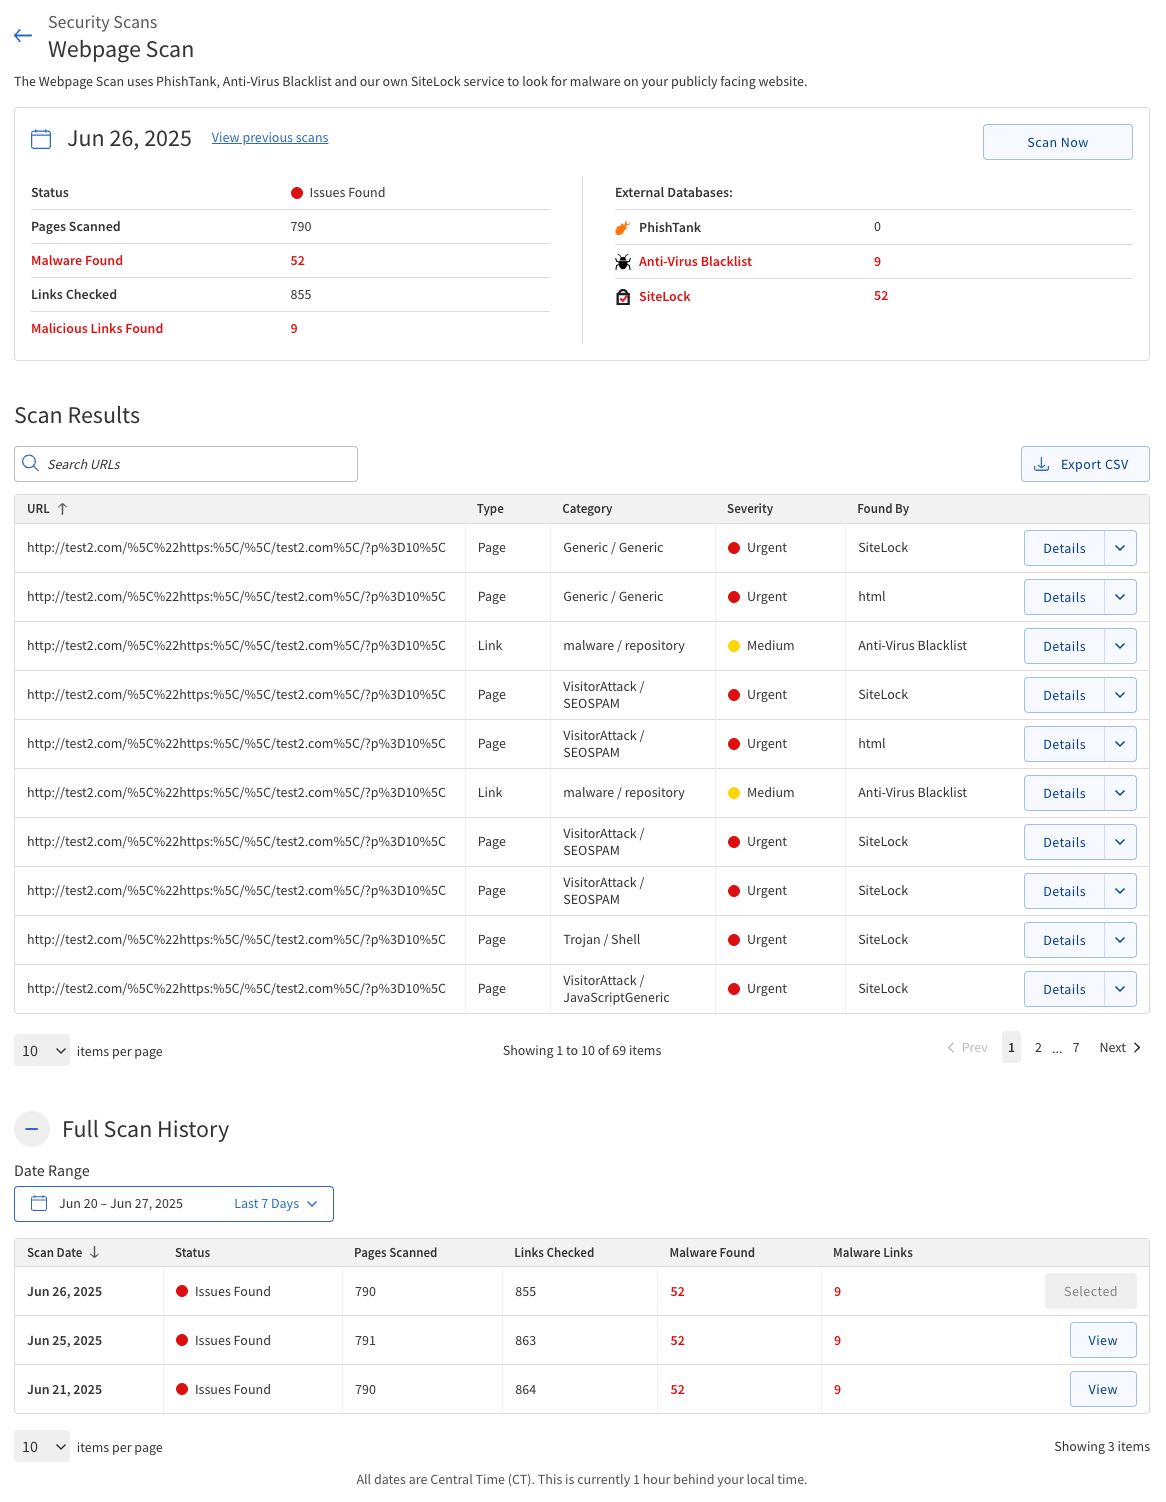
Scan Results
The Scan Results section provides a summary and detailed information about the findings produced by a scanning process. It typically includes detected issues, vulnerabilities, or anomalies identified during the scan, along with relevant metadata.
The following table describes detected malware of the Webpage Scan.
| Field | Description |
|---|---|
URL |
The specific webpage or resource where malware or a malicious link was detected. |
Type |
Indicates whether the threat was found in the page’s code (Page) or in a link on the page (Link). |
Category |
The classification of the detected malware (for example, phishing, trojan, defacement, etc.). |
Severity |
The risk level of the detected threat, and available options are: *Low *Medium *High *Critical |
Found By |
The threat intelligence source or database that identified the threat (such as SiteLock, Google, PhishTank, or an antivirus blacklist). |
If malware or malicious links are detected, click the Details button and take appropriate action to remove the threats from your website.
| The Webpage Scan cannot automatically clean detected malware; manual intervention is required. |
Scan Summary
The Scan Summary section provides a quick overview of the most recent Webpage Scan.
Review these fields after each scan to monitor your website’s security and take action if any issues are reported.
| Scan Detail | Description |
|---|---|
Scan Date |
The date and time when the most recent scan was completed (displayed in Central Time Zone, UTC-6). |
Status |
Indicates whether the scan found any issues, and possible values are:
|
Last Good Scan |
The date of the last scan where no threats were detected. |
Pages Scanned |
The total number of website pages checked during the scan. |
Malware Found |
The number of malware items detected. |
Links Checked |
The total number of links analyzed on your website. |
Malware Links |
The number of links identified as malicious. |
External databases |
Lists the threat intelligence sources used for detection, such as SiteLock, Google, PhishTank, and Anti-Virus Blacklist. |
Vulnerability Scan
The Vulnerability Scan checks your website for known security weaknesses in your content management system (CMS) and its plugins. It identifies issues such as outdated software, insecure plugins, and common web vulnerabilities like Cross-Site Scripting (XSS) and SQL Injection.
| Currently, the Vulnerability Scan detects vulnerabilities only for WordPress and Joomla. |
To run a Vulnerability Scan:
-
Log in to your SiteLock Dashboard.
-
Navigate to Security Scans.
-
Locate the Vulnerability Scan panel.
-
Click Scan Now (if available) to start a scan, or View Details to see the latest scan results.
The scan will be automatically run at scheduled intervals. You can review the results and take action as needed.
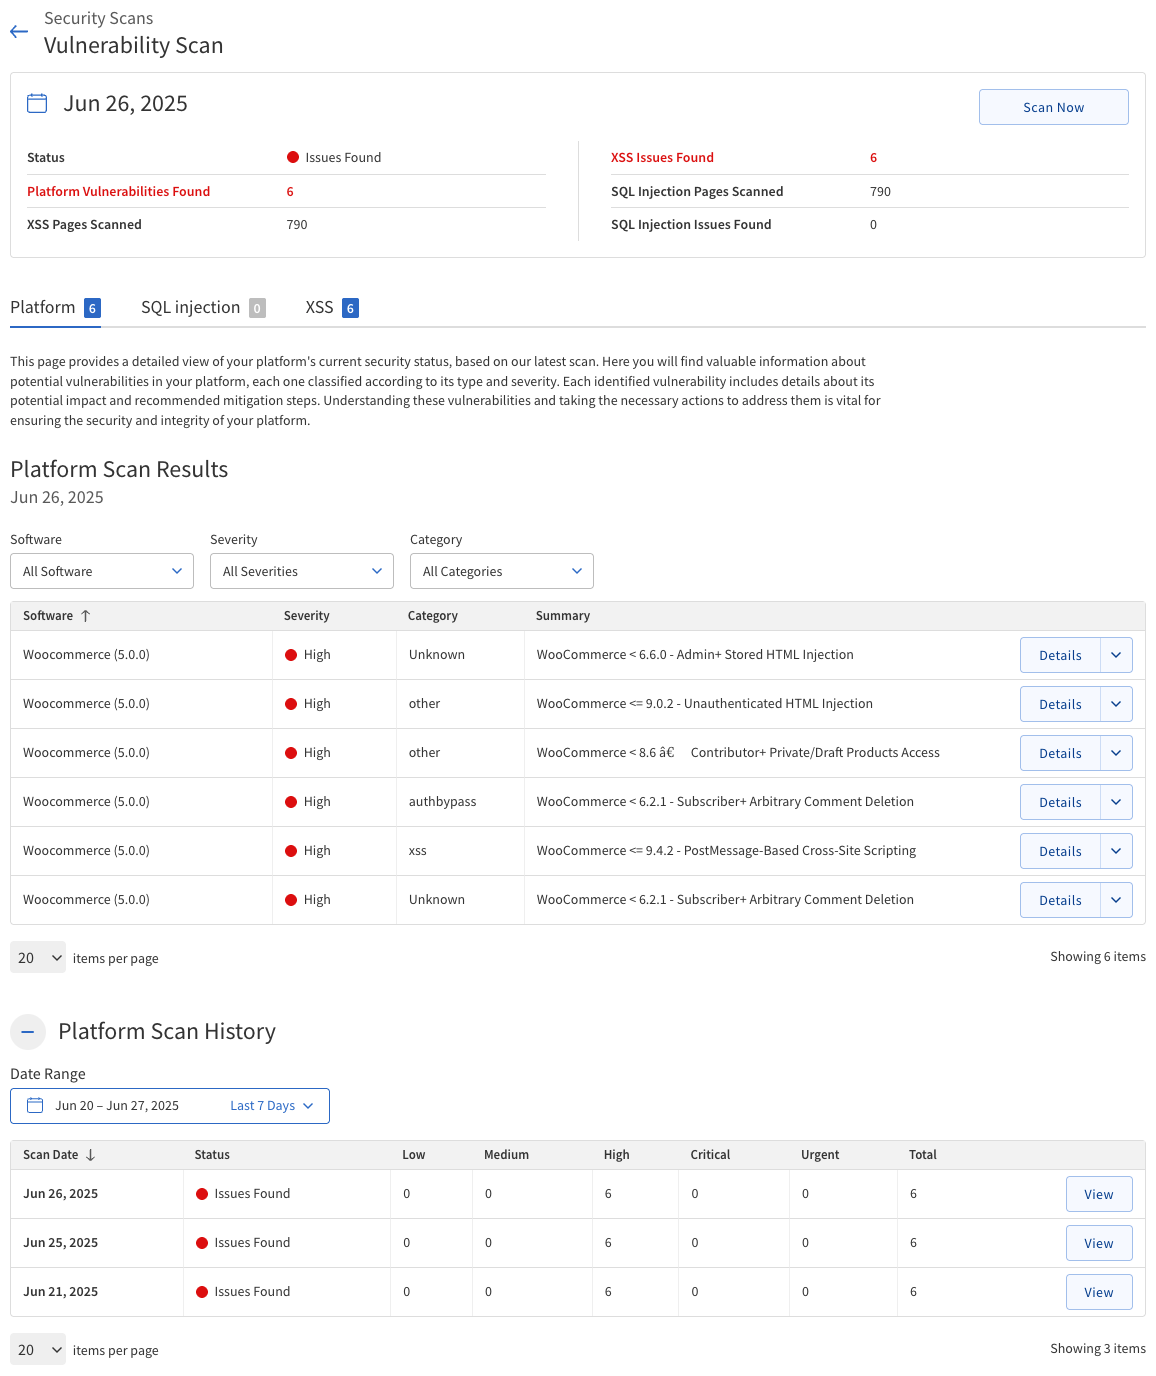
Scan Summary
The Scan Summary section provides a concise overview of the most recent Vulnerability Scan results. Review these fields to monitor your website’s security status and identify any vulnerabilities that require attention.
| Field | Description |
|---|---|
Scan Date |
The date and time when the latest vulnerability scan was completed (displayed in Central Time Zone, UTC-6). |
Status |
Indicates the outcome of the scan, and the possible statuses are:
|
Platform vulnerabilities found |
The number of vulnerabilities detected in your website’s platform (such as WordPress or Joomla core, or their plugins/themes). |
XSS pages scanned |
The total number of website pages checked for Cross-Site Scripting (XSS) vulnerabilities. |
XSS issues found |
The number of XSS vulnerabilities identified during the scan. |
SQL Injection pages scanned |
The total number of website pages checked for SQL Injection vulnerabilities. |
SQL Injection issues found |
The number of SQL Injection vulnerabilities detected. |
To view more details about any detected vulnerabilities, click the relevant tab (Platform, SQL Injection, or XSS) in the scan results panel. Address any issues promptly to maintain your website’s security.
Platform tab
The Platform tab displays a table of all detected platform vulnerabilities, allowing you to filter and review issues by software, severity, and category.
-
Use the list of filters at the top of the table to narrow results by:
-
Software — Filter vulnerabilities by the affected CMS or plugin name.
-
Severity — Filter vulnerabilities by risk level (such as Low, High, or Critical).
-
Category — Filter vulnerabilities by the type of issue detected (for example, XSS, SQL Injection, etc.).
-
-
The following table describes the details of the Platform tab.
Column Description Software
The name of the affected CMS or plugin.
Severity
The risk level of the vulnerability (Low, High, or Critical).
Category
The type of vulnerability detected (for example, XSS, SQL Injection, etc.).
Summary
A brief overview of the vulnerability and its potential impact.
-
For each vulnerability, click the Details list in the Summary column to view more information, including:
-
Category — The type of vulnerability detected.
-
Summary — A brief overview of the vulnerability and its potential impact.
-
Description — A detailed description of the vulnerability.
-
SQL Injection tab
SQL Injection is a critical security vulnerability that could allow attackers to manipulate your database, leading to data theft, data modification, or even data deletion.
-
Use the list of filters at the top of the table to narrow results by:
-
A Search field to filter URLs by keyword.
-
A Status list to filter results by vulnerability status.
-
An Export button to download the report as a
.csvfile.
-
-
The following table describes the details of the SQL Injection tab.
Column Description URL
The specific webpage or resource that was tested for SQL injection vulnerabilities.
Status
Indicates whether the URL is susceptible to SQL injection. If the status is OK, a green indicator is shown. If a vulnerability is detected, the status will be Issues Found and a red indicator is shown.
For URLs with issues, a Detail button appears in this column.
XSS tab
The XSS tab displays a list of URLs that have been tested for Cross-Site Scripting (XSS) vulnerabilities. Each entry shows whether the URL is secure or susceptible to XSS, and you can expand each row for more details.
-
Use the list of filters at the top of the table to narrow results by:
-
A Search field to filter URLs by keyword.
-
A Status list to filter results by vulnerability status.
-
An Export button to download the report as a
.csvfile.
-
-
The following table describes the details of the XSS tab.
Column Description URL
The specific webpage or resource that was tested for XSS vulnerabilities.
Status
Indicates whether the URL is susceptible to XSS. If the status is OK, a green indicator is shown. If a vulnerability is detected, the status will be Issues Found and a red indicator is shown.
For URLs with issues, a Detail button appears in this column.
-
For any URL with Issues Found, click the Detail button in the Status column to expand the row and view a description of the detected XSS vulnerability, including information about the risk and recommended remediation steps.
The XSS (Cross-Site Scripting) is a severe security vulnerability that may enable attackers to inject harmful scripts into webpages, potentially leading to user data theft, session hijacking, defacement of the website, or even distribution of malware to site visitors.
SMART File Scan
The SMART File Scan is an automated tool that scans your website’s files (supports SFTP/FTP/FTPS). By default, SMART File Scan page will display the latest scan data for malware, suspicious code, and unauthorized changes. It can also remediate (clean) detected malware automatically, helping to keep your site secure.

To run a SMART File Scan:
-
Log in to your SiteLock Dashboard.
-
Navigate to Security Scans.
-
Locate the SMART File Scan panel.
-
Click Scan Now to start a scan, or View Details to see the latest scan results.
The scan will run automatically at scheduled intervals, but you can also start a scan manually at any time.
The following table describes the Scan Summary section of the SMART File Scan.
| Field | Description |
|---|---|
Scan Date |
The date and time when the most recent SMART File Scan was completed (Central Time Zone, UTC-6). |
Status |
Indicates the result of the scan: Good (no threats found) or Issues Found (malware or suspicious files detected). |
Files Scanned |
The total number of files checked during the scan. |
Files Added by Customer |
Number of new files uploaded to your site since the last scan. |
Files Modified by Customer |
Number of existing files that have been changed since the last scan. |
Files Delisted by Customer |
Number of files deleted since the last scan. |
Malicious files cleaned |
Number of infected files that were automatically cleaned by SMART File Scan. |
Malicious files found |
Number of infected files detected but not yet cleaned. |
Suspicious files found |
Number of files flagged as suspicious (potential threats) that require further review. |
Files Under Review |
Number of files currently being analyzed by the SiteLock Research Department for a final determination. |
If malicious or suspicious files are found, review the details in the Scan Results section.
Scan Results
The Scan Results section provides detailed information about the files detected during the latest SMART File Scan. The results are organized into three tabs: Malicious Files, Suspicious Files, and Review.
The following table describes the contents in each tab.
| Tab | Description |
|---|---|
Malicious Files Tab |
Displays the results of found and cleaned malicious files. If any files remain uncleaned, a Clean All button will appear, allowing the user to trigger a scan that cleans these files. This option is usually available when a scan runs in warn-only mode or if a previous issue prevented SMART File Scan from remediating the files. |
Suspicious Files Tab |
The Suspicious Files tab displays files that have characteristics of malware or suspicious code but require further analysis by SiteLock’s research team. |
Review Tab |
The Review tab lists files that are currently being analyzed by SiteLock’s research department. These files are pending a final determination. |
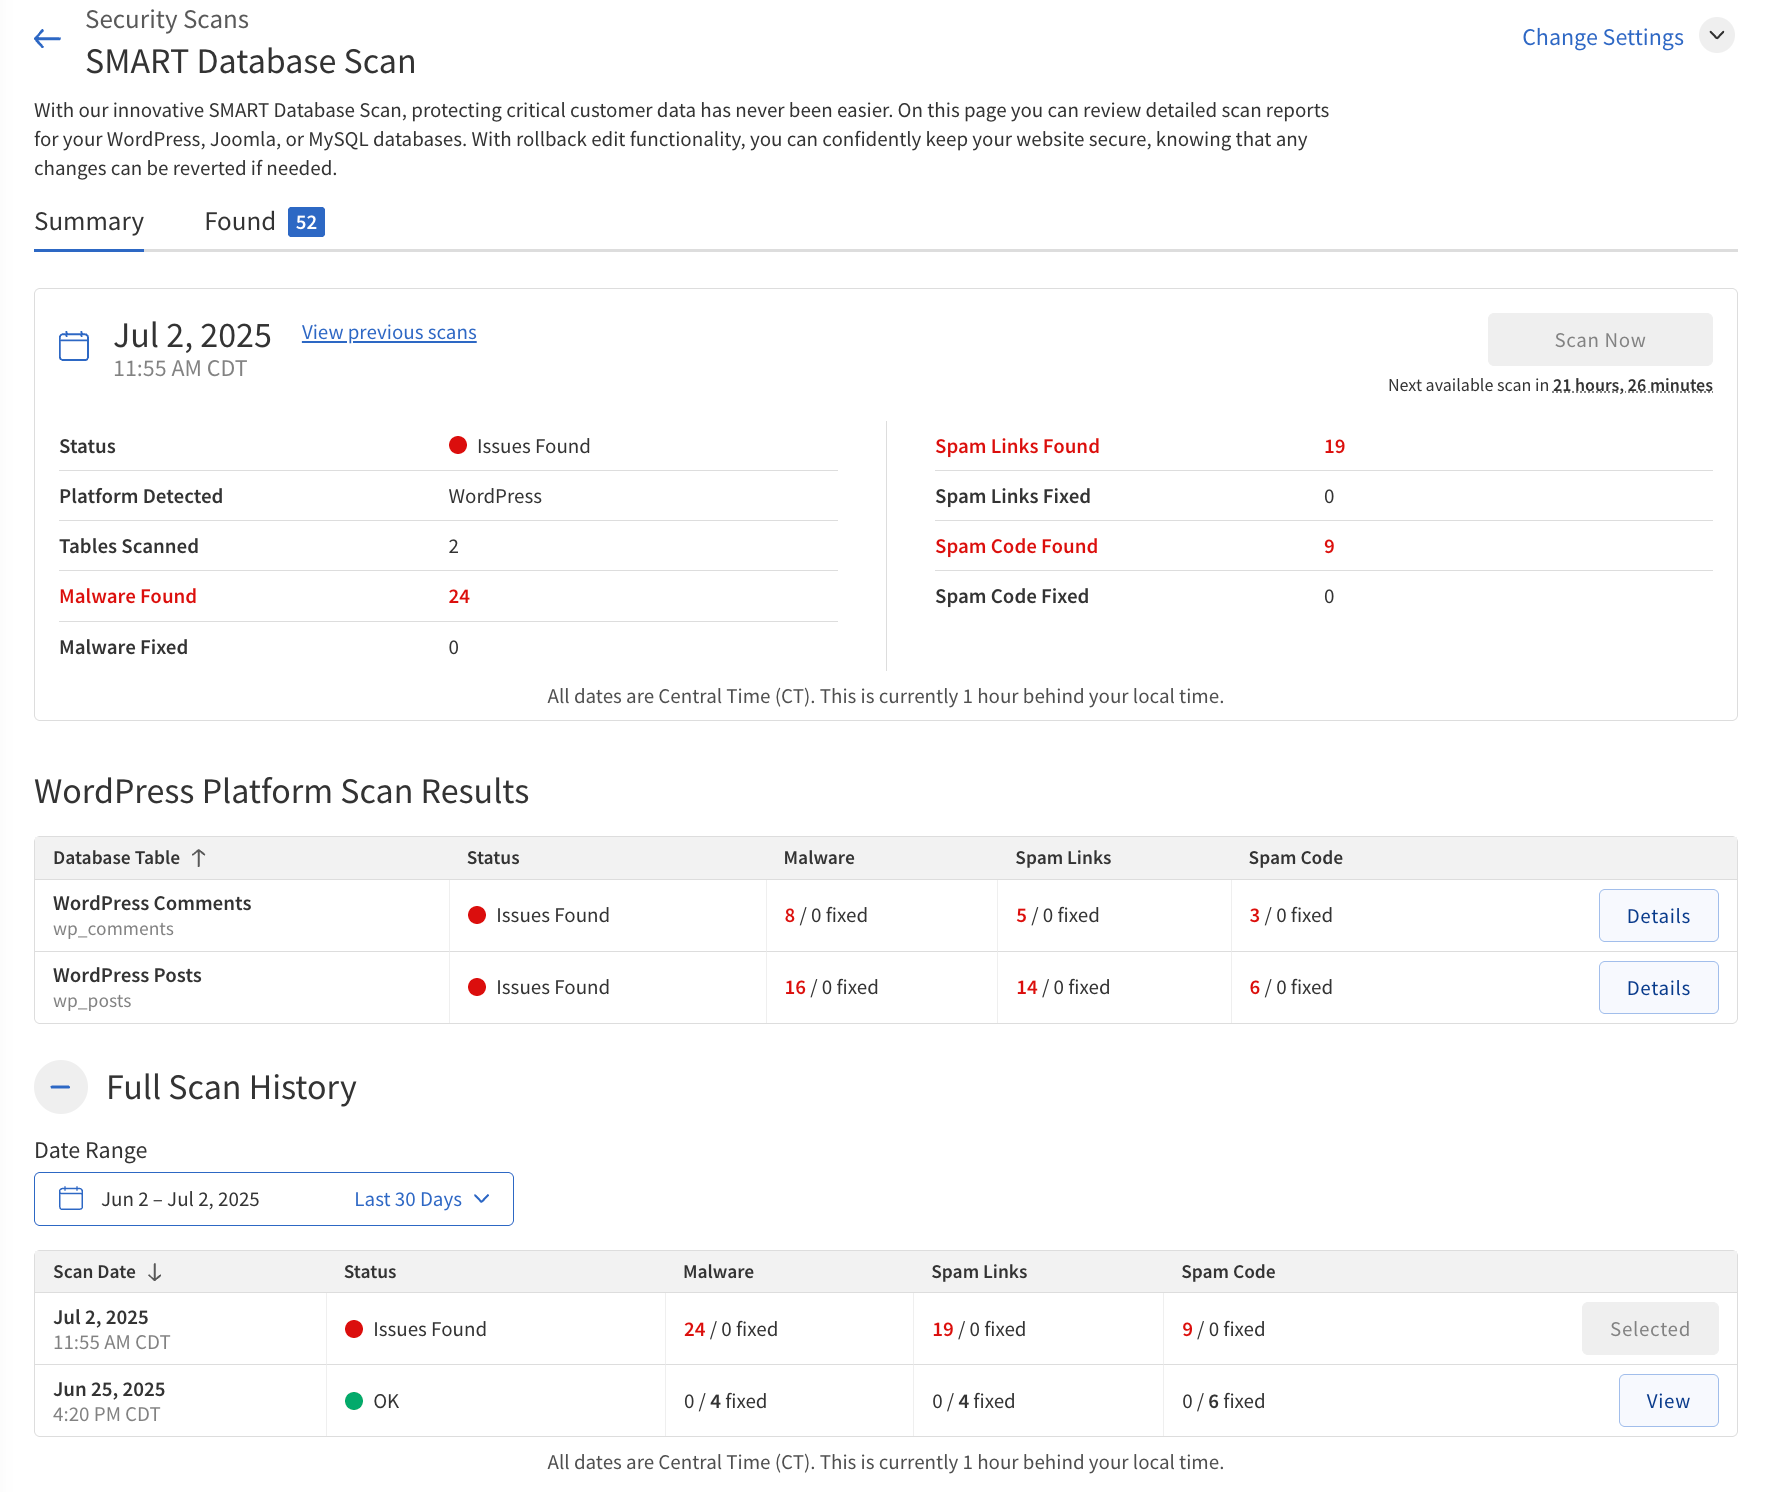
SMART Database Scan
The SMART Database Scan checks your website’s database for threats such as malware and spam (including links and code). It enables you to remediate issues by either cleaning only the malicious content within a record or deleting the entire affected record. You can review and select actions for each detected threat, and the scan also provides rollback functionality for the last scan if needed. SMART Database Scan supports WordPress and Joomla with automatic credential configuration, and you can manually configure MySQL database credentials for other platforms.
To run a SMART Database Scan:
-
Log in to your SiteLock Dashboard.
-
Navigate to Security Scans.
-
Locate the SMART Database Scan panel.
-
Click Scan Now to start a scan, or View Details to see the latest scan results.
The scan will run automatically at scheduled intervals, but you can also start a scan manually at any time.
The following table describes the Scan Summary section of the SMART Database Scan.
| Field | Description |
|---|---|
Scan Date |
The date and time when the most recent SMART Database Scan was completed (Central Time Zone, UTC-6). |
Status |
Indicates the result of the scan: Good (no threats found) or Issues Found (malware, spam links, or spam code detected). |
Tables Scanned |
The total number of database tables checked during the scan. |
Malware Found |
The number of malware items detected in the database. |
Malware Fixed |
The number of malware items that were automatically cleaned or fixed. |
Spam Links Found |
The number of spam links identified in the database. |
Spam Links Fixed |
The number of spam links that were removed. |
Spam Code Found |
The number of spam code items detected. |
Spam Code Fixed |
The number of spam code items resolved. |
If threats are found, you can review and remediate them using the Found and Fixed tabs in the scan results panel.
The Found tab lists all detected issues, and you can choose to clean or delete affected records individually or in bulk.
Address All Issues

| These steps are only required if SMART Database Scan is set to warn only instead of automatically fixing issues. |
To remediate or delete all issues at once:
-
Select Clean all records or Delete all records with threats.
-
Click Clean Table.
-
Clean — Remediate the issue while leaving behind legitimate content (recommended).
-
Delete — Deletes the entire post that contained the threat (permanent and cannot be undone).
-
The Fixed tab shows all issues that have been resolved.
For each detected threat, you can:
-
Clean — Remove only the malicious content from the record, preserving legitimate data.
-
Delete — Remove the entire record containing the threat (cannot be undone).
-
Ignore — Mark the issue as ignored if you do not want to take action.
After selecting actions:
-
Click Save Action to apply changes on the next scan, or Apply Action to remediate immediately.
To view detailed information about each threat:
-
Click View Threat.