Firewall
On the Firewall page, you can configure traffic rules, block harmful access, and optimize your firewall security settings.
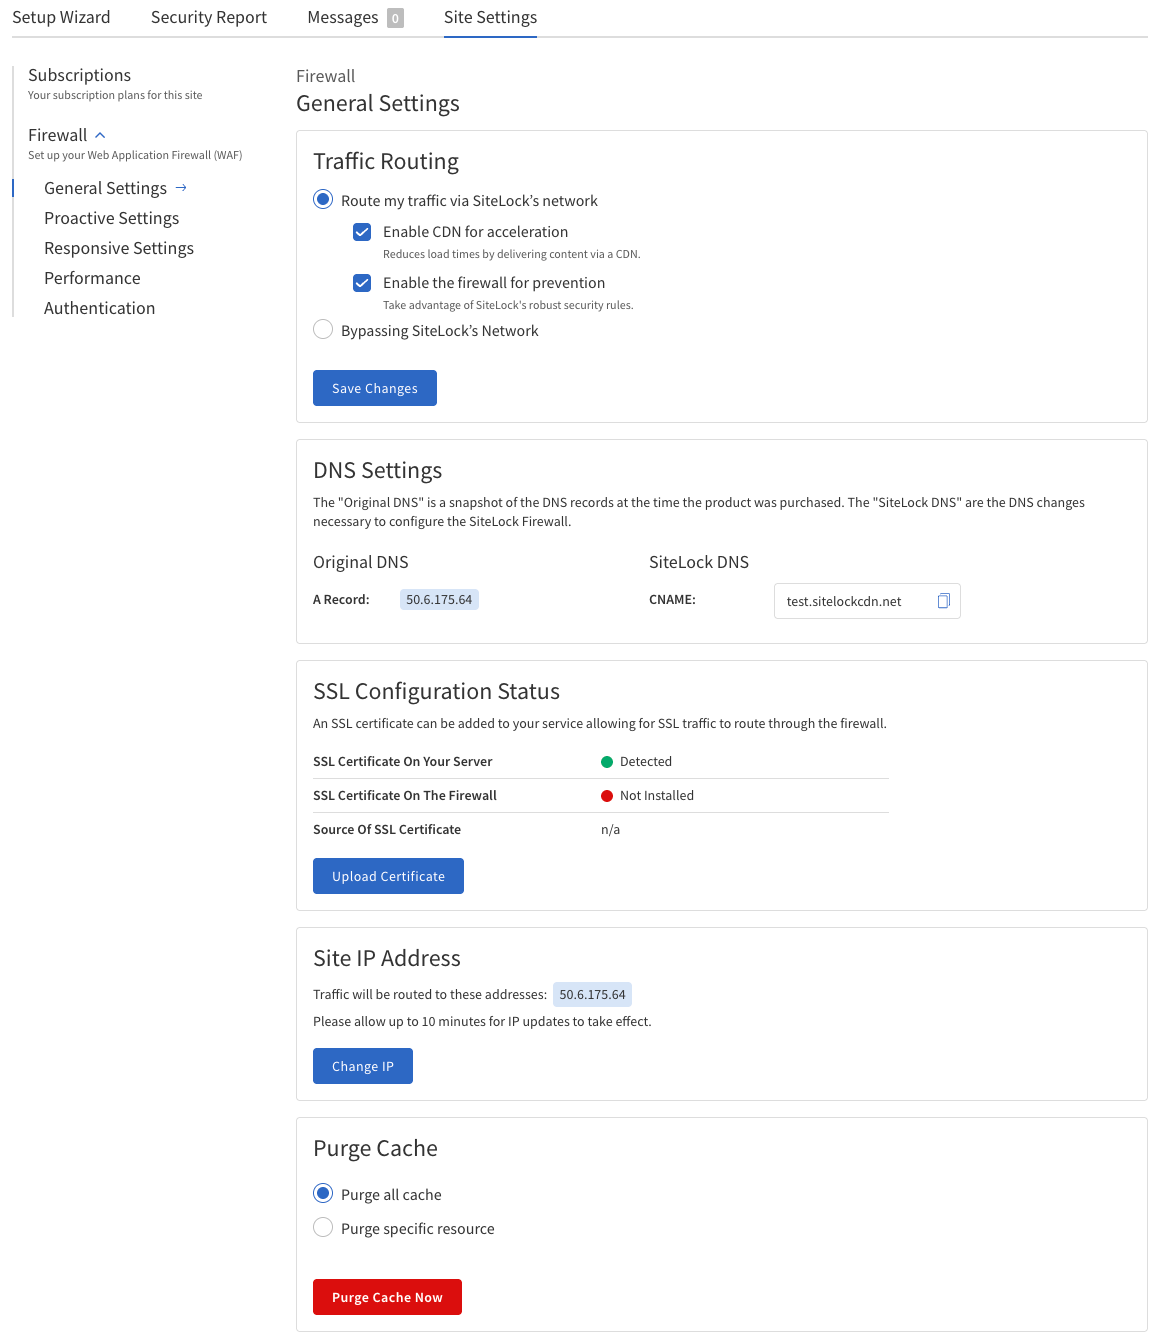
General Settings
In this section you can configure traffic routing, DNS settings, SSL/TLS configuration, and cache management to optimize website performance and security.
The following table describes fields and options in the General Settings section, including their definitions and usage instructions.
| Field | Value |
|---|---|
Traffic Routing |
|
DNS Settings (Informational) |
|
SSL Configuration Status |
|
Site IP Address |
|
Purge Cache |
|
Functionality |
|
Configure General Settings
-
Navigate to Firewall > General Settings.
-
Configure the settings as needed.
-
Traffic Routing — Enable or disable CDN and firewall, or temporarily bypass SiteLock’s network.
-
-
. Click Save Changes to apply any changes made.
-
DNS Settings — View original and SiteLock DNS records (informational only).
-
SSL Configuration Status — Check the status of SSL certificates on your server and firewall, and upload a new certificate if needed.
-
-
. Click Upload Certificate to upload a new SSL certificate.
-
. In the pop-up, upload the certificate file, private key file, and enter the passphrase if
-
Site IP Address — View and change the IP address where your website traffic is routed.
-
-
. Click Change IP to update the IP address.
-
. Enter the new IP address and click Save.
-
Purge Cache — Clear all cached content or specific resources to ensure visitors see the latest version of your site.
-
-
. Click Purge Cache Now to clear the cache based on the selected options.
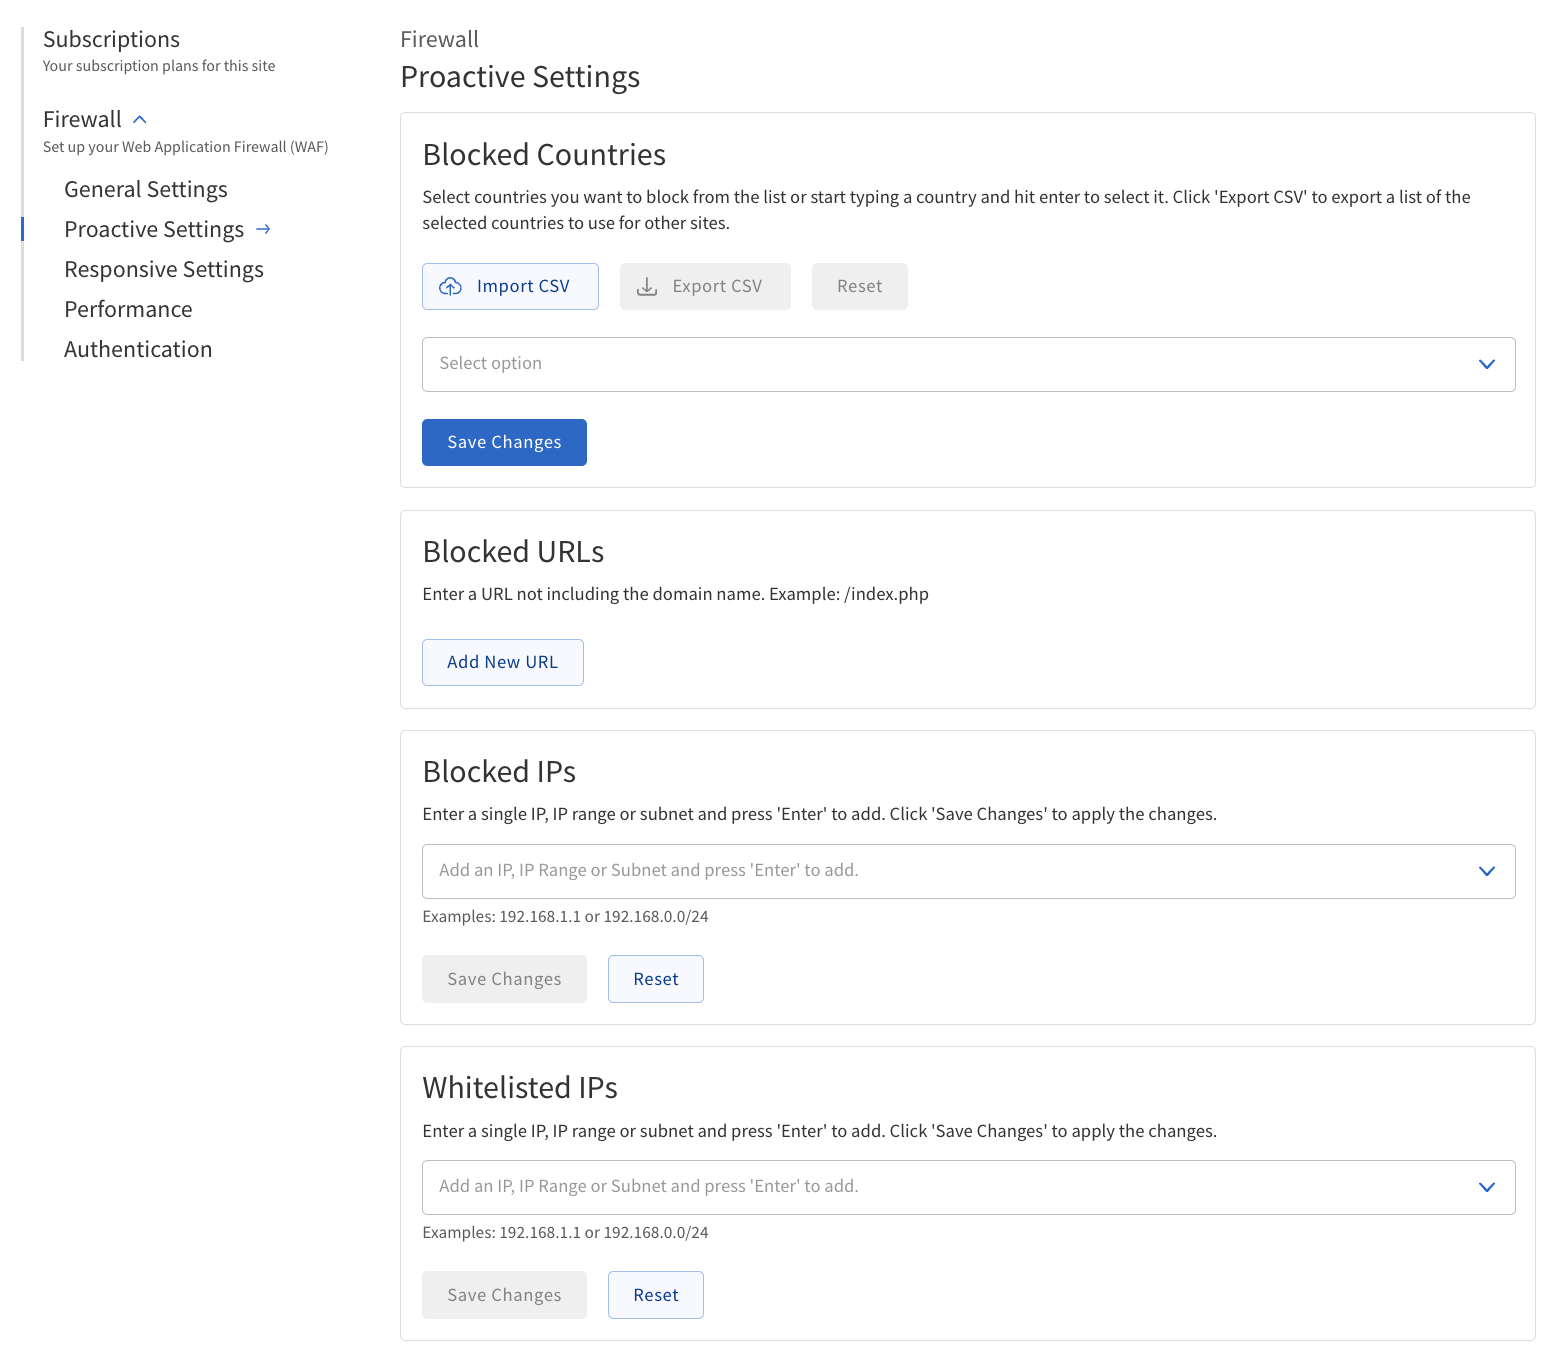
Proactive Settings
In this section you can configure security settings related to blocking access from specific countries, URLs, and IP addresses to enhance website security.
The following table describes fields and options in the Proactive Settings section, including their definitions and usage instructions:
| Field | Value |
|---|---|
Blocked Countries |
|
Blocked URLs |
|
Blocked IPs |
The IP addresses, ranges, or subnets to block. Examples:
|
Whitelisted IPs |
The IP addresses, ranges, or subnets to allow, overriding other blocking rules. |
Configure Proactive Settings
-
Navigate to Firewall > Proactive Settings.
-
Configure the settings as needed.
-
Blocked Countries — Import, export or reset a list of countries to block, or select countries from a list.
-
-
. Click Save Changes to apply any changes made.
-
Blocked URLs — Add URL patterns to block specific URLs or parts of URLs.
-
-
. Click Add New URL, select a pattern, enter a value, and click the plus icon to add it to the list.
-
Blocked IPs — Specify IP addresses, ranges, or subnets to block.
-
-
. Enter the IP address, range, or subnet in the provided field.
-
. Click Save Changes to apply any changes made.
-
Whitelisted IPs — Specify IP addresses, ranges, or subnets to allow, overriding other blocking rules.
-
-
. Click Save Changes to apply any changes made.
Responsive Settings
In this section you can customize exceptions to the Firewall. For each category of threat, select the specific rules and exceptions to the rules.

The following table describes fields and options in the Responsive Settings section, including their definitions and usage instructions.
| Field | Action |
|---|---|
Threat |
Malicious Script Access Attempts:
|
Attempts, Cross-Site Scripting Attempts |
Illegal Resource Access Attempts, Remote File Inclusions, SQL Injection.
|
Configure Responsive Settings
-
Navigate to Firewall > Responsive Settings.
-
Configure the settings as needed.
-
Threat — Select the type of threat to configure rules for.
-
Action — Select the specific rules and exceptions to the rules for the selected threat.
-
-
When you have selected the variables for tha rules, click Add.
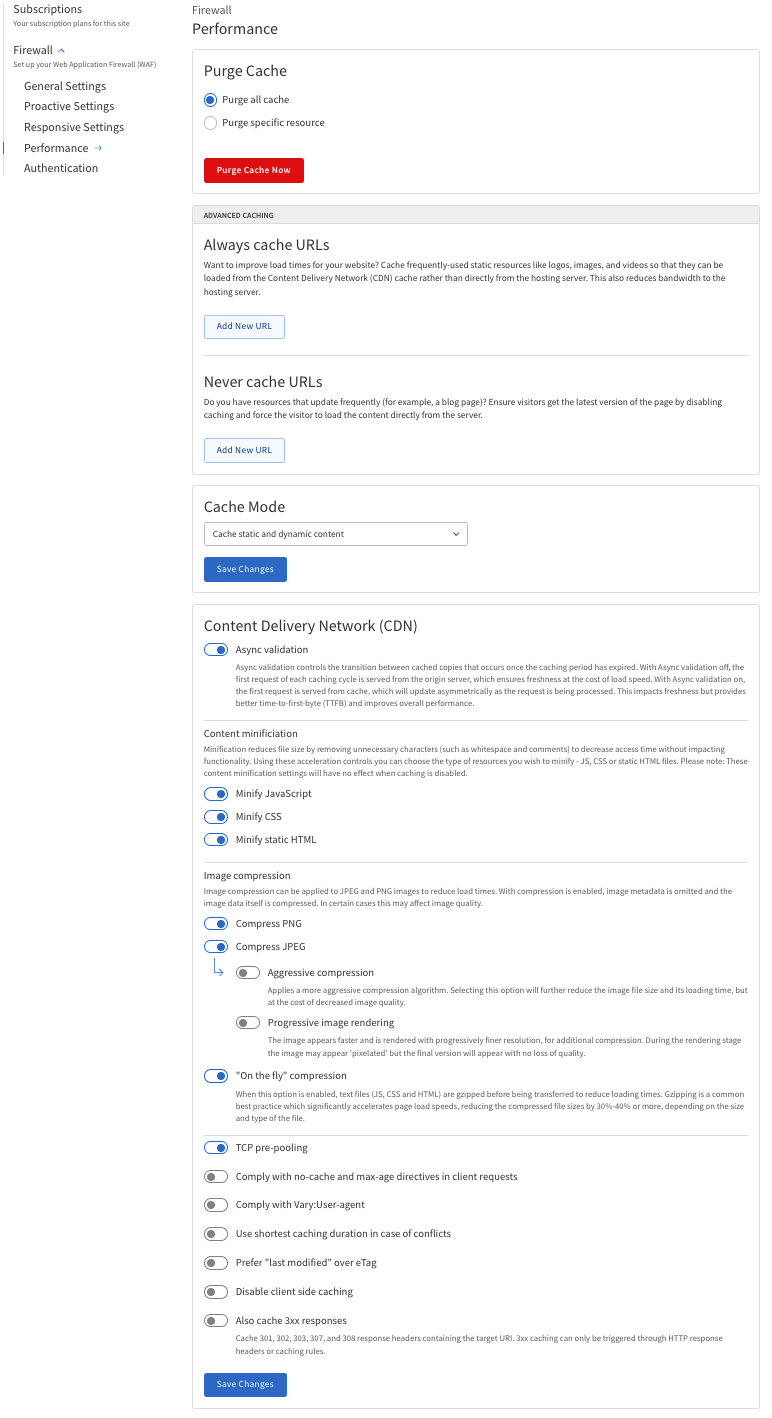
Performance
In this section you can configure caching and content delivery to improve website performance.
The following table describes fields and options in the Performance section, including their definitions and usage instructions.
| Field | Action |
|---|---|
Purge Cache |
|
Advanced Caching |
|
Pattern |
Select the pattern for the URL - applicable to both always cache URLs and never cache URLs.
|
TTL Unit |
Select the time-to-live unit for caching.
|
Cache Mode |
Options:
|
Content Delivery Network (CDN) |
Configure settings for content delivery to improve load times by serving content from servers closer to the visitor. |
Auto Minify |
Minify specific types of resources to reduce file size and improve load times.
* Minify JavaScript — Remove unnecessary characters from JavaScript files.
* Minify CSS — Remove unnecessary characters from |
Image Compression |
Options for compressing images to reduce file size and improve load times.
* Compress PNG — Reduce the size of |
Other Settings |
|
Configure Performance Settings
-
Navigate to Firewall > Performance.
-
Configure the settings as needed.
-
Purge Cache — Clear all cached content or specific resources to ensure visitors see the latest version of your site.
-
-
. Click Purge Cache Now to clear the cache based on the selected options.
-
Advanced Caching — Set rules for always caching or never caching specific URLs.
-
Cache Mode — Choose what types of content to cache: static, dynamic, or disable caching.
-
-
. Click Save Changes to apply any changes made.
-
Content Delivery Network (CDN) — Configure settings for content delivery to improve load times by serving content from servers closer to the visitor.
-
Auto Minify — Minify specific types of resources to reduce file size and improve load times.
-
Image Compression — Options for compressing images to reduce file size and improve load times.
-
Other Settings — Additional performance-related settings.
-
-
. Click Save Changes to apply any changes made.
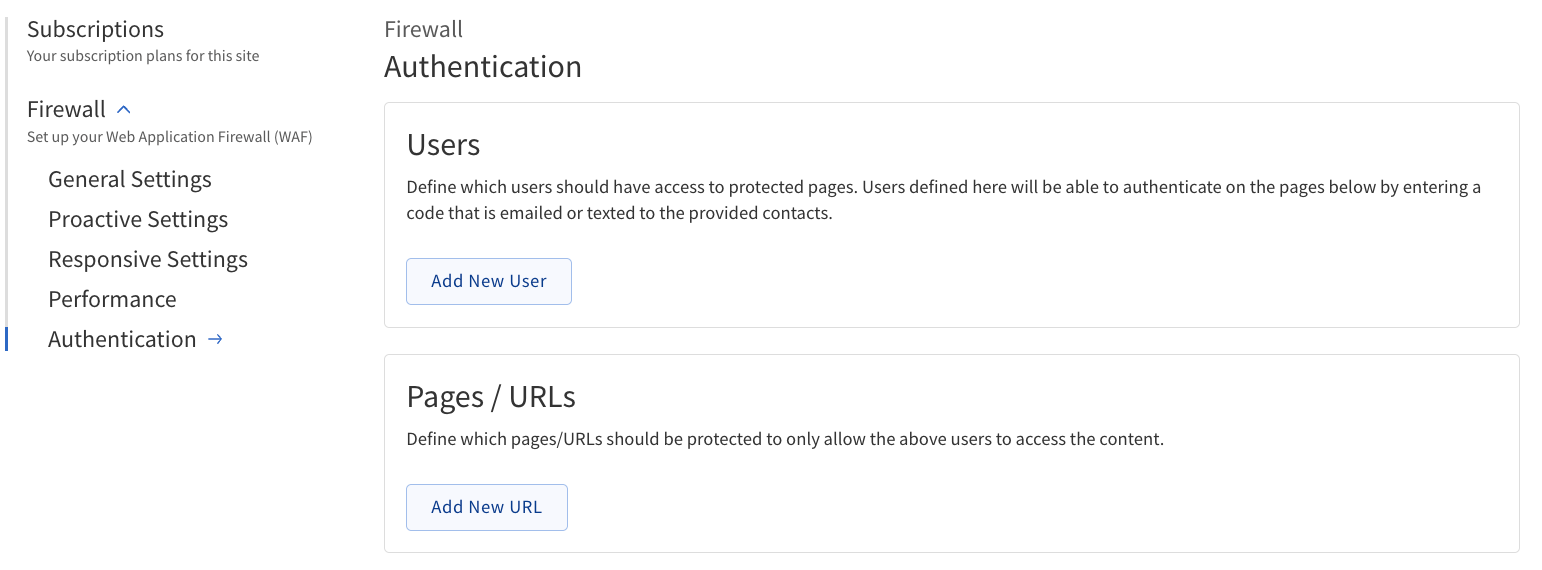
Authentication
In this section you can add an additional layer of security to specific pages or URLs, such as a WordPress admin page.
The following table describes fields and options in the Authentication section, including their definitions and usage instructions.
| Field | Action |
|---|---|
Users |
Define which users should have access to protected pages. Users defined here will be able to authenticate on the pages below by entering a code that is emailed or texted to the provided contacts.
|
Pages/URL |
Define which pages/URLs should be protected to only allow the above users to access the content.
|
Configure Authentication Settings
-
Navigate to Firewall > Authentication.
-
Configure the settings as needed.
-
Users — Define which users should have access to protected pages. Users defined here will be able to authenticate on the pages below by entering a code that is emailed or texted to the provided contacts.
-
-
. Click Add New User, enter the user’s name, email address, and phone number, then click the plus icon to add the user to the list.
-
Pages/URL — Define which pages/URLs should be protected to only allow the above users to access the content.
-
-
. Click Add New URL , select a pattern, enter a value, and click the plus icon to add it to the list.