Sectigo Security for Windows
This guide provides details on the Sectigo self-enrollment client, which can be installed on individual user systems running Windows OS, to enroll Client and/or Device certificates for secure email communications (client certificate) or device authentication (device certificate) to the network components.
Overview
The client is designed to generate a key pair on the trusted platform module (TPM) of the Windows systems to keep the private key secured on the TPM (it cannot be exported) and import the enrolled certificates to the corresponding keystore of the Windows system for crypto operations.
The Sectigo self-enrollment client supports the following authentication types for certificate enrollment:
-
Client certificate:
-
Email
-
Identity provider (IdP) (SAML integration)
-
Auth via Person Secret ID
-
-
Device certificate:
-
Email
-
Identity provider (IdP) (SAML integration)
-
-
Components of Sectigo self-enrollment services:
-
Sectigo Certificate Manager (SCM): Responsible for core logic around certificate profiles and organizations
-
Custom self-enrollment service: (Optional) External service, hosted in K8S, responsible for UI and SAML attribute extraction
-
Sectigo Security for Windows: New client to handle keygen in TPM
-
Audience
This guide is written for an audience that is familiar with concepts related to SCM, security certificates issuance and management.
This guide also assumes that you are familiar with your IdP environment and operating system. The general functions of any operating system are described in the user documentation for that system and are not repeated here.
Scope
This guide covers only the instructions for Sectigo self-enrollment service client installation and enrollment of keys and certificates in TPM. This guide uses Azure as IdP for SAML authentication and authorization and Sectigo backend as the Service Provider. Setting up SCM accounts and SAML configurations are out of the scope of this guide. See the relevant documentation from the vendors for setting up Azure directory and SAML integrations.
Installation overview
This section discusses the full details of Sectigo certificate enrollment for end users using Sectigo Security client.
Software requirements
-
Operating system: Sectigo Security for Windows client is supported on Windows 10 and Windows 11 with TPM 2.0 enabled.
Windows 10 requires Windows 10 1809 or greater. -
Browser support: Sectigo self-enrollment service is supported on current versions of Firefox, Microsoft Edge, and Chrome, as of July 2022.
Hardware requirements
A system with Trusted Platform Module (TPM) V2.0 enabled is required to use Sectigo self-enrollment service as the service will generate an asymmetric (public/private) key pair in the TPM.
Certificate type, key size, and algorithm limitations
The Sectigo Security client supports both RSA and ECDSA asymmetric algorithms for key generation on TPM, however only p256r1 was tested for ECDSA due to the limitation of TPM.
This version of the client supports device and client certificate creation. Other certificate types are not supported by the current version of the client.
SSL, Device or Client certificate enrollment workflow
-
Contact Sectigo Sales or Onboarding team to register with SCM. As an optional step, enable SAML integration with SCM for IdP (Identity Provider) authentication if the customer supports IdP integration.
-
Create one or more certificate profiles with Sectigo CA backend (Private or Public).
-
Create one or more accounts in the Enrollment form for device and certificate endpoints, with a specific authentication type.
-
Download Sectigo Security for Windows.
-
Install the client on every machine where certificate will be installed.
-
Use one of the supported browsers to connect to Sectigo enrollment endpoints specific to the certificate type (device or client).
-
Depending on the selected authentication method, authenticate with SCM for certificate enrollment.
-
Successful authentication will redirect the link to Sectigo self-enrollment service UI.
-
Submit the certificate creation request.
-
Sectigo Security client which was installed in Step 2 will be invoked by the service to generate a new key pair, CSR generation and certificate enrollment with Sectigo CA services.
-
A user certificate will be successfully installed in the personal store of the user for client certificate and personal store of the local system for the device certificate.
-
Now the newly created certificate can be used for device authentication or client authentication as per the customer setup.
Installing and enrolling a certificate
Authentication
The Sectigo self-enrollment client supports the following authentication types for the certificate enrollment:
-
SSL Certificate:
-
Email
-
Identity Provider (IdP) (SAML Integration)
-
Client Certificate:
-
-
Email
-
Identity Provider (IdP) (SAML Integration)
-
Person Secret ID
-
Device Certificate:
-
-
Email
-
Identity Provider (IdP) (SAML Integration)
-
IdP authentication is done via SAML. Customer is expected to configure the IdP assertion details with Sectigo backend for service access upon successful authentication.
Authorization requirements for IdP based authentication
-
Users are authorized to complete an enrollment based on the
<schacHomeOrganization1>and<groups>SAML assertions.Ask Sectigo Sales for mapping details. -
The
<schacHomeOrganization>attribute must map to an existing organization/department in the SCM account, otherwise an error message will appear. -
If the user’s groups map to one or more profiles they will be authorized to complete the enrollment, otherwise an error message will appear.
-
Contact Support if an error is encountered during authentication or authorization to access the self-enrollment service.
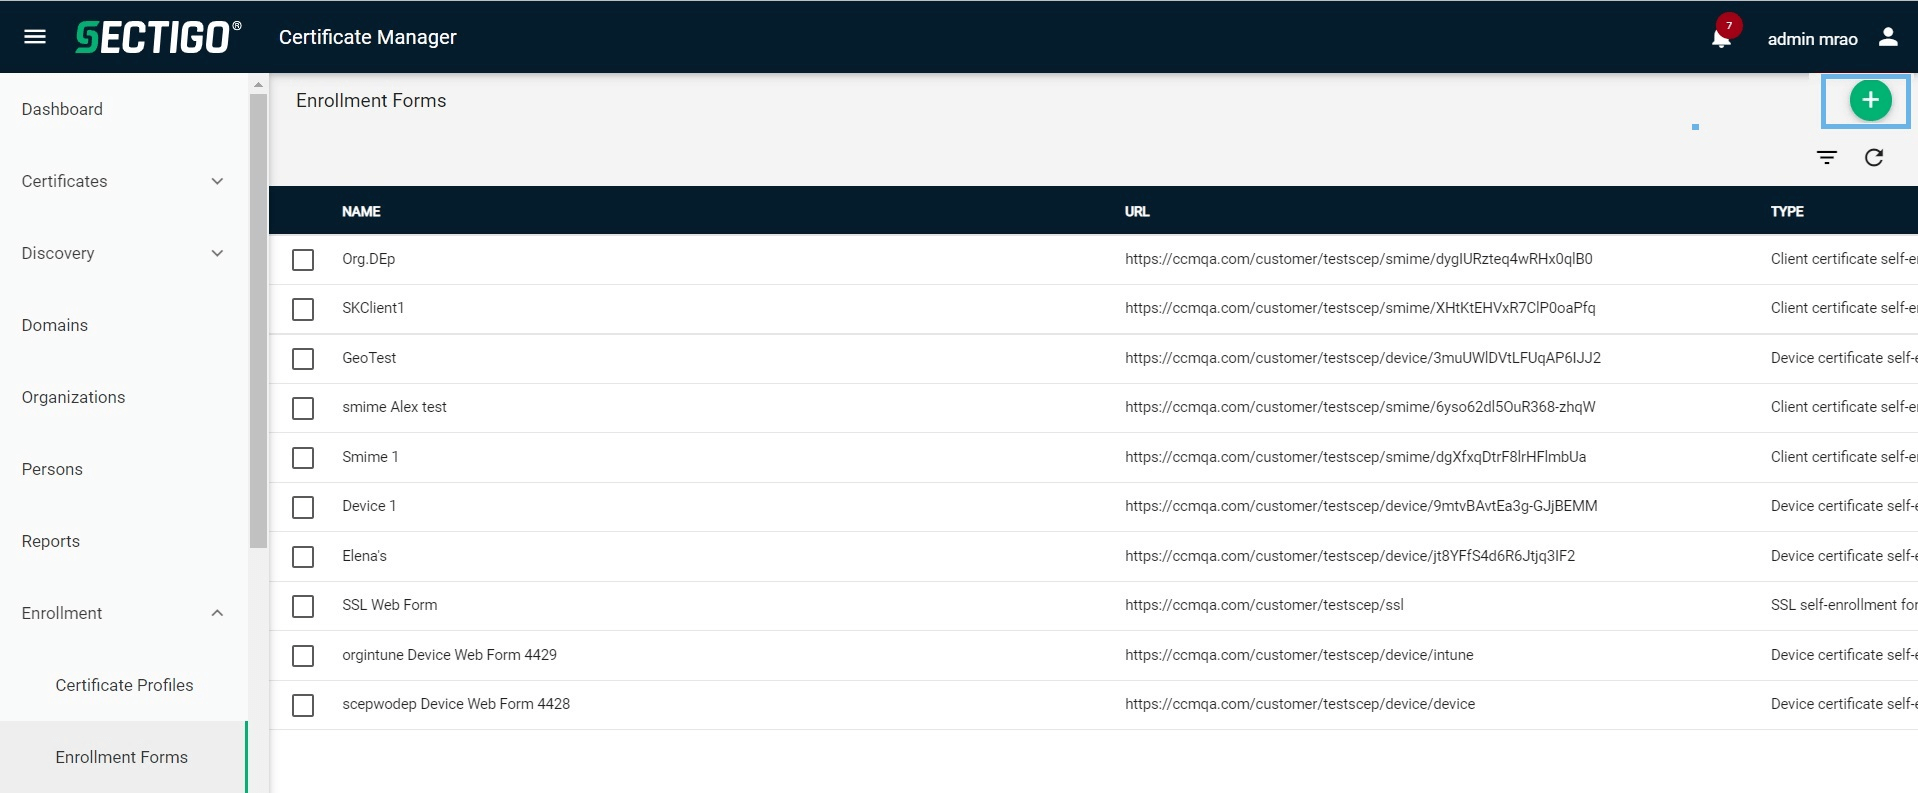
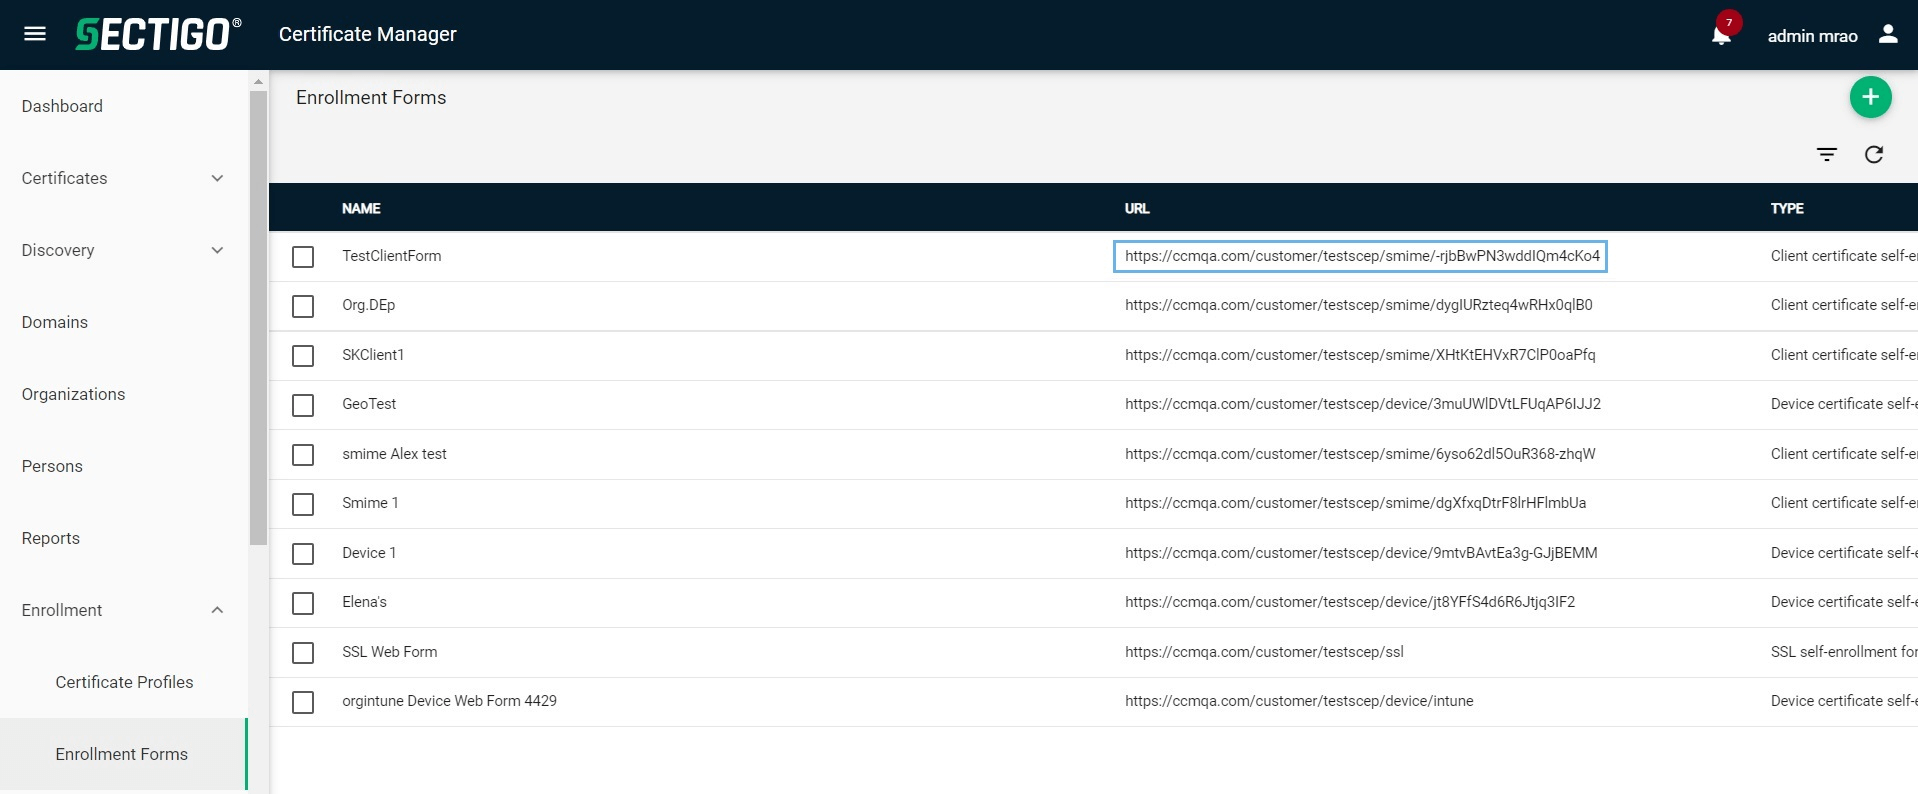
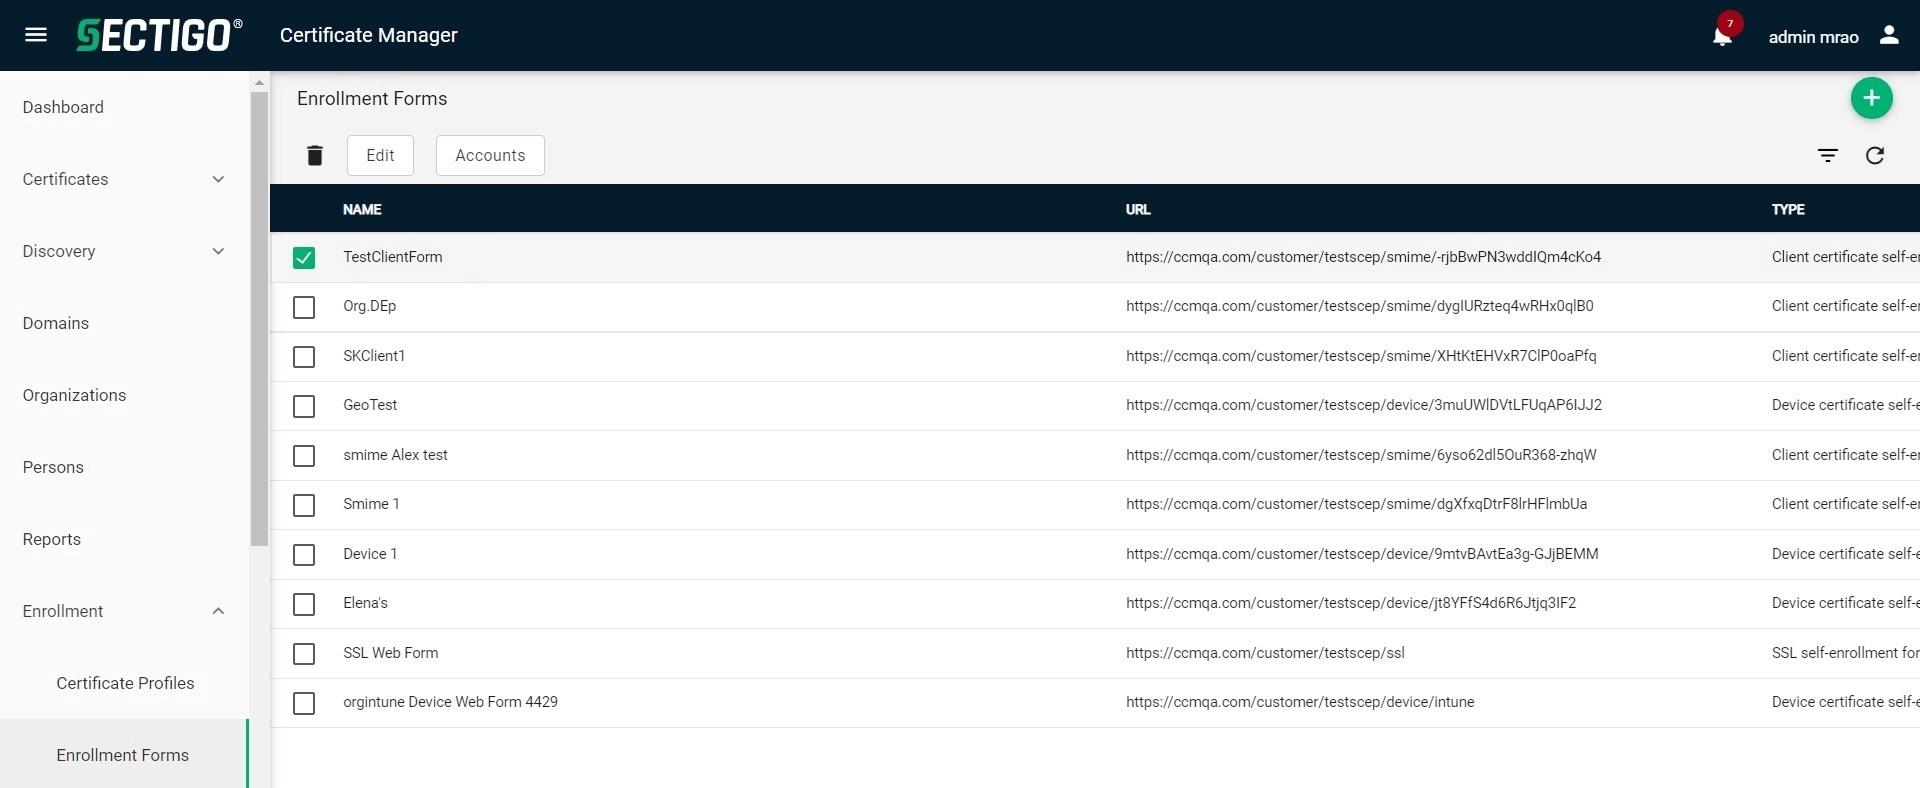
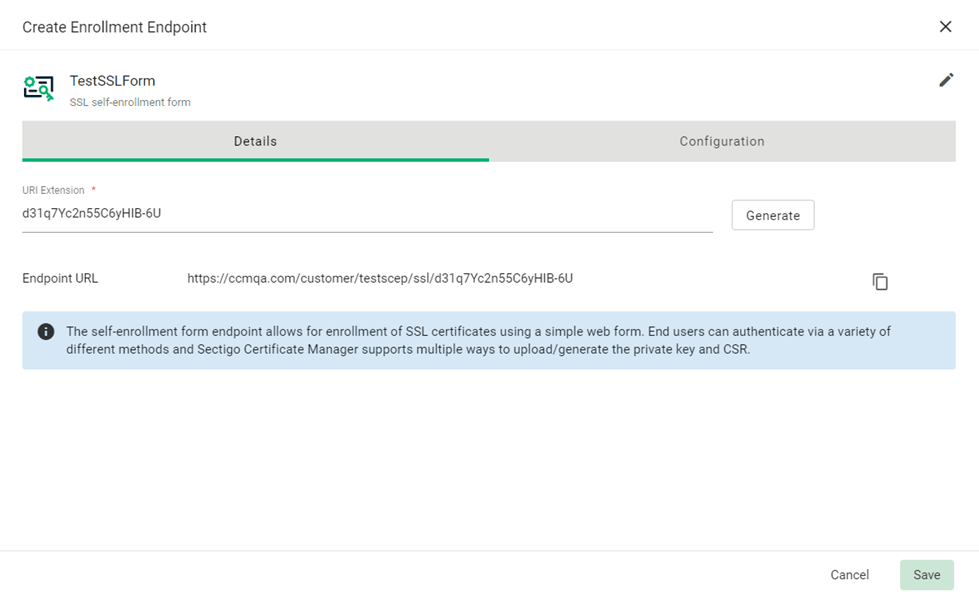
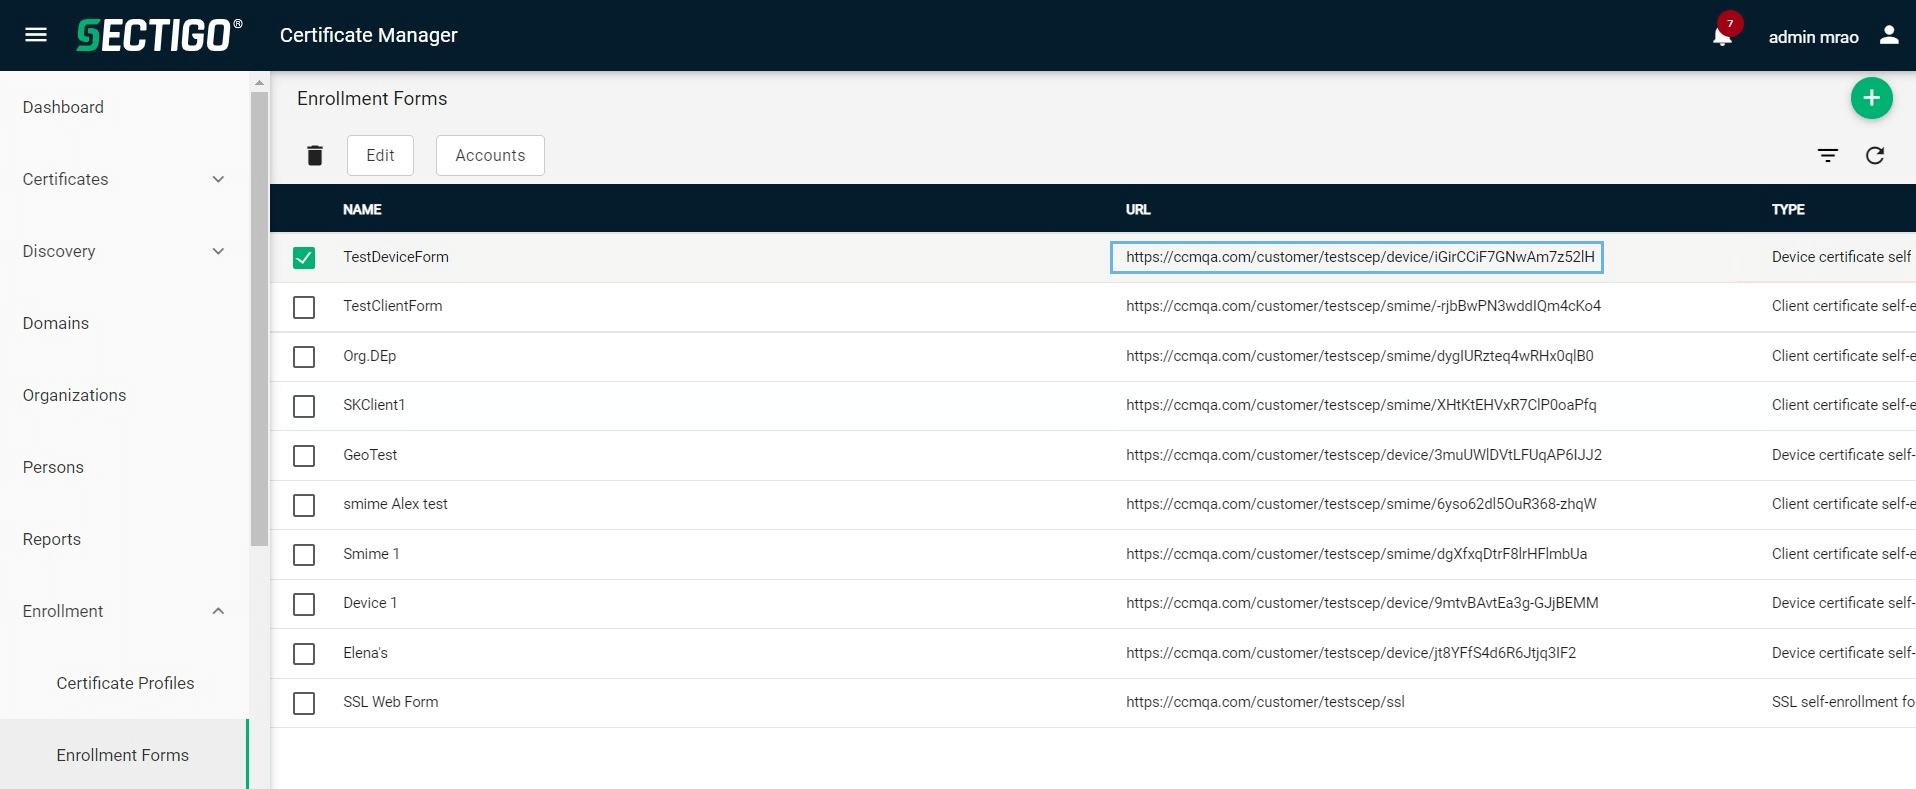
Create a new SSL, client, or device enrollment form
-
Login to SCM as a mrao or admin.
-
Select .
-
Click Add (+).
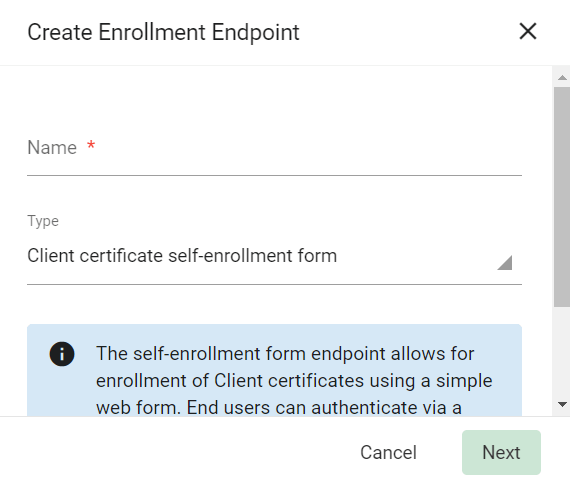
-
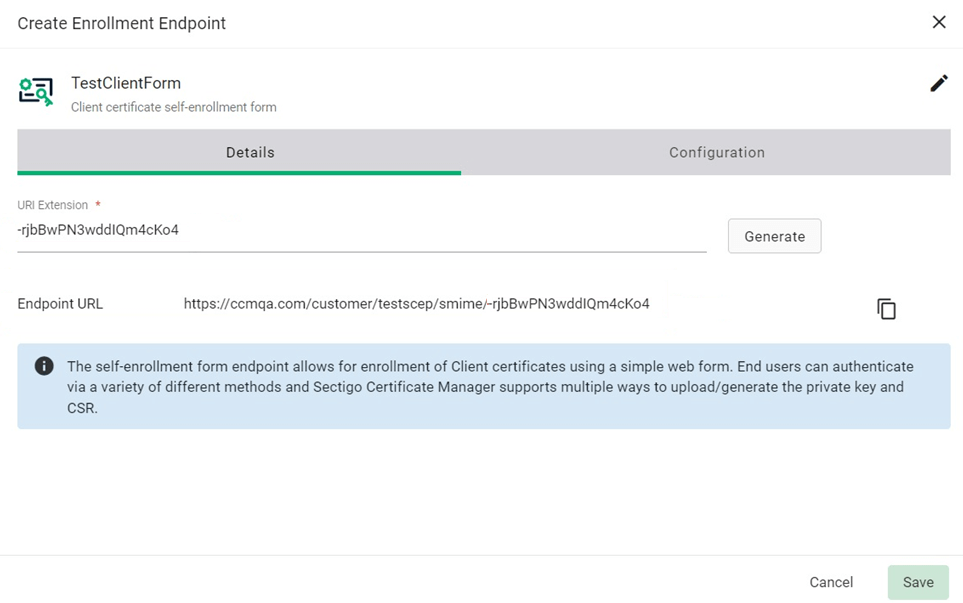
Enter a name for the New Enrollment Endpoint.
-
Select SSL certificate self-enrollment form, Client certificate self-enrollment form, or Device Certificate self-enrollment form, as appropriate to your requirements.
-
Click Next.
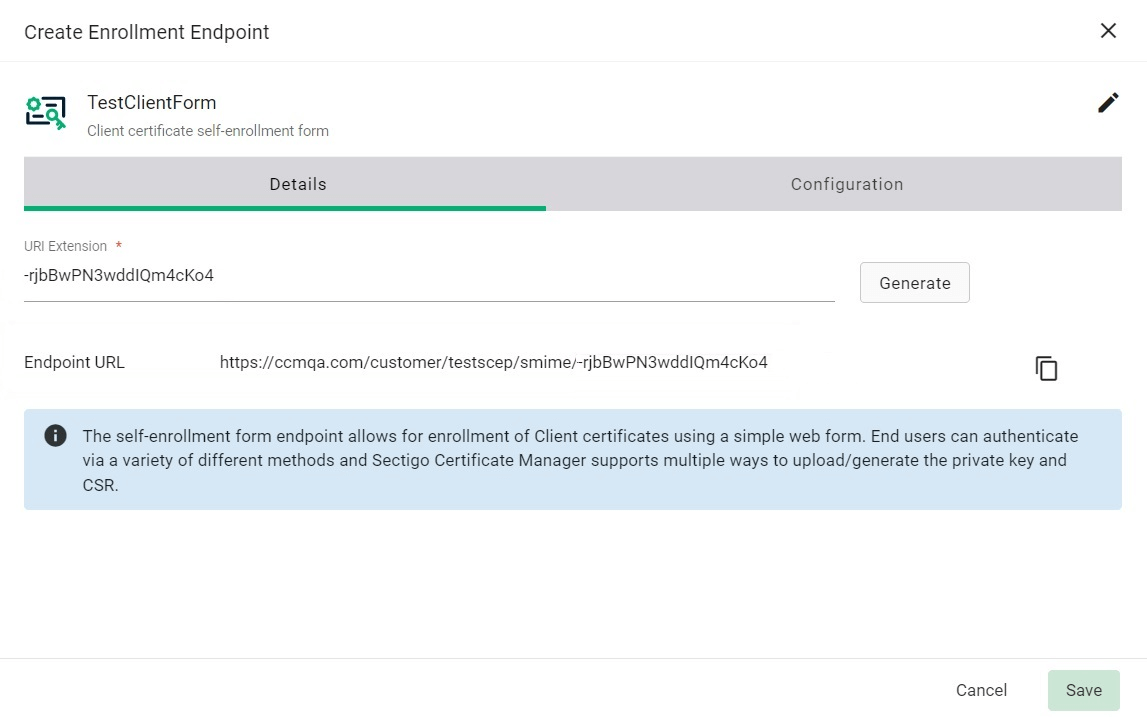
-
In the Details tab, click Generate, to generate the URI extension.
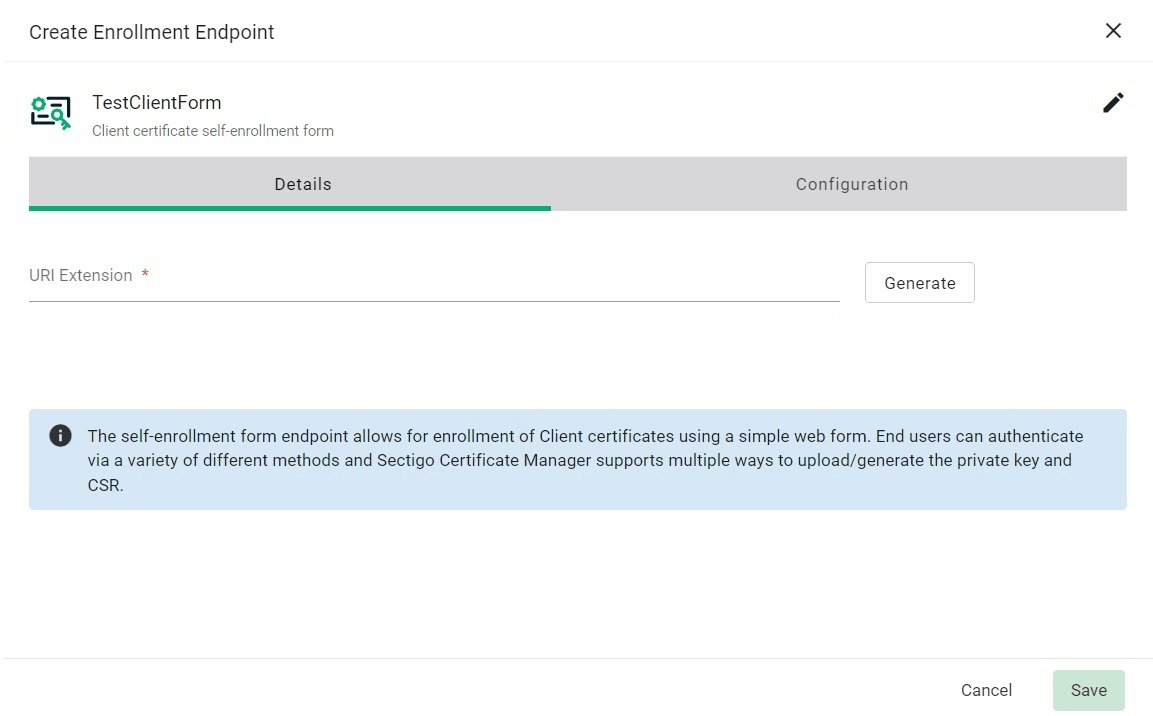
The value generated for the URI extension can be distributed to the end users via group policy or through automated scripts that load it in the browser on the end user’s system to invoke the certificate creation flow.
-
In the Configuration tab, select the appropriate Authentication Type(s) for your requirements/setup.

See Authentication for allowed authentication types depending on the certificate type (device vs client). -
Click Save.
The newly created enrollment endpoint will be shown on the main page.
Create Web Form accounts
-
Select .
-
Select the endpoint and click Accounts.
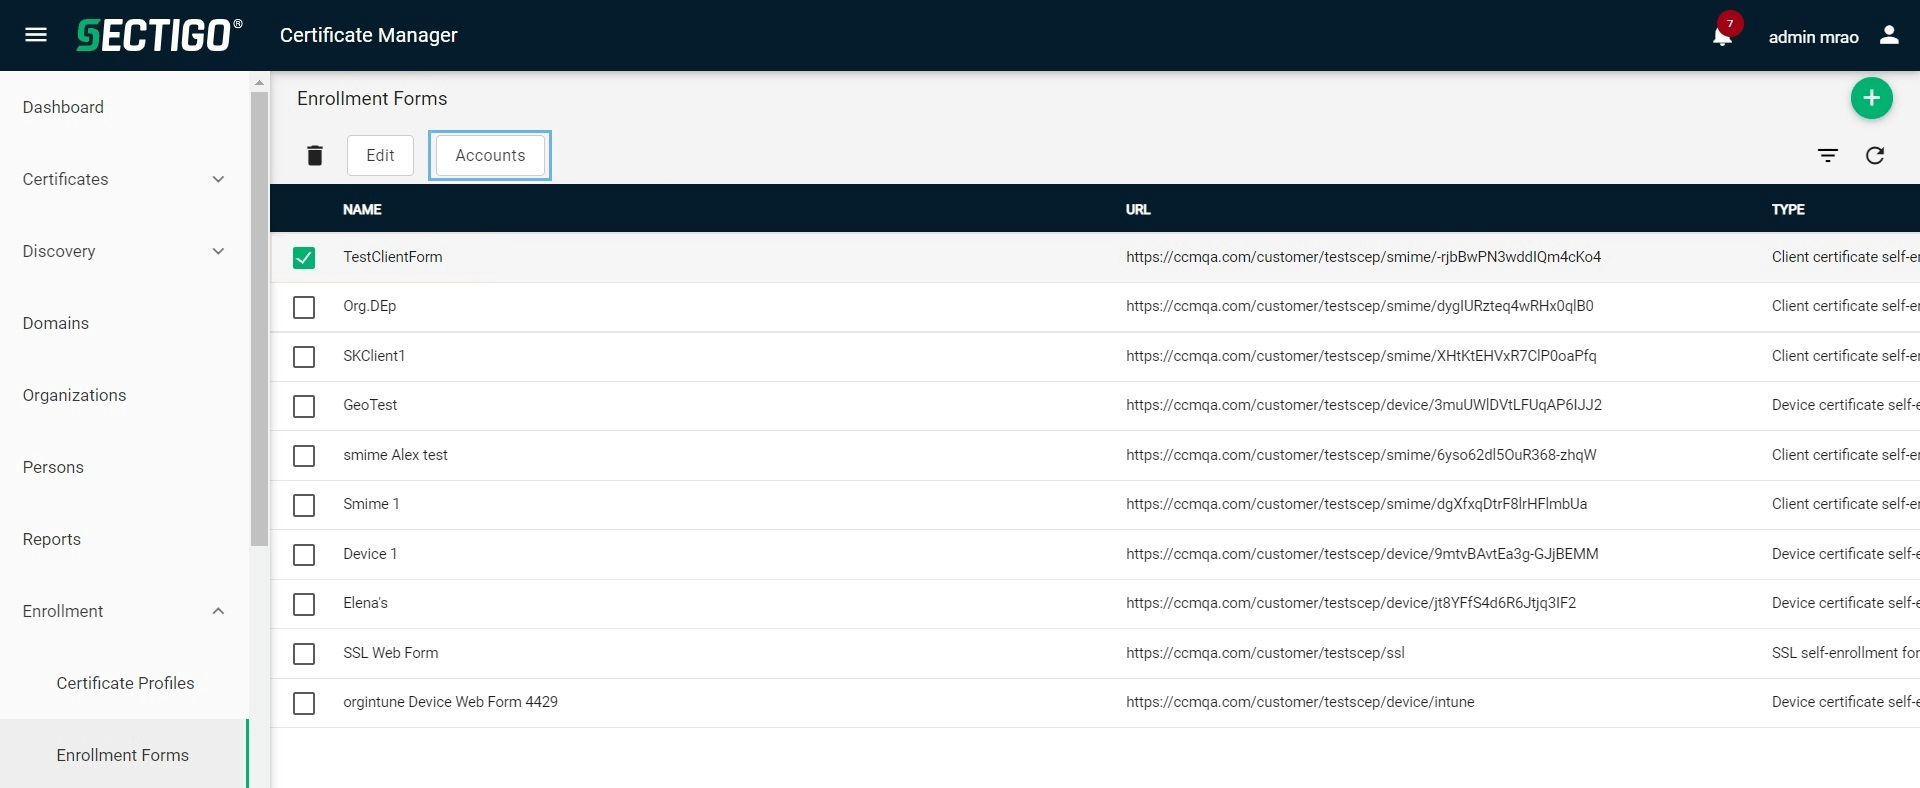
-
Click Add (+).
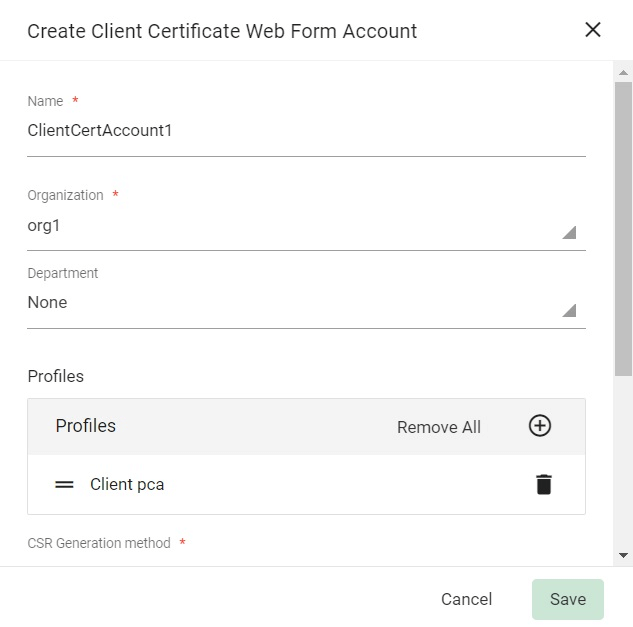
The Create Client Certificate Web Form Account window appears.
You can create more than one web form account inside an enrollment endpoint for different configurations like organization, certificate profile, or CSR generation method.
Each account is uniquely identified using the authorization code provided during the account creation.
-
Provide the following details for the new account:
-
Enter the Name of the account.
-
Select the Organization.
-
Select the Department (optional).
-
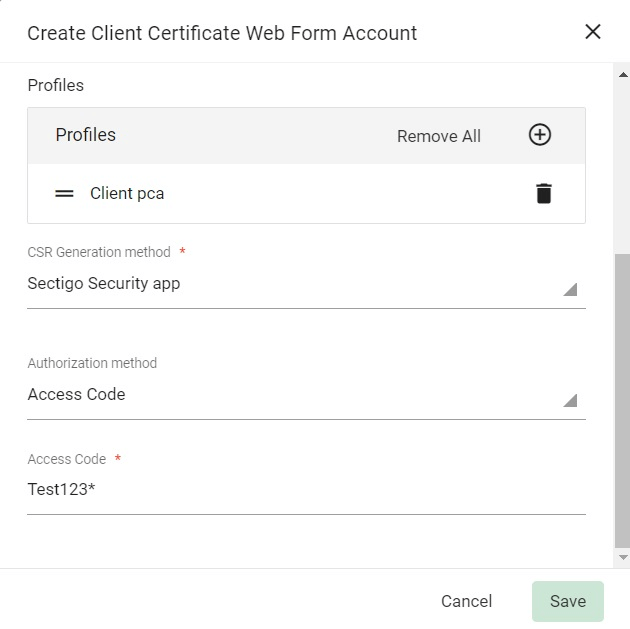
Add certificate Profiles.
-
In CSR Generation method, enter Sectigo Security App.
-
Select the Authorization method (None is the default).
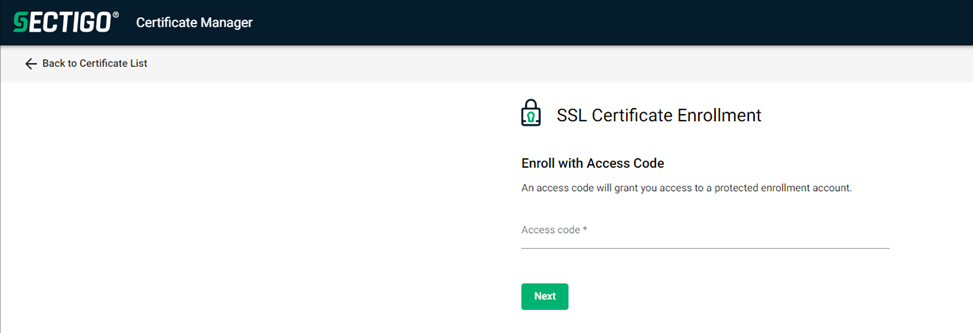
-
If Access Code is selected as the authorization method, enter an alphanumeric code.
The access code for every account should be unique, otherwise the following error will appear. 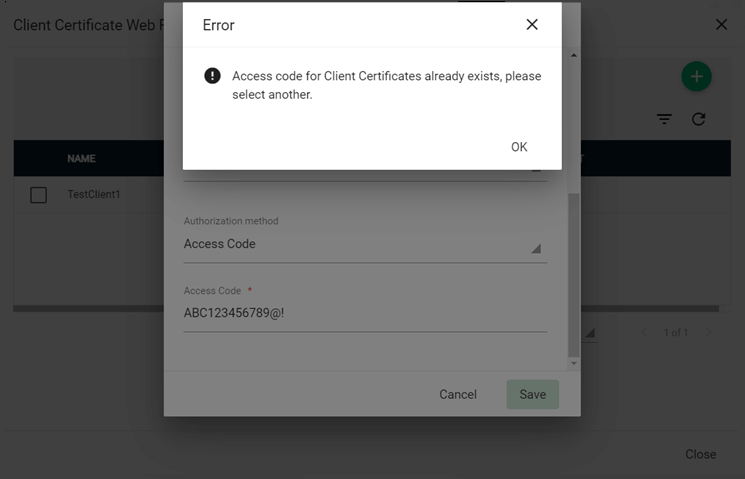
-
-
Click Save.
-
Click Close to exit.
A new form is created with the provided configuration.
Install Sectigo Security for Windows
-
Download Sectigo Security for Windows.
-
Open the download location, right-click the package, and click Install.
-
Click Next.
-
Review and accept the Sectigo Security License Agreement.
-
Click Next.
-
Specify an install location and click Next.
-
Click Finish.
The client is ready for the enrollment process.
| Verify the successful installation by navigating to , and locating Sectigo Security. |
Enroll an SSL certificate
-
Log in to your Windows system.
-
Log in to SCM as a mrao or admin.
-
Select .
-
Select an SSL enrollment form and copy Endpoint URL.
-
Open a supported browser and paste the SSL enrollment endpoint URL.
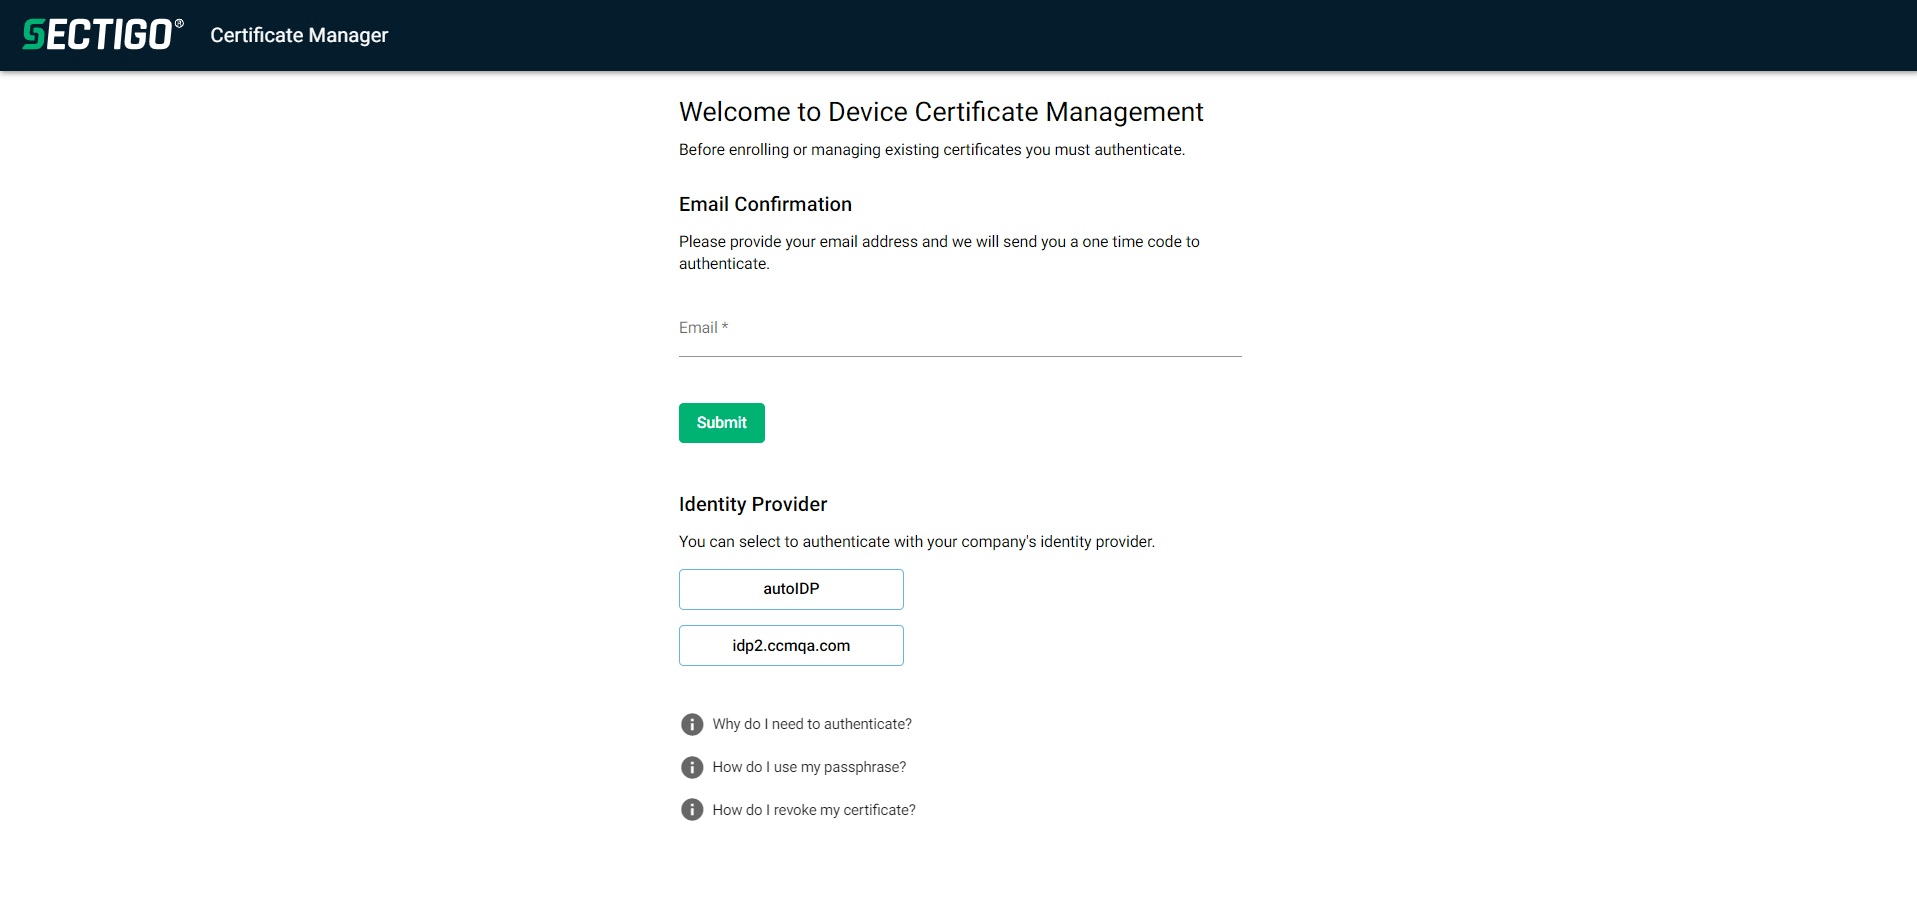
Depending on the authentication method(s) selected during the account creation, an authentication page will appear with selected options. This example was configured with all authentication methods:
-
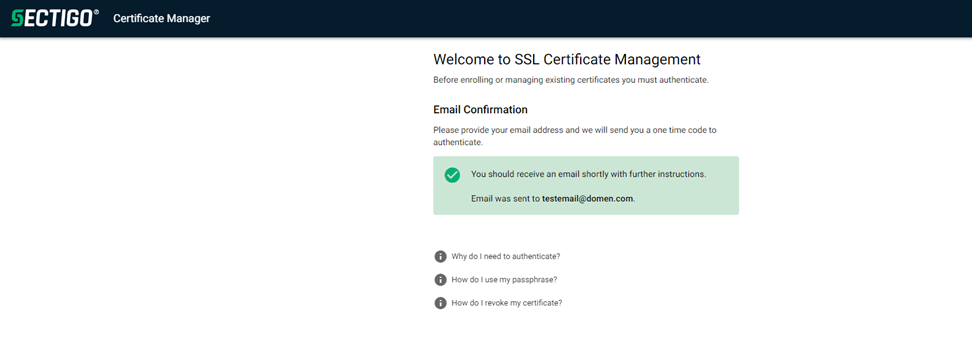
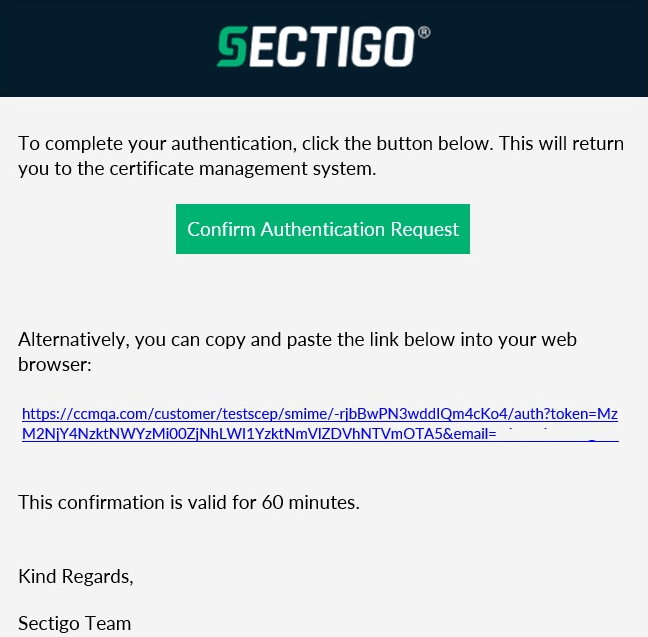
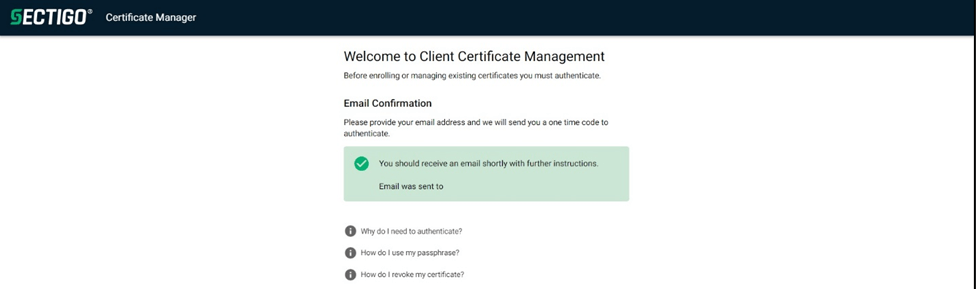
If email authentication is selected, and a valid email address is added to the field for client certificate creation, an email with a link to complete the certificate enrollment will be sent to the entered email address.
-
If the email address provided is valid, then you will receive an email as follows.
-
-
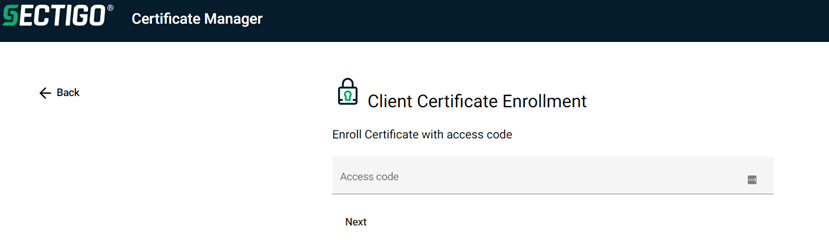
Click the link provided in the email to authenticate to the client service using the access code shared securely with you by your administrator.
Successful authentication and authorization will open the following page for certificate details selection.
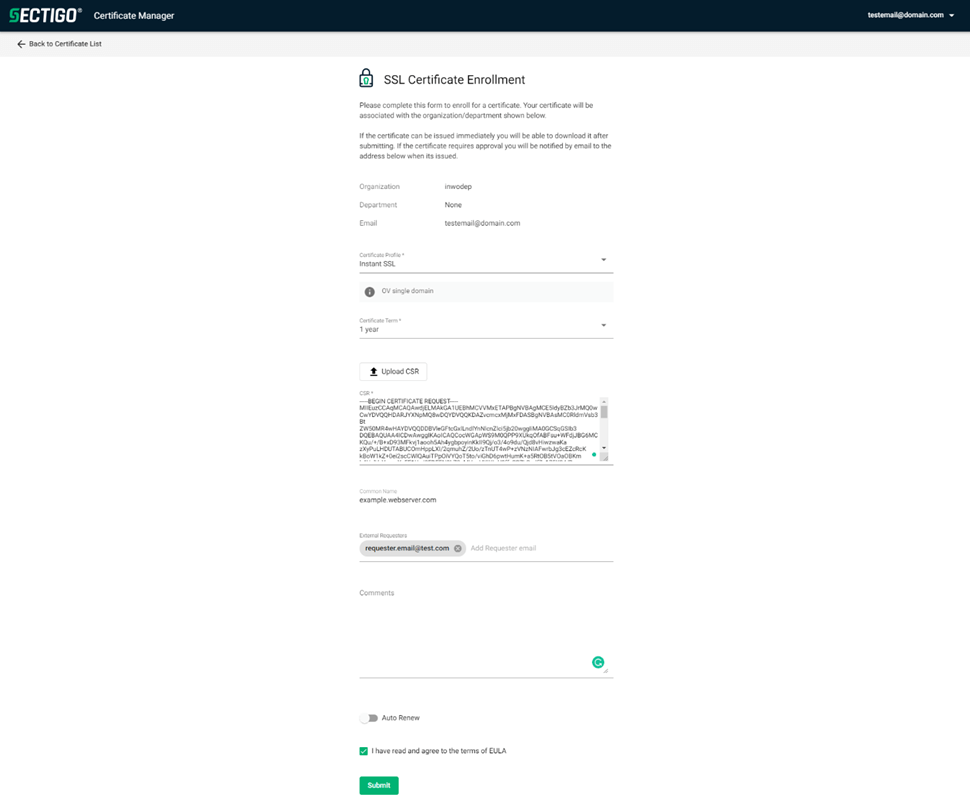
-
Accept the terms of the Sectigo EULA.
-
Click Submit.
-
Click Open URL:sectigogen.

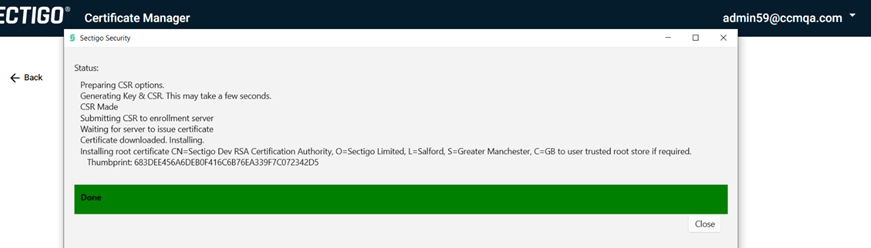
An asymmetric key pair is generated in TPM, and a CSR is created, sent to the Sectigo backend for certificate enrollment, and imported to the Windows store.
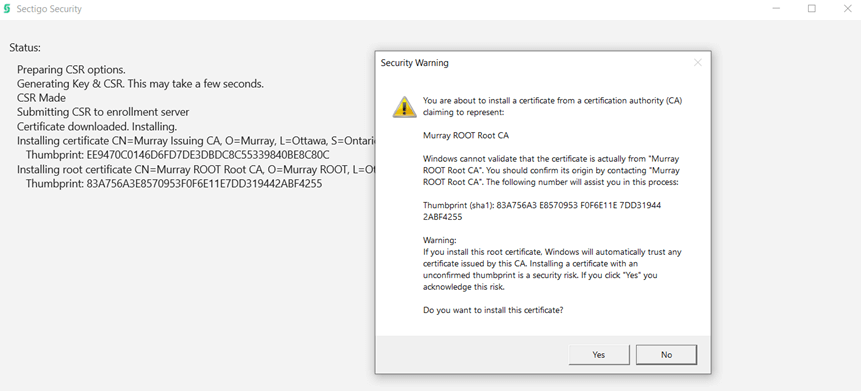
Successful certificate creation will show the root certificate window to import to the Trusted Certificate Authorities store.
-
Click Yes to install the root certificate.
-
Click Close to exit the window.
-
Open to confirm the import of the SSL certificate to the Personal Store and root certificate in the Trusted CA store.
If the Windows store has a valid certificate previously imported, then clicking the link from the email will show a page with list of enrolled certificates. To enroll a new SSL certificate, click Add (+) and repeat the steps above.
Enroll a client certificate
-
Log in to your Windows system.
-
Log in to SCM as a mrao or admin.
-
Select .
-
Select the newly created client enrollment form and copy Endpoint URL.
-
Open a supported browser and paste the client enrollment endpoint URL.
Depending on the authentication method(s) selected during the account creation, an authentication page will appear with selected options. This example was configured with all authentication methods:
-
If email authentication is selected, and a valid email address is added to the field for client certificate creation, an email with a link to complete the certificate enrollment will be sent to the entered email address.
-
If the email address provided is valid, then you will receive an email as follows.
-
-
Click the link provided in the email to authenticate to the client service using the access code shared securely with you by your administrator.
Successful authentication and authorization will open the following page for certificate details selection.
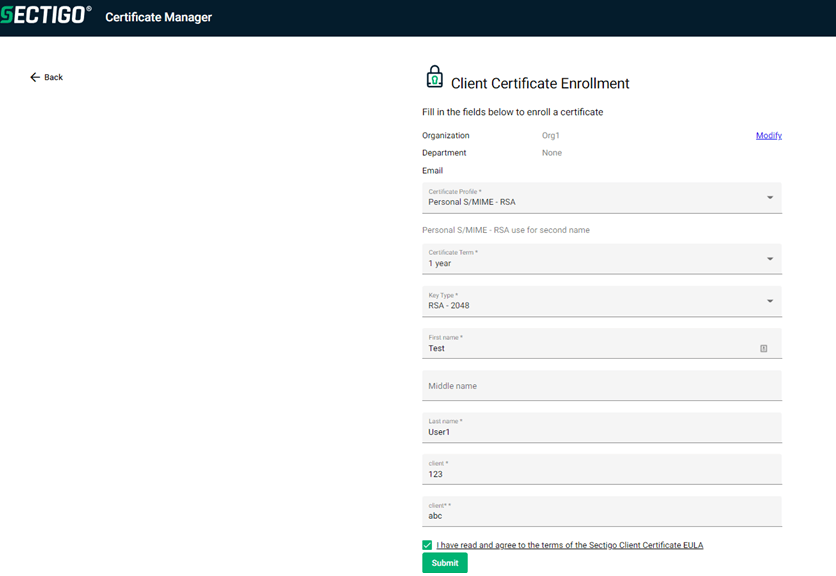
-
Accept the terms of the Sectigo EULA.
-
Click Submit.
-
Click Open URL:sectigogen.
An asymmetric key pair is generated in TPM, and a CSR is created, sent to the Sectigo backend for certificate enrollment, and imported to the Windows store.
Successful certificate creation will show the root certificate window to import to the Trusted Certificate Authorities store.
-
Click Yes to install the root certificate.
-
Click Close to exit the window.
-
Open to confirm the import of the client certificate to the Personal Store and root certificate in the Trusted CA store.
If the Windows store has a valid certificate previously imported, then clicking the link from the email will show a page with list of enrolled certificates. To enroll a new client certificate, click Add (+) and repeat the steps above.

Enroll a device certificate
-
Log in to your Windows system.
-
Log in to SCM as a mrao or admin.
-
Select .
-
Select a device enrollment form and copy Endpoint URL.
-
Open a supported browser and paste the device enrollment endpoint URL. Depending on the authentication method(s) selected during the account creation, an authentication page will appear with selected options. This example was configured with all authentication methods.
-
If email authentication is selected, and a valid email address is added to the field for client certificate creation, an email with a link to complete the certificate enrollment will be sent to the entered email address.
-
If the email address provided is valid, then you will receive an email as follows.
-
-
Click the link provided in the email to authenticate to the client service using the access code shared securely with you by your administrator.
Successful authentication and authorization will open the following page for certificate details selection.
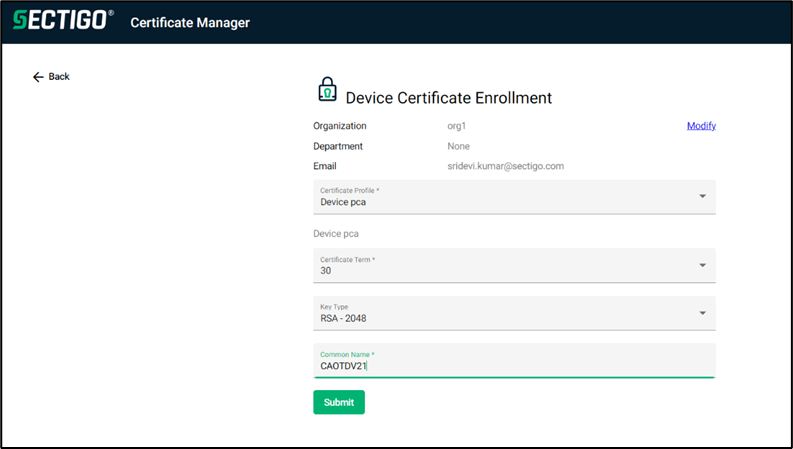
-
Accept the terms of the Sectigo EULA.
-
Click Submit.
-
Click Open URL:sectigogen.
An asymmetric key pair is generated in TPM, and a CSR is created, sent to the Sectigo backend for certificate enrollment, and the certificate is saved to the personal store of the local computer.
Successful certificate creation will show the root certificate window to import to the Trusted Certificate Authorities store.
-
Click Yes to install the root certificate.
-
Click Close to exit the window.
-
Open to confirm the import of the device certificate to the Personal Store and root certificate in the Trusted CA store.
If the Windows store has a valid certificate previously imported, then clicking the link from the email will show a page with list of enrolled certificates. To enroll a new device certificate, click Add (+) and repeat the steps above.
IdP authentication
If IdP authentication is selected (see Create a new SSL, client, or device enrollment form), the following page will be shown for IdP authentication using SAML. Contact Sectigo Sales team for more information on IdP integration to use SAML based IdP authentication.
Client certificate validation
-
Open Microsoft Management Console (
mmc.exe) from Windows Start. -
Select .
-
Select .
You can see a new certificate created on the username selected during the authentication.
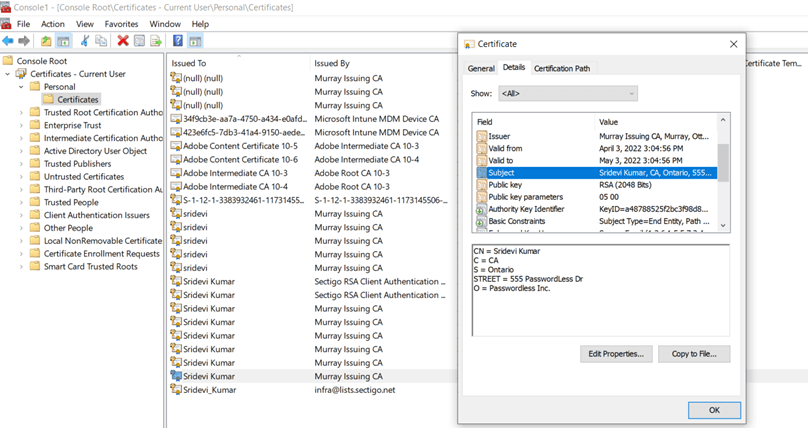
The client certificate is now available on the system to be used for SMIME and Client authentication purposes.
Select Trusted Root Certificate Authorities and Intermediate Certificate Authorities from Console Root to see the Root and Issuing CA certificates imported to the stores.
If you encounter any issues or problem when using Sectigo Security Client on your system, contact Sectigo Support.
Device certificate validation
-
Open Microsoft Management Console (
mmc.exe) from Windows Start. -
Select .
-
Select .
You can see a new certificate created on the username selected during the authentication.
The device certificate is now available on the system to be used for device authentication purposes.
Select Trusted Root Certificate Authorities and Intermediate Certificate Authorities from Console Root to see the Root and Issuing CA certificates imported to the stores.
If you encounter any issues or problem when using Sectigo Security Client on your system, contact Sectigo Support.
TPM enrollment validation
You can validate that the key was enrolled into a TPM using the following command.
certutil -user -store MyThis will dump all certificates and key info from the user’s Personal Certificate store. The output should be as follows.
================ Certificate 1 ================
Serial Number: 63d72d7e8e5ec754e3f7473e7663287d
Issuer: CN=Murray Issuing CA, O=Murray, L=Ottawa, S=Ontario, C=CA
NotBefore: 2022-03-29 12:25 PM
NotAfter: 2022-04-28 12:25 PM
Subject: CN=Murray Brown, C=CA, L=Kanata, S=Ontario, STREET=Suite 501,
STREET=300 March Road, O=Sectigo, PostalCode=K2K 2E2
Non-root Certificate
Cert Hash(sha1): 8e424c0497024a6663abdcf54a48e907387aee07
Key Container = tp-8913cbd9-9d93-466e-87b5-c3912e9d2af7
Unique container name:
C:\Users\admin\AppData\Local\Microsoft\Crypto\PCPKSP\6a05f691b169a07a2
8dac0df4ca6c4ce7edc04ca\d671752f9bfd7e84f64afdef946ec14b89dec491.PCPKE
Y
Provider = Microsoft Platform Crypto Provider
Private key is NOT exportable
Encryption test passed
Note the Provider is "Microsoft Platform Crypto Provider" and key is
not exportable.
The Key Container is also a giveaway. The container name can be seen in other tools that show TPM data.