Security Report
The Security Report tab provides a summary of your website’s security status.
It can be accessed through your WordPress admin dashboard by navigating to SiteLock and selecting the Security Report tab.
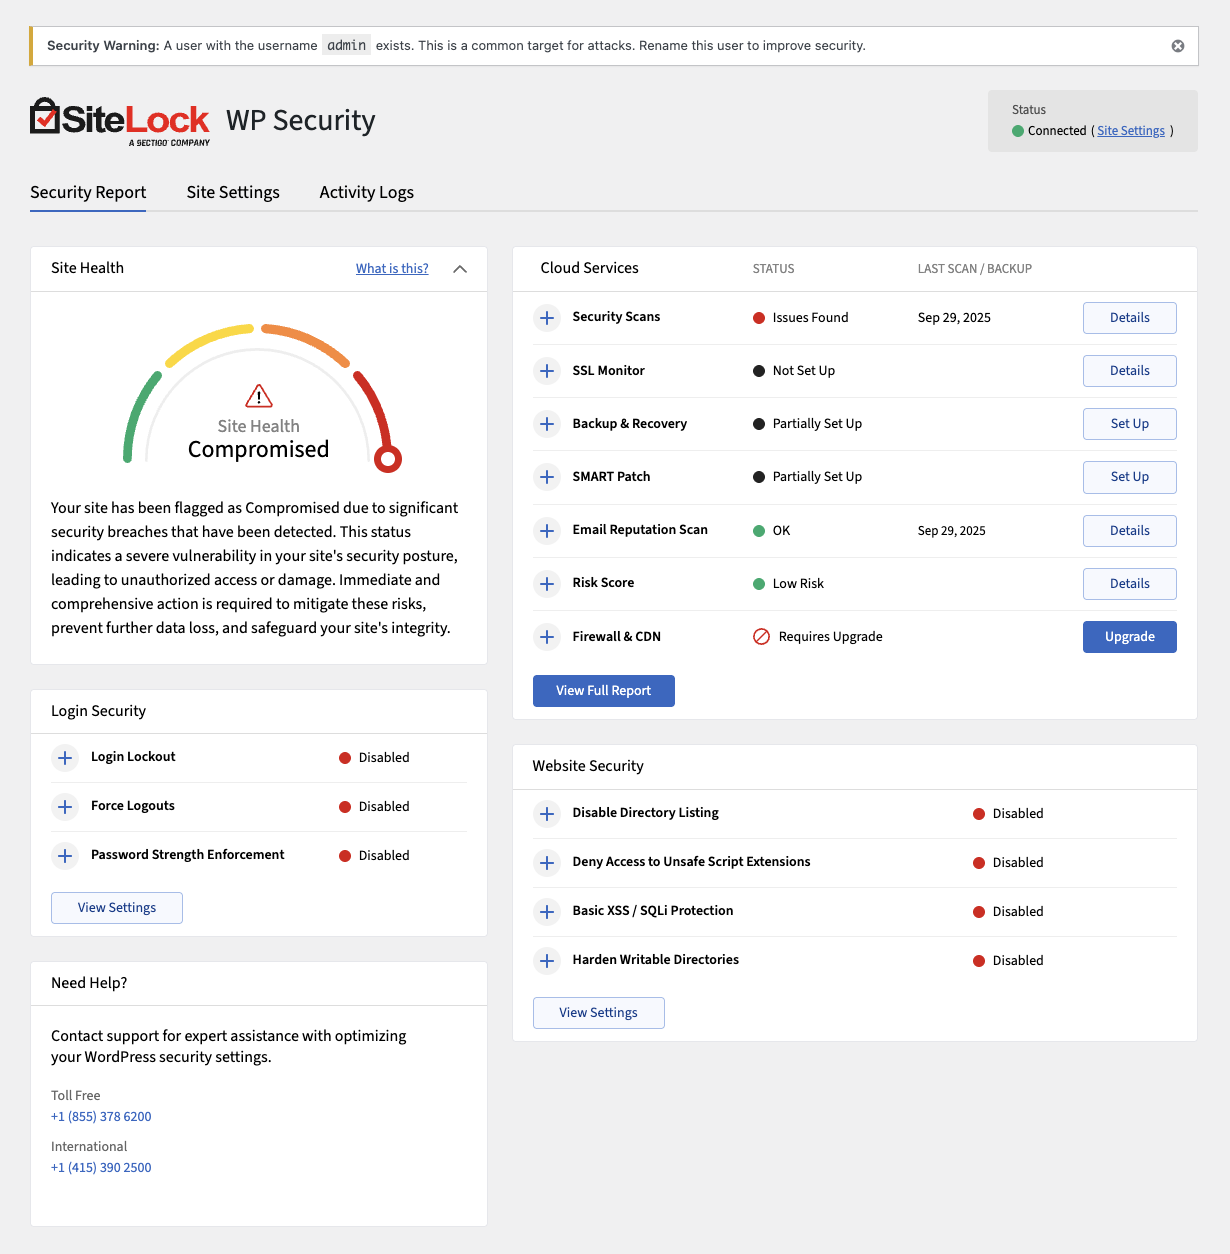
Understand the Security Report
The Security Report is divided into several panels:
-
Site Health
-
Cloud Services
-
Login Security
-
Website Security
-
Need Help?
Login Security
Login Security lists security features to help protect your WordPress admin login from unauthorized access and weak credentials.
The following table describes the details and controls of the Login Security panel.
| Element | Description |
|---|---|
2FA (Two-Factor Authentication) |
Adds an extra layer of security to user logins by requiring a second form of verification (such as a code from an authenticator app) in addition to the password. |
Login Lockout |
Blocks users after repeated failed login attempts. |
Force Logouts |
Automatically logs out users after a set time for better security. |
Password Strength Enforcement |
Requires users to create strong passwords. |
Status |
Shows whether each feature is activated or deactivated, and available statuses are:
|
Actions |
|
View Settings |
Opens the Site Settings tab to configure options for each feature in Login Security. |
Website Security
Website Security lists features that help protect your WordPress site from common exploits and vulnerabilities.
The following table describes the details and controls of the Website Security panel.
| Element | Description |
|---|---|
Disable Directory Listing |
Prevents attackers from browsing files in directories. |
Deny Access to Unsafe Script Extensions |
Blocks access to potentially dangerous script file types. |
Basic XSS/SQLi Protection |
Blocks basic cross-site scripting and SQL injection attempts. |
Harden Writable Directories |
Restricts write permissions on sensitive directories to prevent unauthorized changes. |
View Settings |
Opens the Website Security settings tab to configure options. |
Status |
Shows whether each feature is activated or deactivated, and available statuses are:
|
Actions |
|
View Settings |
Opens the Site Settings tab to configure options for each feature in Website Security. |
Site Health
Site Health represents the overall health of your website in a chart.
The health of your website is calculated based on the results of all the security scans performed by SiteLock, which checks for vulnerabilities, configuration issues, and overall protection.
The following table describes each possible health status:
| Element | Description |
|---|---|
Requires Activation |
There is no active SiteLock account connected to the plugin and there have been no scans performed. Activate your SiteLock account to access the security features and improve your site health. |
Analyzing |
Your site is undergoing a detailed analysis to assess its security posture and identify potential vulnerabilities or threats. |
Healthy |
Your site’s security is in excellent condition. No malware, vulnerabilities or configuration issues were detected. |
At Risk |
Your site has low-severity threats in one of your web applications. These threats can allow attackers to alter or inject content. This status may also indicate incomplete SiteLock configuration. Address these issues promptly to prevent further infections. |
Impaired |
Your site has moderate-severity threats that can allow attackers access to files or databases and inject unwanted content. Immediate action is required. |
Compromised |
Significant security breaches have been detected. Unauthorized access or damage has occurred. Take immediate and comprehensive action to mitigate threats and protect your site’s integrity. |
Actions |
|
Activate Free Account |
Activate your SiteLock account to access SiteLocks security features and improve your site health. |
Compare Plans |
Open a comparison of SiteLock plans and features. |
Cloud Services
Cloud Services lists services that provide advanced protection for your website.
| The features available under Cloud Services depend on your SiteLock plan, and the status of each service will indicate if you need to upgrade your plan to access it. |
The following table describes the details and controls that may be present in Cloud Services.
| Service | Description |
|---|---|
Security Scans |
Summary of the latest scan results. Expanding this panel will display the summarized results of the latest scans for the following features:
|
SMART Patch |
Automatically applies patches to detected vulnerabilities. |
Email Reputation Scan |
Provides the status of the website’s email reputation, including any detected issues such as blacklisting. |
Firewall/CDN |
Provides the Web Application Firewall (WAF) and Content Delivery Network (CDN) status. |
Backup & Recovery |
Provides automated file and database backups and recovery options to protect your website data. |
SSL Monitoring |
Monitors your SSL certificates for validity and expiration. |
Risk Score |
A calculated value representing the overall risk level of the website based on detected vulnerabilities and configuration. The possible scores are:
|
Status |
Shows the current status of each service. The possible statuses are:
After activating the free plan, the status may change to:
|
Last Scan |
The date and time of the most recent scan for each service. |
Actions |
|
Learn More |
Expands the section to provide more details about the service and its benefits. Clicking Pick a Plan from the menu will redirect you to the pricing page to choose a SiteLock plan that includes the service. |
Activate Free Account |
Redirects you to activate your free SiteLock account to access the service. |
Get your license key now |
Retrieve your SiteLock license key if you have already purchased a plan but have not connected your SiteLock account to the plugin. |
Details |
Opens a page in the SiteLock dashboard, where you can view detailed information about the service and configure its settings. |
Set Up |
Opens the Setup Wizard to guide you through the process of configuring the service. |
Upgrade |
Redirects you to a page with contact information you can use to upgrade your account and access the service. |
View Full Report |
Open a detailed security report for your website, providing insights into vulnerabilities, threats, and overall site health. |
Resolve security warning for admin username
If your website has an admin username, a Security Warning banner will be displayed in the Security Report tab, indicating that having an admin username poses a security risk.

To resolve the issue, follow these steps:
-
In the left-hand menu of your WordPress Admin Dashboard, click Users.
-
From the menu, select All Users.
-
In the top-right corner, click Add New.
-
Fill in the following details for the new user:
-
Username — Choose a unique username that is not
admin. -
Email — Enter a valid email address.
You need an email address that is different from the adminemail. You can change the email address back to the originaladminemail after deleting theadminuser. -
Role — Assign the new user the same role as the
adminuser (such as Administrator). -
Password — Create a strong password for the new user.
-
-
Click Update User to save the new user account.
-
Log out of your WordPress admin dashboard and log back in using the new user credentials you just created.
-
Navigate to Users > All Users again.
-
Locate the original
adminuser account and click Delete. -
Beside Attribute all content to, select the new user account you created.
-
Click Confirm Deletion to remove the
adminuser account.
After completing these steps, the Security Warning banner should no longer appear, and your site will be more secure against common attacks targeting the admin username.