Configuring the connector
This page describes how to configure the connector to automate certificate lifecycle management.
Extract the package contents
| To upgrade an existing configuration to a new version of the Palo Alto agent, see Upgrade to a new version. |
-
Log in to your Linux client machine as a user with administrator privileges.
-
Create a new directory called
sectigosomewhere on your machine and place the integration package in the newly created directory. The following commands assume that the package is located inopt/sectigo. -
Navigate to
/opt/sectigoand execute the following commands (you don’t need to install the unzip utility if you already have it).
Install the dependencies
-
Navigate to the
sectigo-paloaltofw-agent_<version>/paloaltofwdirectory. -
Install the Python dependencies listed in the
requirements.txtfile.We recommend that you install Python packages into a virtual environment. The following instructions are Ubuntu-specific.
sudo apt install python3.8-venv
python3 -m venv .venv
source .venv/bin/activate
pip3 install -r requirements.txt
The following instructions are Ubuntu-specific.
sudo apt update
sudo apt install python3-pip
pip3 install -r requirements.txt
Set up the SCM credentials file
Configure the scm.yaml file in the profiles_sample directory.
If needed, create an additional account entry in the file for each additional SCM account used.
SCMDV:
    sectigo_cm_user_id: "b8923830-11f5-4c34-951b-fc1235634972"
    sectigo_cm_user_secret: "Ti]hXzuxj.!T,zg!S0rZ0StbwyDlhCP4"
    sectigo_cm_url: "https://murray.enroll.demo.sectigo.com/api/vl"
The following table describes parameters in the file.
| Parameter | Description |
|---|---|
|
An arbitrary credentials label.
This label is referenced in the |
|
The client ID of the SCM user |
|
The client secret of the SCM user |
|
The URL of the SCM account. |
Create PaloAlto API key
Add PaloAlto dedicated admin user (recommended)
The connector will use max-scoped partial commits (per-admin + area exclusion), but best practice is for you to create a dedicated admin user exclusively for the connector. This gives the strongest possible commit isolation. The dedicated admin user is the one whose API key will be detected by the connector and configured.
-
Navigate to your UI in either Panorama or PaloAlto Firewall (PanOS).
-
In the left nav, select Administrators.
-
Select the admin ID and click Add.
-
Use your new admin user ID to generate an API key.
Generate PaloAlto API key
To interact with the Palo Alto Networks firewall programmatically, you first need to generate an API key. This key replaces username and password authentication in subsequent API calls, making automation more secure and efficient.
Example curl command:
curl -k -X POST 'https://<firewall-ip>/api/' \
  -d 'type=keygen' \
  -d 'user=<admin-username>' \
  -d 'password=<admin-password>'
Set up the Palo Alto firewall profile file
Configure a Palo Alto firewall profile file.
This file specifies the target firewall to which a certificate will be attached.
A sample fw_paloalto_config.yaml file is located in the profiles_sample directory.
A single firewall profile can be used as target in multiple certificate profiles.
You can have as many firewall profile files as you want.
All filenames must start with fw_.
| The API key must be generated under the dedicated admin user account that the customer wants the connector to use (since the connector now relies entirely on the API key to identify the user). We recommend that you create a separate user on Palo Alto specifically for API operations. |
paloalto_url : "https://my_paloalto_instance.com/"
paloalto_api_key : "gJlQWE56987nBxIqyfa62sZeRtYuIo2BgzEA9UOnlZBhU=="
paloalto_commit_description : "Sectigo Palo Alto commit"
The following table describes parameters in the file.
| Parameter | Description |
|---|---|
|
The FQDN or IP address of the firewall instance |
|
The API key for authenticating API calls to Palo Alto. See Get Your API Key for instructions on generating an API key. |
|
An arbitrary description for a commit of configuration changes |
Set up the certificate profile file
Configure a certificate profile file for a firewall instance.
A sample certificate.yaml file is located in the profiles_sample directory.
You can have one or more certificate profiles for each firewall profile.
You can give any name to the certificate profile file and it will be used as the certificate name inside the Palo Alto firewall.
|
We recommend that you keep the certificate template files outside the connector’s directory on the client machine.
Use the |
paloalto_fw_profile: "fw_paloalto_config"
scm_credential_detail : "SCMDV"
sectigo_ssl_cert_type: DV
sectigo_ssl_cert_comments: Certificate for Palo Alto Firewall
sectigo_ssl_cert_external_requester: "[email protected]"
sectigo_ssl_cert_subject_alt_names: "example.com", "www.example.com", "192.168.0.101"
sectigo_csr_domain: "www.example.com"
sectigo_csr_country: "CA"
sectigo_csr_state: "ON"
sectigo_csr_location: "Ottawa"
sectigo_csr_organization: "JohnDoe"
sectigo_csr_key_type: "RSA"
sectigo_csr_key_size: 3072
sectigo_force_renewal: False
sectigo_expiry_window: 30
sectigo_auto_renew: true
# Single template
panorama_template: "TemplateName"
# Multiple templates
panorama_template: ["TemplateOne", "TemplateTwo"]
panorama_push_to_devices: false
The following table describes parameters in the file.
| Parameter | Description |
|---|---|
|
The name of the firewall profile file |
|
The credentials ID (label) from the |
|
The type of the SSL certificate. The possible values are |
|
(Optional) Comments for certificate enrollment |
|
The email address of the external certificate requester included in the emailAddress field |
|
A comma-separated list of subject alternative names (SAN) included in the certificate subjectAltName field |
|
The domain name included in the certificate Common Name (CN) field |
|
The country name included in the certificate Country (C) field |
|
The state or province name included in the certificate State (ST) field |
|
The locality name included in the certificate Locality (L) field |
|
The organization name included in the certificate Organization (O) field |
|
The key algorithm to use for certificate enrollment. The possible values are |
|
The key size to use for certificate enrollment. The possible values are:
|
|
Specifies whether to forcibly renew a certificate, even though it’s not yet expired. The possible values are |
|
The number of days prior to expiration that a certificate renewal process is initiated. The default expiry window is |
|
Specifies whether to renew a certificate automatically. The possible values are |
|
(Optional) The name of the Panorama template (or list of templates) to import the certificate into. Accepts either a single template name as a string, or multiple templates as a list. When multiple templates are specified, the same certificate is imported into each listed template, and (if |
|
(Optional) When set to Requires |
Multiple templates
When you have multiple Panorama templates:
-
A single CSR is generated using the first template in the list as the primary context.
-
One enrollment to SCM produces one certificate ID.
-
The same certificate is imported into every listed template.
-
A single partial commit covers all template imports (admin-scoped, isolation preserved).
-
If
panorama_push_to_devices=true, the connector performs commit-all for each template individually. -
It is backward compatible, existing single-template configurations continue to work without changes.
-
This applies to enroll, renew, and replace.
Set up the config file
Configure the config.yaml file in the profiles_sample directory.
sectigo_log_file : "sectigo_pycert.log"
sectigo_log_path : "/opt/sectigo/paloaltofw/logs"
cert_profile_path : "/opt/sectigo/paloaltofw/profiles_sample"
sectigo_log_level : debug
sectigo_log_size_mb : 1
sectigo_logger_count : 10
sectigo_sleep_download : 1
sectigo_encrypt_credentials : False
sectigo_gnu_key : "02C5433F6789F1390EBA00C4316B3F25AD25DBE0"
The following table describes parameters in the file.
| Parameter | Description |
|---|---|
|
The name for the log file.
When the log file reaches its maximum size as specified in |
|
The path to the directory that hosts the log files. If you are on Windows, use a double backslash as a separator ( |
|
The path to the directory that hosts the certificate and firewall profile files. If you are on Windows, use a double backslash as a separator ( |
|
The log level.
The supported values are |
|
The maximum size (in megabytes) of a log file.
The default value is |
|
The maximum number of log files.
The default value is |
|
The time (in seconds) between an enrollment request and an attempt to dowload the provisioned certificate files |
|
Specifies whether to encrypt the credentials.
The possible values are |
|
The GPG key for encrypting the credentials.
This parameter has effect if |
Encrypting the credentials file
The connector can work with plaintext or encrypted configuration files. If you prefer to store your SCM and Palo Alto credentials in an encrypted form, you need to install the GPG command-line tool and SOPS editor of encrypted files.
| Encrypting the SCM secret and Palo Alto API key is an optional but recommended step to protect your credentials from unauthorized access. |
Install GPG
Run the following commands to install GPG (GNU Privacy Guard). The last two commands let you generate some randomness required to generate a key.
|
To check whether GPG is installed on the system, run |
sudo apt-get install gnupg
sudo apt-get install rng-tools
sudo sed -i -e 's|#HRNGDEVICE=/dev/hwrng|HRNGDEVICE=/dev/urandom|' /etc/default/rng-tools
sudo service rng-tools start
GPG_TTY=$(tty)
export GPG_TTY
sudo yum install gnupg
sudo yum install rng-tools
sudo sed -i -e 's|#HRNGDEVICE=/dev/hwrng|HRNGDEVICE=/dev/urandom|' /etc/default/rng-tools
sudo service rng-tools start
GPG_TTY=$(tty)
export GPG_TTYInstall SOPS
Install the SOPS editor for encrypting and decrypting the credentials.
|
To check whether SOPS is installed on the system using the |
Encrypt the credentials file
-
Change the value of the
sectigo_encrypt_credentialsparameter in theconfig.yamlfile toTrue. -
Create a private key.
gpg --batch --passphrase '' --quick-gen-key $(whoami) default defaultThe
--quick-generate-key optionrequires you to specify the user ID field on the command line and optionally an algorithm, usage, and expire date. Default values are used for all other options.gpg --full-generate-keyThe
--generate-keyoption prompts for the real name and email fields before asking for a confirmation to proceed, and provides a dialog for all options. -
Retrieve the key fingerprint.
gpg -list-keys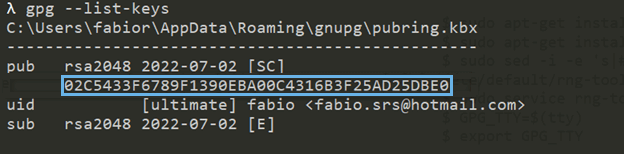
-
Add the fingerprint to the
sectigo_gnu_keyparameter inconfig.yaml. -
Encrypt the credentials.
Upgrade to a new version
When a new version of the Palo Alto agent is released, there is no need to re-configure. You can install the new package and bring your config and profiles over from the old folder.
-
Extract the new package into a new folder.
unzip sectigo-paloaltofw-cm-vYY.MM.NN.zip -d paloaltofw-new -
Copy your existing config and profiles from the old folder:
cp paloaltofw/config/config.yaml  paloaltofw-new/config/
cp -r paloaltofw/profiles_sample/*.yaml   paloaltofw-new/profiles_sample/
If you set a custom cert_profile_pathinconfig.yaml, copy that folder instead ofprofiles_sample/. -
Install Python dependencies in the new folder.
cd paloaltofw-new
pip3 install -r requirements.txt
Your config.yaml, certificate profiles, firewall profiles, and SCM credentials will carry over.
Encrypted credentials (SOPS/GPG) continue to work since the keys live in your GnuPG keyring, not in the package.
If a release ever requires extra steps (e.g. a new mandatory config field), it will be noted in the release notes.