Configuring the connector
This page describes how to configure the connector and related services to automate the certificate lifecycle management on HAProxy load balancers.
Validate the domains
-
Log in to SCM at
https://cert-manager.com/customer/<customer_uri>with the MRAO administrator credentials provided to your organization.Sectigo runs multiple instances of SCM. The main instance of SCM is accessible at
https://cert-manager.com. If your account is on a different instance, adjust the URL accordingly. -
(Optional) Navigate to the Organizations page to see if an organization with departments already exists. On this page you can create a new organization or add departments to an existing organization.
To add an organization:
-
Click Add.
-
Complete the fields with the organization’s details, then click Next.
-
Configure settings for specific types of certificates.
-
Click Save.
-
Select the newly created organization from the list of organizations.
-
Click Add Department and complete the fields with the department’s details.
-
Click Validate to start the validation process for this organization.
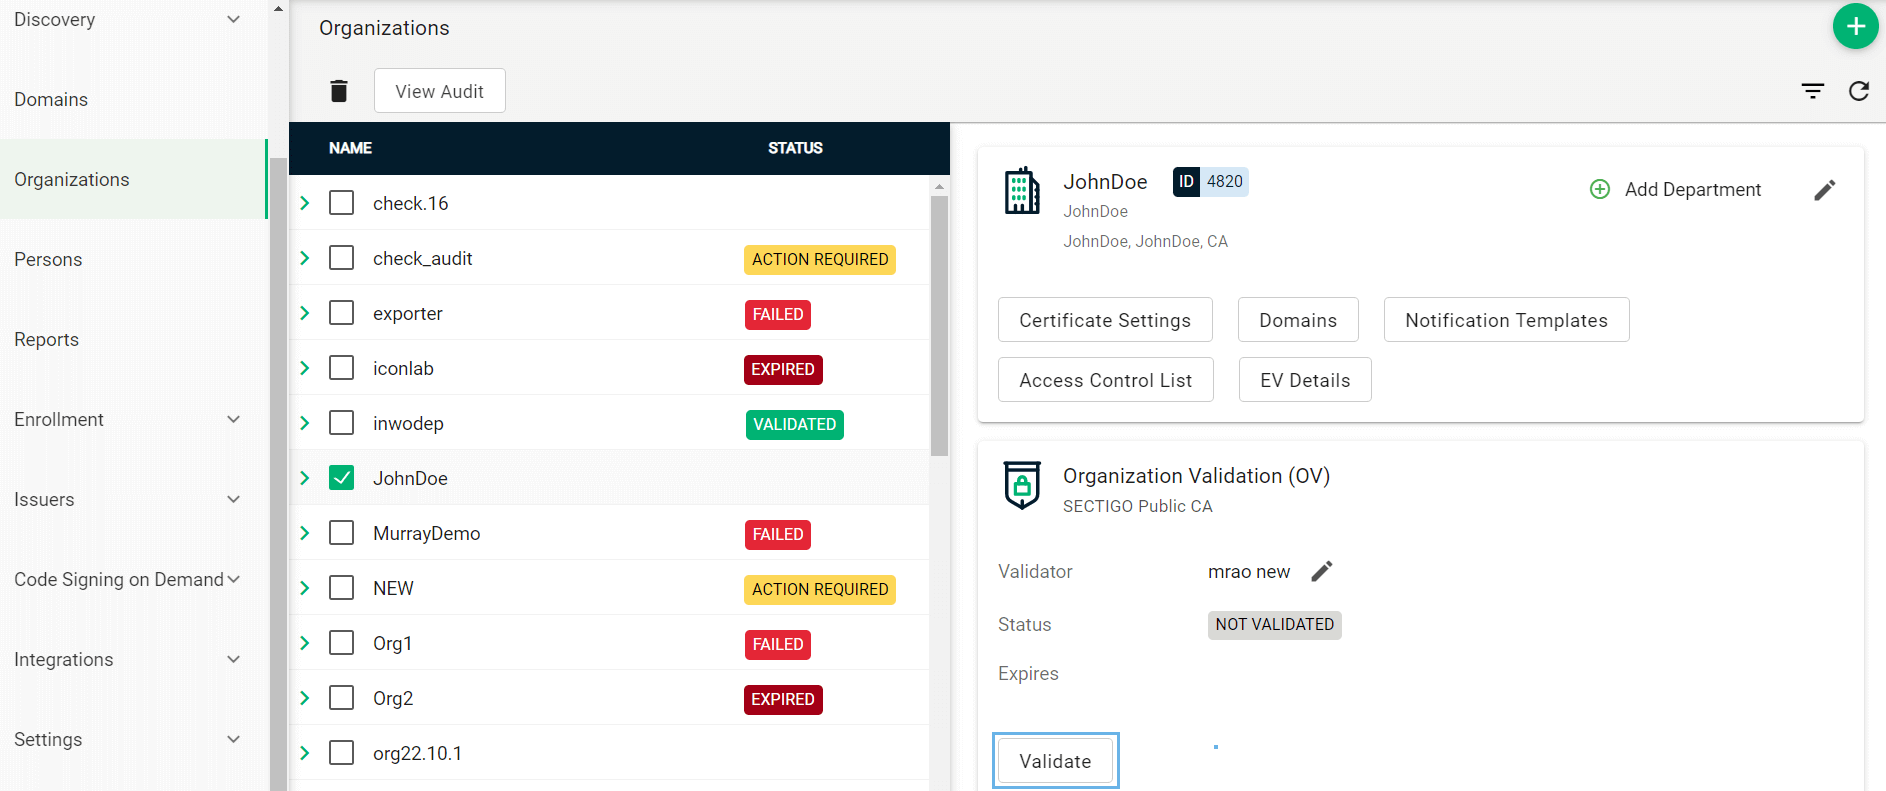
-
-
Navigate to the Domains page.

-
To create a new domain entry, click Add.
-
Specify the domain name, select the organizations/departments to delegate the domain to, and the allowed certificate types.
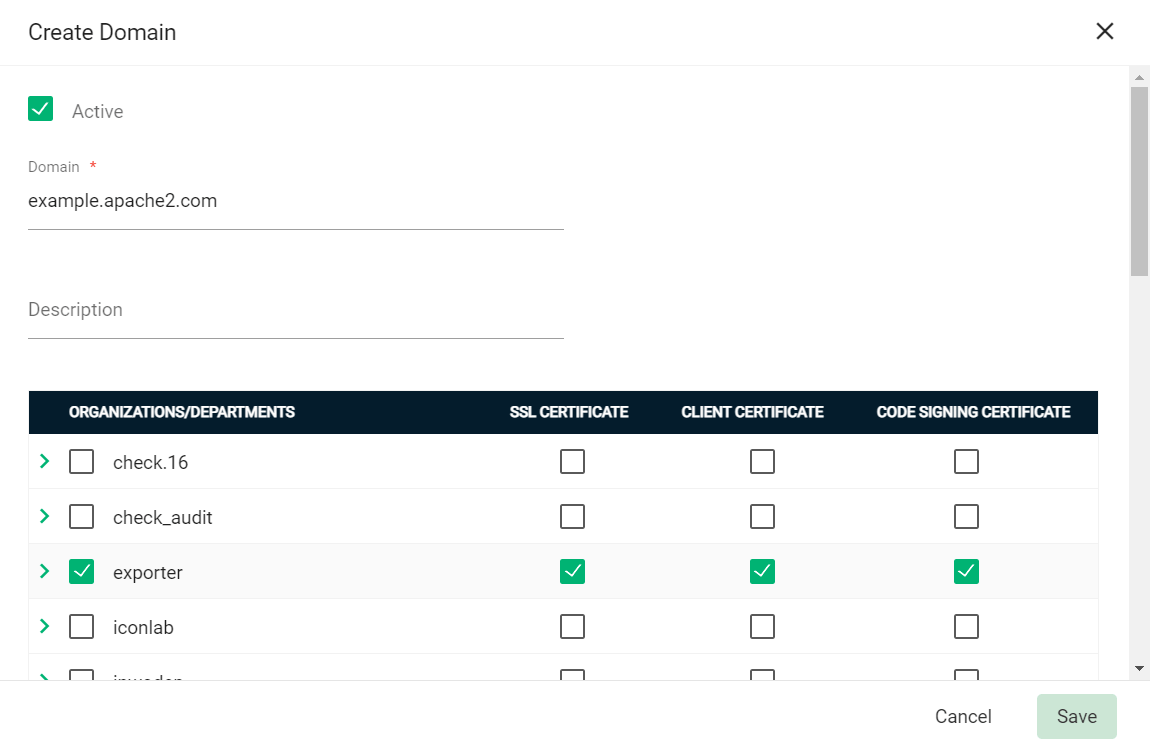
-
Click Save.
-
If your organization or department requires delegations to be approved:
-
Select the newly created domain from the list of domains.
-
Click Approve Delegations.

-
Select the organization or department, then click Approve.
To change the organization or department which the domain is delegated to, click Delegate and select the appropriate Organizations/Departments.
-
-
(Public CA only) Validate your domain:
-
Select your domain and click Validate.

-
Select the appropriate DCV method as per your initial setup.
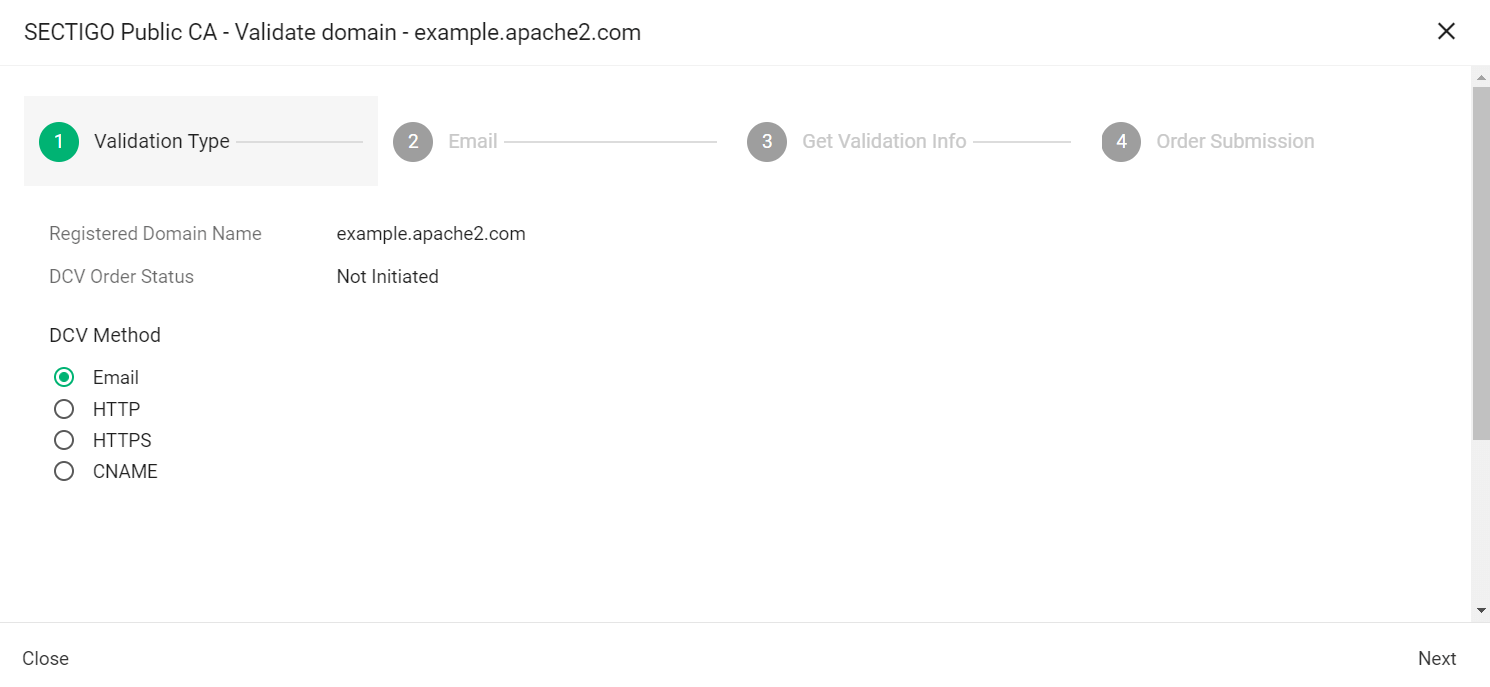
The following steps assume that you selected Email as the DCV method. -
Click Next.
-
In Select an email address, select a registered email.
-
Click Submit.
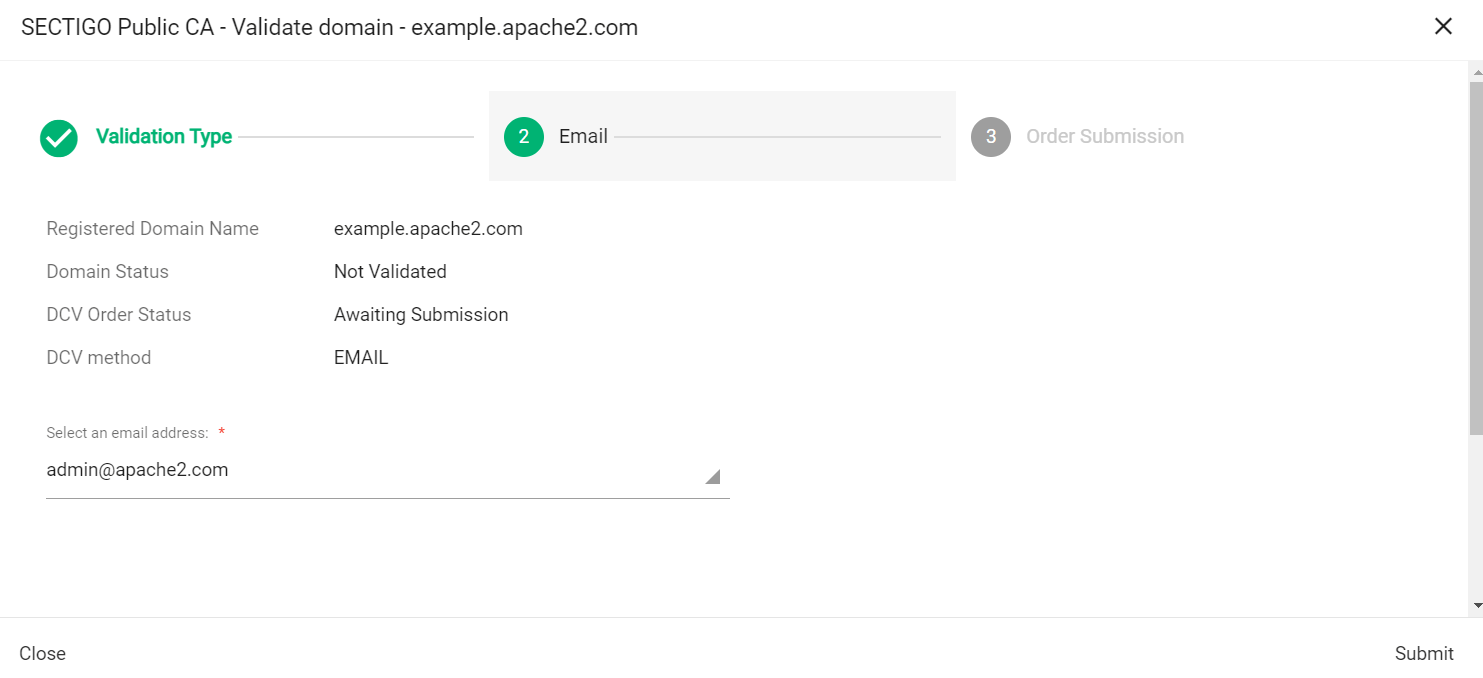
A message confirms that the validation letter was sent to your selected email.
-
Click OK.
-
Follow the instructions provided in the email to validate your domain.
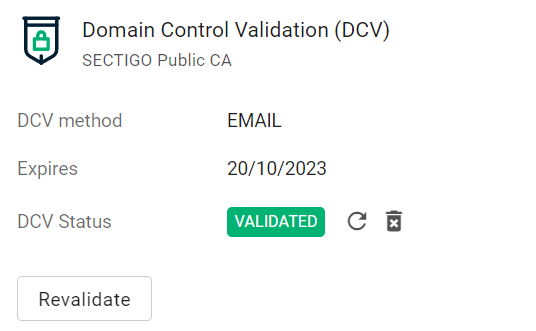
Once the domain is validated, its Status will change to Validated on the Domains page.
-
Create an ACME account and obtain the EAB values
-
Log in to SCM at
https://cert-manager.com/customer/<customer_uri>with the MRAO administrator credentials provided to your organization.Sectigo runs multiple instances of SCM. The main instance of SCM is accessible at
https://cert-manager.com. If your account is on a different instance, adjust the URL accordingly. -
Navigate to .

-
Select your ACME endpoint.

-
Click Accounts.
-
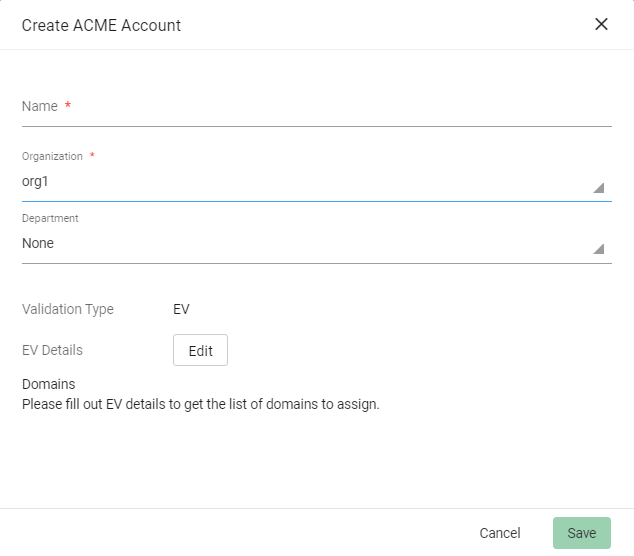
Click Add and provide the following details:
-
Name: A name for the ACME account
-
Organization: The organization to be associated with the ACME account
-
Department: (Optional) The department to be associated with the ACME account
-
-
Click Save.
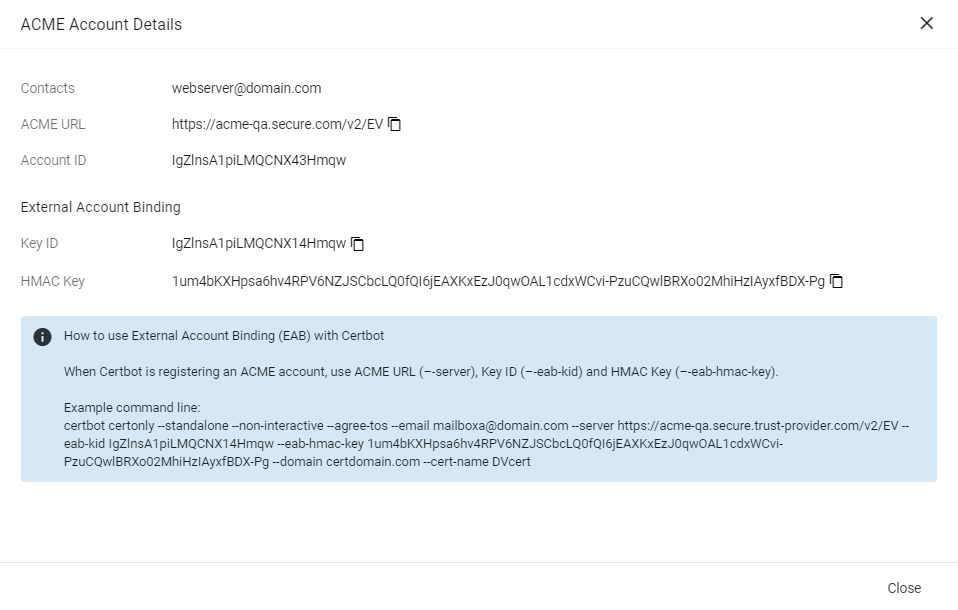
External Account Binding (EAB) is now created for the new ACME account.
-
Make a note of the following ACME account details for client registration:
-
ACME URL
-
Key ID
-
HMAC Key
-
-
Click Close.
Extract the contents
-
Extract the contents of the
sectigo-haproxy-connector-<version>.ziparchive to the current path. -
Navigate to the root directory containing the solution files.
-
Give execute permission to the
sectigo-haproxy-connectorfile.chmod +x ./sectigo-haproxy-connector
Set up the certificate profile file
Configure the certificates.yml file in the configs directory.
sectigo:
  commonParams:
    country: US
    province: Texas
    locality: Texas
    organization: Sectigo
  certificates:
    - frontendName: www-https
      commonName: john-doe.com
      comments: frontend www-https
      subjAltNames: ["john-doe.com","www.john-doe.com"]
      externalRequester: "[email protected]"
      renewBeforeDays: 30
      keyType: RSA
      keySize: 2048
      forceRenew: no
    - frontendName: jane-https
      commonName: jane-doe.com
    ...
The following table describes the parameters in the file.
| Parameter | Description |
|---|---|
|
The country name included in the certificate Country (C) field |
|
The state or province name included in the certificate State (ST) field |
|
The location name included in the certificate Locality (L) field |
|
The organization name included in the certificate Organization (O) field |
|
The name of the HAProxy frontend section. For more information, see Frontend. |
|
The domain name included in the certificate Common Name (CN) field |
|
(Optional) Comments for certificate enrollment |
|
A comma-separated list of subject alternative names (SAN) included in the certificate subjectAltName field |
|
The email or a comma-separated list of emails of the certificate requester |
|
The number of days prior to expiration that a certificate renewal process is initiated.
The default expiry window is |
|
The key algorithm to use for certificate enrollment.
The possible values are |
|
The key size to use for certificate enrollment. The possible values:
|
|
Specifies whether to force the renewal of a certificate.
For example, you can use this parameter to renew a certificate issued by a Microsoft CA which doesn’t provide the required OSCP URL.
The possible values are |
Configure the connector
The connector can work with plaintext or encrypted ACME credentials.
To reduce the amount of manual, error-prone configuration, particularly for encryption, it offers a prompt where you can type answers on the command line to specify the HAProxy Data Plane API credentials, ACME credentials, whether to encrypt the ACME credentials, and other configuration details.
The solution creates an scm.yml file in the configs directory and populates it with configuration data.
|
To view all available options, run |
Run the connector with the --configure or -c option in the terminal and follow the prompt to provide the ACME credentials, logging level, and certificate directory.
If you choose to encrypt your credentials, this command also creates a key pair in the current directory and encrypts your HMAC key using the public key.
sudo ./sectigo-haproxy-connector --configureAt each prompt, provide the parameters that will define your configuration file. The square brackets indicate an existing or default value, if any. If you want to keep the default setting at a specific prompt, hit Enter.
|
If you type If you keep the default value |
Specify your Sectigo ACME credentials for the SCM configuration file.
Sectigo ACME URL [None]: https://acme-qa.secure.trust-provider.com/v2/DV
Sectigo ACME Key ID [None]: 2a82af7331a11fc8b9ec2793d924b0aa
Sectigo ACME HMAC Key [None]: AqlqlXB9mQoQzrGHmFzLSdbhENiea9RibwyCZoNfXrp7o7A1Yb9pvPwCPFpl7ZBMztc752le8VhCDXyTg5ms68U6
Encrypt ACME HMAC Key (yes / no) [yes]: yes
Log level (panic, fatal, error, warning, info, debug, trace) [info]: info
Configuration file successfully created!

Specify your Data Plane API credentials for the HAProxy configuration file.
HAProxy Data Plane API Username [None]: admin
HAProxy Data Plane Password [None]: adminpwd
Enable HAProxy force restart (yes / no) [no]: yes
Encrypt HAProxy Data Plane API password (yes / no) [yes]: yes
HAProxy configuration file successfully created!
Run the connector with the following command.
./sectigo-haproxy-connectorsectigo:
acme:
apiUrl: "https://acme-qa.secure.trust-provider.com/v2/DV"
kid: "2a82af7331a11fc8b9ec2793d924b0aa"
hmacKey: "4Of1p44zWexJ1lUQcQmozXyisMHEBAGwKOm7V6hqOon+CcpZfudSSXl58shivtyM/GcR1KTm8tjeqPXYcmhcRs0yFjcJSdNtvs7MCso2EotOneAwDLFf7LzshNtMm+vDUP8di1JntaLevRjRiG4m2exUTvxwVQI8NYksizHAp7NdkpsyxOC01Tp2tdZ0Pny4/hI1PL9a2i/9I/l5i7GYm3QOjsARoBSAuCfaN7ntHTN2yrLQEdSBHGeoOTBMUNJBpTcnOv2MGnvFeTivFIRISNO3jJmMwOPrFqdNrM7xux3+lLnAvQn2aECPw4SA5zWj0vwKXRy913LajcVH4NJ06Q=="
timeout: 30
logger:
level: info
encrypted: rsa_key_scm.priThe following table describes the parameters in the scm.yaml file.
| Parameter | Description |
|---|---|
|
The URL of the ACME service |
|
The key ID for external account binding |
|
The HMAC key for external account binding |
|
The timespan to wait before the request times out. If you’re getting a timeout error during an enrollment attempt, increase the value of timeout. The default value is 30 seconds. |
|
The log level to use.
The possible values are |
|
Specifies whether to encrypt the HMAC key |
haproxy:
    configuration-file: /etc/haproxy/haproxy.cfg
    bin: /usr/sbin/haproxy
    backups: 4
    transaction-dir: /tmp/haproxy
    data-plane-api:
        credentials:
            username: admin
            password: warw6LgCa0nPxA6iiYl8txmCSbYEh9dX2Lt7TlmkzIEqWIcesM56CSWOkDkXf6RpQbEhHW0JFHOOCg7bZHajajF1b0eBa5BPxRKVJ62jbSSrL9azPro7e5q4i1IgugXTgX3U84O/ACXPlIUyc2d7kLT/8OzqThxpQMTN8A82iH8nziwC4MW98TZ6unMmIoncCyoruzMPPwW4a/wF3uOGNa+MxnLjdoys6k1L8IoR6reA+nBwyl5AwY6PV2nniDuCOA4jv1L6rhygJJVt0p/I9unLaK197yJkALPKRavCuk0weY1OejfE0xvqUxIWohupiOgbQTCNgmhMEPtUuQgi9A==
        force-reload-enabled: "true"
        root:
            url: http://localhost:5555/v2
        storage:
            url: /services/haproxy/storage/ssl_certificates
        health:
            url: /health
    encrypted: rsa_key_haproxy.pri
Sample HAProxy config file
The following is a sample haproxy.cfg file from the /etc/haproxy/ directory of HAProxy Community.
global
master-worker

defaults unnamed_defaults_1
mode http
timeout http-request 10s
timeout connect 5s
timeout client 10s
timeout server 10s

frontend myfrontend from unnamed_defaults_1
  bind :80
  # the following line redirects HTTP to HTTPS
  http-request redirect scheme https unless { ssl_fc }
  default_backend web_servers

backend web_servers from unnamed_defaults_1
server myserver 127.0.0.1:8000

program api
command dataplaneapi -f /etc/haproxy/dataplaneapi.hcl
no option start-on-reload
Sample Data Plane API config file
The following is a sample dataplaneapi.hcl file from the /etc/haproxy/ directory of HAProxy Community.
dataplaneapi {
  host = "0.0.0.0"
  port = 5555

  user "admin" {
    insecure = true
    password = "adminpwd"
  }

  transaction {
    transaction_dir = "/tmp/haproxy"
  }
}

haproxy {
  config_file = "/etc/haproxy/haproxy.cfg"
  haproxy_bin = "/usr/sbin/haproxy"

  reload {
    reload_cmd  = "service haproxy reload"
    restart_cmd = "service haproxy restart"
    reload_delay = "5"
  }
}