Installation and configuration
This page describes how to configure the connector to automate certificate lifecycle management. The configuration involves validating domains in SCM, creating an ACME account, and defining certificate profile and credentials files.
Create ACME account and obtain EAB values
-
Log in to SCM at
https://cert-manager.com/customer/<customer_uri>with the MRAO administrator credentials provided to your organization.Sectigo runs multiple instances of SCM. The main instance of SCM is accessible at
https://cert-manager.com. If your account is on a different instance, adjust the URL accordingly. -
Navigate to .
-
Select your ACME endpoint.
-
Click Accounts.
-
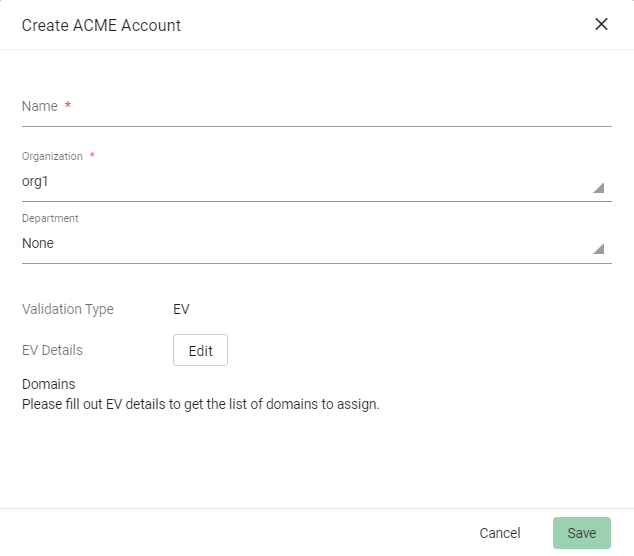
Click Add and provide the following details:
-
Name: A name for the ACME account
-
Organization: The organization to be associated with the ACME account
-
Department: (Optional) The department to be associated with the ACME account

-
-
Click Save.
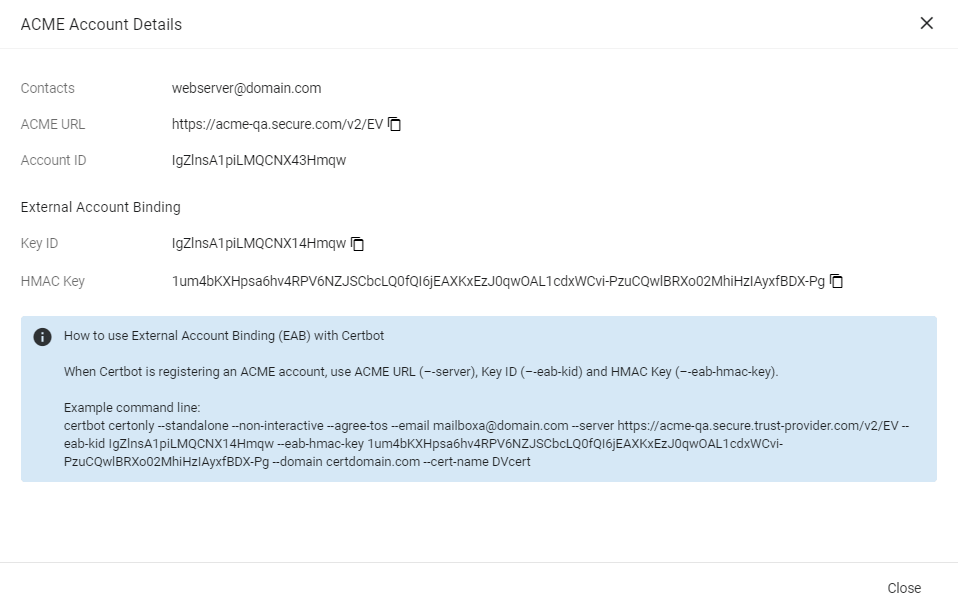
External Account Binding (EAB) is now created for the new ACME account.
Make a note of the following ACME account details for client registration:
-
ACME URL
-
Key ID
-
HMAC Key

-
-
Click Close.
Install the connector
-
Login as
rootto the Linux client machine. -
Navigate to the
/optdirectory. -
Copy the
sectigo-acme-f5-bigip-<version>.tgzfile to the/optdirectory. -
Extract the file to the
/optdirectory.tar xvf sectigo-acme-f5-bigip-<version>.tgzThis will create a subdirectory called
sectigounder/opt. -
Navigate to the
sectigodirectory. -
Run
./install.sh.You can accept EULA automatically by using the
./install.sh --agree-toscommand.
Set up the SCM ACME credentials file
Update the /opt/sectigo/env file with ACME account details corresponding to your account in SCM.
You can have details for one or more ACME accounts, separated with labels.
The default account doesn’t require any label.
Additional accounts inherit parameters and values from the default account, or you can override them.
ACME_URL=https://acme.demo.sectigo.com
ACME_EXTERNAL_ACCOUNT_ID=2a82af7331a11fc8b9ec2793d924b0aa
ACME_EXTERNAL_ACCOUNT_KEY=AqlqlXB9mQoQzrGHmFzLSdbhENiea9RibwyCZoNfXrp7o7A1Yb9pvPwCPFpl7ZBMztc752le8VhCDXyTg5ms68U6
[email protected]
EXPIRY_WINDOW=30

[acme.ov]
ACME_URL=https://acme.secure.trust-provider.com/v2/OV
ACME_EXTERNAL_ACCOUNT_ID=4d31gd7331a11jc8b9ek2783d924b0aa
ACME_EXTERNAL_ACCOUNT_KEY=KulqlMB2mQoQzrGHmFzLSdbhENiea9LibwyCZoDfXpc7o7A1Yb9pvPwCPFpl7ZBMztc752le8VhCDXyTg5ms68U6

[acme.enterprise]
ACME_URL=https://enterprise.acme.sectigo.com
ACME_EXTERNAL_ACCOUNT_ID=6c35hf7351a13fh8d9kc2753l914l0ar
ACME_EXTERNAL_ACCOUNT_KEY=VrlalXB9mJoQzrPHmFjLSubhENiea3RibwyPZoSfHrp7o7A4Yb5pvPwCPFpl2ZBMztc843le8VhCDXyTg5ms68U6
EXPIRY_WINDOW=60
The following table describes the parameters in the env file.
| Variable | Mandatory | Description |
|---|---|---|
|
Yes |
The URL of the ACME service |
|
Yes |
The key identifier (key ID) for EAB |
|
Yes |
The hash-based message authentication code (HMAC key) for EAB |
|
Yes |
An email address for important account notifications |
|
No |
A comment to be added to the |
|
No |
The number of days prior to expiration that a certificate renewal process is initiated. The default value is This is a global parameter that is applied to all certificate profiles.
For per-certificate expiry window control, apply an optional parameter |
|
No |
A user-defined credentials label.
This label is referenced in the |
Set up the certificate profile file
Certificate profiles are YAML files. Each file defines details of a certificate and the configuration for client SSL profiles and virtual servers on a BIG-IP device.
In the project root, there are two certificate profiles:
-
cert_profile_example.yaml— example of a minimal configuration. -
cert_profile_reference.yaml— all possible configuration options with documentation.
You can create copies of these files under any directory, and then edit them to set actual values.
version: v1
devices:
  - host: "3.123.235.15"
    username: "bigip_user"
    password: "s3cr3t"

    common_name: "example.com"
    key_type: RSA
    key_size: 2048

    clientssl_profiles:
      - name: profile_1
        virtualservers:
          - name: virtual_server_1
- name: virtual_server_2| Copy, paste, and edit as needed. Parameters are explained in the table below. |
version: v1
devices:
  - host: "3.123.235.154"
  - ha_hosts:
    - "3.123.235.154"
    - "3.123.235.155"
    username: "bigip_user"
    password: "s3cr3t"
    bigip_partition: "Partition2"

    common_name: "example.com"
    san_domains:
      - "www.example.com"
      - "app.example.com"
    key_type: RSA
    key_size: 2048
    protect_key: yes

    acme_account: acme.ov
    contact_email: "[email protected]"
    force_renew: no
    expiry_window: 45
    renew_on_ocsp_fail: yes
    verify_ssl: /path/to/your/CA.pem

    detach_clientssl: profile_old

    clientssl_profiles:
      - name: profile_1
        parent: custom_clientssl
        sni_default: yes

        virtual_servers:
          - name: virtual_server_1
            port: 8443
The following table describes the parameters in the configuration file.
| Parameter | Parent field | Description |
|---|---|---|
|
root |
The value must be set to |
|
|
The IP address or domain name of the BIG-IP device.
|
|
|
A BIG-IP account username, e.g. Required if an external credentials file is not provided. Administrator privileges are necessary since the connector uses tmsh for some operations. |
|
|
Required if an external credentials file is not provided. e.g. |
|
|
(Optional) the BIG-IP partition in which operations will be performed, e.g. The default value is |
|
|
Required. The common name (CN) to be used in the certificate, e.g. |
|
|
(Optional) a list of Subject Alternative Name (SAN) domains. The e.g. |
|
|
The possible key types are |
|
|
The possible key sizes are:
|
|
|
Specifies whether to set a passphrase for the private key. The possible values are The default value is |
|
|
(Optional) Specifies which ACME account to use when multiple accounts are configured, e.g. If not specified, the default ACME account will be used. |
|
|
(Optional) Email address to receive notifications for certificate lifecycle events, e.g., |
|
|
(Optional) When set to The default value is |
|
|
(Optional) Specifies the number of days before certificate expiry when renewal should be triggered. If not specified, |
|
|
(Optional) When enabled, the certificate will be renewed if the OCSP revocation check fails (e.g., due to server issues or missing OCSP URL). Options are The default is |
|
|
(Optional) Specifies whether the certificate chain will be verified by the device up to the root certificate. Options are The default is |
|
|
(Optional) Specifies the name of the client SSL profile to detach from virtual servers before attaching the new profile(s). e.g., This is useful when switching the SNI default profile. |
|
|
A list of client SSL profile (and virtual server) configurations. |
|
|
(Required) The name of the client SSL profile where the certificate chain will be set after enrollment/renewal. e.g., If a profile with this name does not exist, it will be created |
|
|
(Optional) Specifies an existing client SSL profile to serve as the parent profile, inheriting its settings. e.g., The default value is |
|
|
(Optional) Indicates whether this profile should be used as the Server Name Indication (SNI) default when the client does not specify a hostname. The possible values are The default value is |
|
|
(Optional) A list of virtual server configurations to which the client SSL profile will be attached. |
|
|
Required. The name of the virtual server to which the client SSL profile will be attached. e.g., |
|
|
(Optional) Specifies a new destination port for the virtual server after attaching the client SSL profile. The default value is |
Set up the F5 credentials file
Optionally, you may move your BIG-IP username and password from the <example_cert_config>.yaml file to a separate file (for example, <bigip_creds>.yaml) to avoid exposing the credentials on a version control system or similar infrastructure tool.
bigip_devices:
  - host: 12.345.67.89
    username: admin
    password: john_1234
  - host: 21.345.67.89
    username: admin
    password: john_jr_1234
Encrypting the credentials file
The connector can work with a plaintext or encrypted configuration file. If you prefer to store your BIG-IP credentials in an ecrypted form, you need to install the GPG command-line tool and sops editor for encrypted files.
| Encrypting the BIG-IP password is an optional but recommended step to protect your credentials from unauthorized access. |
| GPG keys with passphrase are not supported by the connector. |
Install GPG
Run the following commands to install GPG (GNU Privacy Guard). The last two commands let you generate some randomness required to generate a key.
|
To check whether GPG is installed on the system, run |
sudo apt install gnupg
sudo apt install rng-tools
sudo sed -i -e 's|#HRNGDEVICE=/dev/hwrng|HRNGDEVICE=/dev/urandom|' /etc/default/rng-tools
sudo service rng-tools start
GPG_TTY=$(tty)
export GPG_TTY
sudo yum install gnupg
sudo yum install rng-tools
sudo sed -i -e 's|#HRNGDEVICE=/dev/hwrng|HRNGDEVICE=/dev/urandom|' /etc/default/rng-tools
sudo service rng-tools start
GPG_TTY=$(tty)
export GPG_TTYInstall sops
Install the sops editor for encrypting and decrypting the credentials.
|
To check whether sops is installed on the system, use the |
Encrypt the credentials file
-
Create a private key.
gpg --batch --passphrase '' --quick-gen-key $(whoami) default defaultThe
--quick-generate-key optionrequires you to specify the user ID field on the command line and optionally an algorithm, usage, and expire date. Default values are used for all other options.gpg --full-generate-keyThe
--generate-keyoption prompts for the real name and email fields before asking for a confirmation to proceed, and provides a dialog for all options. -
Retrieve the key fingerprint.
gpg --list-keys
-
Encrypt either your certificate configuration file or your external credentials file, depending on where you store the BIG-IP credentials.
This command encrypts the values of all parameters in the file.
sops --encrypt --in-place --pgp <fingerpint> [<cert_config>.yaml] [<bigip_creds>.yaml]If you’d like to encrypt specific values—for example, the client secret and password, you can use a regular expression.
sops --encrypt --encrypted-regex '^client_secret$' --in-place --pgp <fingerpint> scm.yaml
sops --encrypt --encrypted-regex '^password$' --in-place --pgp <fingerpint> [<cert_config>.yaml] [<bigip_creds>.yaml]