Configuring the connector
This page describes how to configure the connector for certificate enrollment and management.
Configure AWS programmatic access
After installing the AWS CLI, configure environment variables to use AWS programmatically:
-
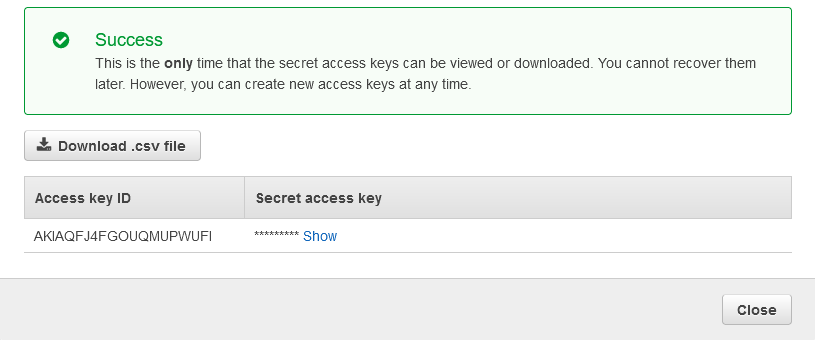
Obtain access credentials associated with your IAM user in the AWS console:
-
Navigate to the IAM section.
-
Select Users in the left menu.
-
Select the user and navigate to the Security credentials tab.

-
Click Create access key and copy Access key ID and Secret access key (you can also download a CSV file with the values).
-
-
Specify your access keys and default region name for one or more AWS accounts (you can change the default region at any time) using the
aws configurecommand.aws configure AWS Access Key ID [None]: "<access_key_id" AWS Secret Access Key [None]: "<secret_access_key>" Default region name [None]: "<region_name>" Default output format [None]: jsonRun the
aws configure --profile <profile_name>command for each AWS account where you will install the connector.aws configure -- profile <account_name> AWS Access Key ID [None]: "<access_key_id" AWS Secret Access Key [None]: "<secret_access_key>" Default region name [None]: "<region_name>" Default output format [None]: jsonThe profile name and default region are saved to the
~/.aws/configfile.[default] region=us-west-2 output=json [profile aws_account_1] region=ca-central-1 output=jsonThe AWS credentials are saved to the
~/.aws/credentialsfile.[default] aws_access_key_id=AKIAIOSFODNN7EXAMPLE aws_secret_access_key=wJalrXUtnFEMI/K7MDENG/bPxRfiCYEXAMPLEKEY [profile aws_account_1] aws_access_key_id=FLI4IOAFOZNN7EXAPPLE aws_secret_access_key=cKeprIUhnFJMI/K7VDENG/bPxRfiCYEXAMPLEKEY
Create an ACME account and obtain the EAB values
-
Log in to SCM at
https://cert-manager.com/customer/<customer_uri>with the MRAO administrator credentials provided to your organization.Sectigo runs multiple instances of SCM. The main instance of SCM is accessible at
https://cert-manager.com. If your account is on a different instance, adjust the URL accordingly. -
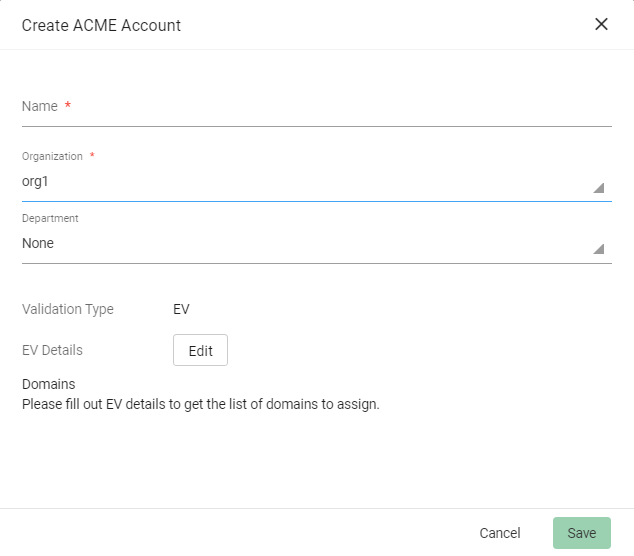
Navigate to .

-
Select your ACME endpoint.

-
Click Accounts.
-
Click Add and provide the following details:
-
Name: A name for the ACME account
-
Organization: The organization to be associated with the ACME account
-
Department: (Optional) The department to be associated with the ACME account
-
-
Click Save.
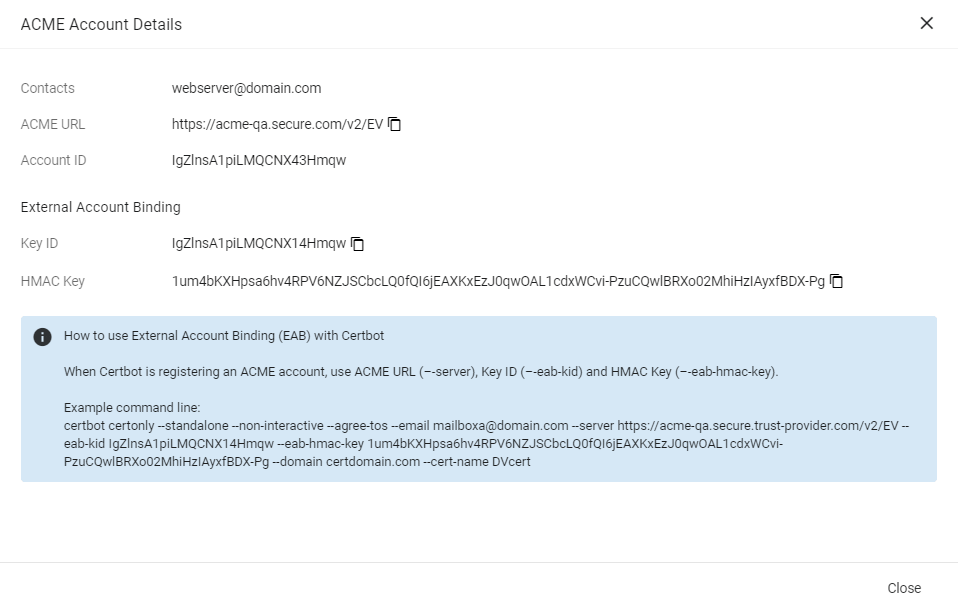
External Account Binding (EAB) is now created for the new ACME account.
Make a note of the following ACME account details for client registration:
-
ACME URL
-
Key ID
-
HMAC Key
Once the client is successfully registered, these values will be erased from the system.
-
-
Click Close.
Configure the ACME accounts file
Configure the acme_accounts.yaml file.
|
The |
accounts:
  scm_demo:
    -
      acme-endpoint: "https://acme.demo.sectigo.com"
      eab-hmac-key: "cXJpUlh2OTZFcW11cEIwcFVrWWtCOFRRYWJzTnVqejhrMDd3MWR6TzBkVnpvaTVY"
      eab-key: "dfd846050852841ffaaf87cfa64b53e1"
      email: [email protected]
      RenewBeforeDays: 30
      KeyType: RSA
      KeySize: 2048
  scm_demo2:
    ...
The following table describes the parameters in the file.
| Parameter | Description |
|---|---|
|
An arbitrary alias for your ACME account |
|
The URL of the ACME server |
|
The HMAC key for external account binding |
|
The key ID for external account binding |
|
The email address for ACME account registration and recovery contact |
|
The number of days prior to certificate expiration that a renewal process is initiated.
The default expiry window is |
|
The key algorithm to use for certificate enrollment.
The possible values are |
|
The key size to use for certificate enrollment.
The possible values are |