Configuring the connector
This page describes how to configure the connector for certificate enrollment and management.
Authenticate to Google Cloud using a user account or service account
To authenticate with a user account (for example, [email protected]), do the following.
-
Authenticate to GCP with the command:
gcloud auth login [email protected]. -
When asked, grant the Google Cloud access to your Google Cloud resources.
To authenticate with a service account (for example, [email protected]), do the following.
-
Create a service accounts key to perform login to GCP.
-
Authenticate to GCP with the command:
gcloud auth activate-service-account --key-file=<path_to_the_service_account_key_file>
Specify the project ID
If you have multiple projects in your GCP account, specify the ID of the project where the connector will be deployed.
gcloud projects list                     # retrieves a list of your projects
gcloud config set project <project_id>   # sets the `project` property in the core section
Extract the contents
The following steps must be performed before running the script:
-
Extract the contents of the
sectigo-gcpcm-vX.ziparchive to the current path. -
Navigate to the
./sectigo_gcpcm_iacdirectory. -
Give the execute permission to the
install.shfile using thechmod +x install.shcommand.
Customize the scm.yaml file
The GCP connector allows you to choose various options for communicating with SCM for SSL certificate management: Admin API, Enrollment API, and ACME.
Locate the scm_template_yaml file in the sectigo_gcpcm_iac\files folder and rename it to scm.yaml, then proceed with the appropriate customization.
-
Add an account definition in
scm.yamlwith your desired name and the following fields. The chosen account name will be required in requests.
| Parameter | Description |
|---|---|
|
The URL of the Sectigo Certificate Manager instance. |
|
Your SCM username. |
|
Your SCM password. |
|
Your SCM URI. |
ADMIN_API_ACCOUNT:
  scm_url: "<your value>"
  scm_user: "<your value>"
  scm_password: "<your value>"
scm_uri: "<your value>"-
Obtain the SCM API credentials.
-
Add an account definition in
scm.yamlwith your desired name and the following fields. The chosen account name will be required in requests.
| Parameter | Description |
|---|---|
|
The URL of the Sectigo Certificate Manager instance. |
|
Your client ID. |
|
Your client secret. |
ENROLL_API_ACCOUNT:
  scm_url: https://scmqa.enroll.demo.sectigo.com/api/v1
  client_id: "e9a4a344-eafd-471d-a9cb-496835ffcb76"
client_secret: "VWBRVB9eC4PQnAz8p`SNqWb79j9iYpl]"-
Obtain the SCM ACME credentials.
-
Add an account definition in
scm.yamlwith your desired name and the following fields. The chosen account name will be required in requests.
| Parameter | Description |
|---|---|
|
The URL of the ACME server. |
|
The HMAC key for external account binding. |
|
The key ID for external account binding. |
ACME_ACC_EXAMPLE:
  acme_endpoint: "https://acme.demo.sectigo.com"
  key_id: 4a987501d00e6a02b3fc0ee4fa436e30
  hmac_key: dVBopertfsdfijJHFRDRDKYGjVMyMmpGM2hWc003MU1aNTJwWWdHRnlPMTBMVWoz
The scm.yaml file is uploaded to Cloud Storage bucket.
This file contains SCM accounts, which is sensitive data and must be protected.
To edit or redeploy the file, use the Google CLI commands.
You can also work with the file using the Google Cloud console.
|
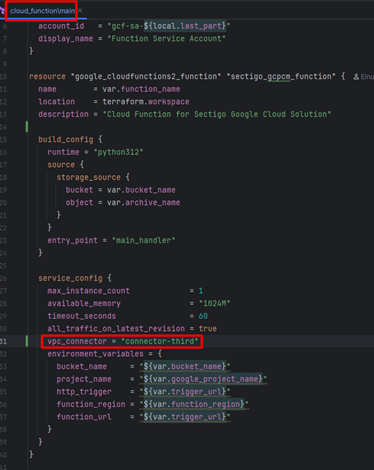
Configure Cloud Run function for use in VPC
To use the Cloud Run function in a virtual private cloud (VPC): add a vpc_connector field to the sectigo_gcpcm_iac/modules/cloud_function/main.tf, sectigo_gcpcm_function resource, in the service.config object.
Change defaults for Cloud Run function
You can change the default values for Cloud Run function configuration in the sectigo_gcpcm_iac/main.tf file.
Refer to the following table.
| Changing Cloud Run function configuration default values may help if you get an "Error: Rate exceeded" message during Cloud Run function invocation. |
| Parameter | Type | Description |
|---|---|---|
|
string |
The amount of memory available for a function. Default is NOTE: For more information on memory limits, see: https://cloud.google.com/run/docs/configuring/services/memory-limits |
|
number |
The number of CPUs used in a single container instance. Default is |
|
number |
Maximum number of concurrent requests that each instance can receive. Default is |
|
number |
The number of seconds until the function execution timeout. Default is |
Override the default service account for Cloud Run function
A new service account (SA) will be created during the deployment process, while running the install.sh script.
The Cloud Run function uses the default service account unless you override it.
To use your service account created during installation (rather than the default), uncomment rows as shown in sectigo_gcpcm_iac/modules/cloud_function/main.tf (in red).
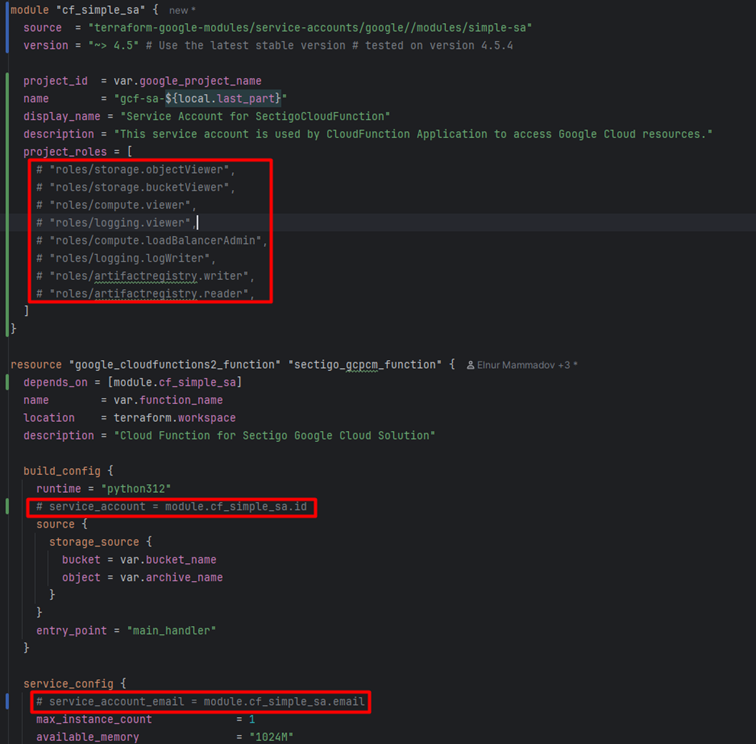
Once you uncomment those rows, additional roles (permissions) will be provided to your service account:
-
roles/storage.objectViewer, to access storage
-
roles/storage.bucketViewer, to access storage
-
roles/compute.viewer, to access quotas etc
-
roles/logging.viewer, to check logs, for example CloudBuild logs
-
roles/compute.loadBalancerAdmin, to create SSL certificate, etc.
-
roles/logging.logWriter, to write logs, for example CloudBuild logs
-
roles/artifactregistry.writer, for Cloud Build
-
roles/artifactregistry.reader, for Cloud Build
To provide additional access (roles), your user or service account should have the role: roles/resourcemanager.projectIamAdmin
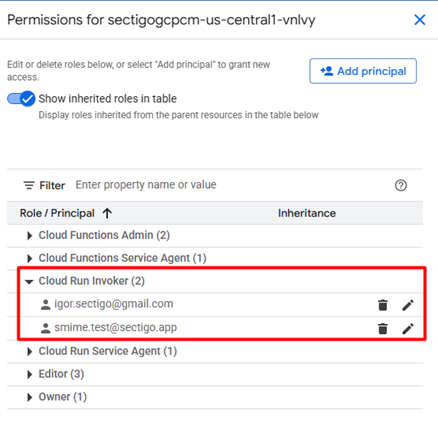
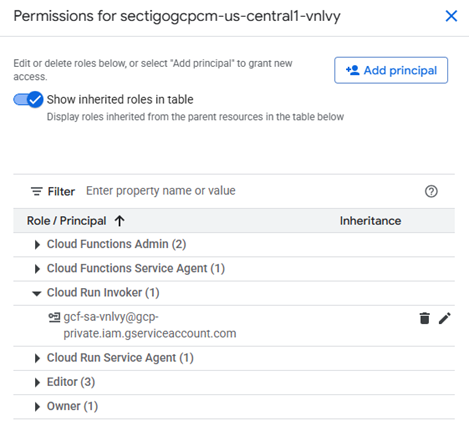
Configure access to Cloud Run function
You can use either user accounts or service accounts (created during deployment) to access Cloud Run function.
Required roles
You need the following permissions for Cloud Run function invocation:
-
roles/cloudfunctions.viewer
-
roles/run.invoker
Specify user account
To specify user accounts for function invocation, set the invoke_emails variable in the sectigo_gcpcm_iac/terraform.tfvars file and then perform install.sh script.
invoke_emails = ["[email protected]", "[email protected]"]