Configuring the connector
This page describes how to configure the connector and related tools to automate the certificate lifecycle management.
Obtain the SCM API credentials
If you haven’t done so already, obtain your SCM Client ID and Client Secret.
-
Log in to SCM at
https://cert-manager.com/customer/<customer_uri>with the MRAO administrator credentials provided to your organization.Sectigo runs multiple instances of SCM. The main instance of SCM is accessible at
https://cert-manager.com. If your account is on a different instance, adjust the URL accordingly. -
Navigate to .
-
Make a note of the URL value for SSL Certificates REST API. You will need to assign it to the
urlparameter in thescm.yamlfile. -
Select SSL Certificates REST API and click Accounts.
-
Select your account and click Edit.
-
In the Edit SSL Certificates REST Account panel, click the Edit icon.
-
Click OK to confirm resetting the client secret.
-
Make a note of the values under Client ID and Client Secret. You will need to add them to the
scm.yamlfile.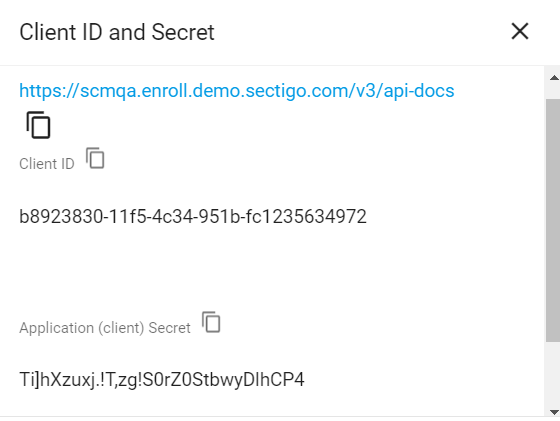
Extract the contents
-
Log into a Linux client machine as a user with administrator privileges.
-
Create a new directory on your local machine and place the integration package in the newly created directory. The following instructions assume a directory called
sectigowas created in the/optdirectory. -
Navigate to
/opt/sectigoand execute the following commands (you don’t need to install the unzip utility if you already have it).sudo apt update sudo apt-update install unzip unzip sectigo-citrix-agent_<version>.zip -d /opt/sectigo
Install the dependencies
-
Navigate to the
sectigo-citrix-agent_<version>directory. -
Install the Python dependencies listed in the
requirements.txtfile.We recommend that you install the Python packages into a virtual environment. The following instructions are Ubuntu-specific.
sudo apt install python3.8-venv
python3 -m venv .venv
source .venv/bin/activate
python3 -m pip install --upgrade pip
python3 -m pip install -r requirements.txt
The following instructions are Ubuntu-specific.
sudo apt update
sudo apt install python3-pip
python3 -m pip install --upgrade pip
python3 -m pip install -r requirements.txt
Set up the SCM credentials file
Configure the scm.yaml file.
If you have more than one SCM account, create an additional entry for each account.
enrollment:
  default:
    url: "https://murray.enroll.demo.sectigo.com/api/v1"
    client_id: "b8923830-11f5-4c34-951b-fc1235634972"
    client_secret: "Ti]hXzuxj.!T,zg!S0rZ0StbwyDlhCP4"
  another_account:
    url: "https://jordan.enroll.demo.sectigo.com/api/v1"
    client_id: "c8923840-12f5-4c34-351b-fj1235674972"
    client_secret: "mirhXzuxj3!f,zg!S0rZ5StbkyDlhCP4"
The following table describes the parameters in the file.
| Parameter | Description |
|---|---|
|
An arbitrary credentials label.
This label is referenced in the |
|
The URL of the SCM account |
|
The client ID of the SCM user |
|
The client secret of the SCM user |
Set up the certificate profile file
In project root, you will find the example_cert_config.yaml file.
You can use it as a template to create certificate profile files.
| We recommend that you keep the certificate template files outside the connector’s directory on the client machine. |
version: v1
devices:
  - common_name: "example.com"
    san_domains:
      - "example.com"
      - "www.example.com"
    key_type: rsa
    key_size: 4096
    protocol: http
    host: 12.345.67.89
    port: 80
    username: admin
    password: "s3cr3t"
    lb_servers:
      - name: lb_server_1
      - name: lb_server_2
    gateway_servers:
      - name: gateway_server_1
      - name: gateway_server_2
    content_switching_servers:
      - name: content_switching_server_1
      - name: content_switching_server_2
    authentication_servers:
      - name: authentication_server_1
      - name: authentication_server_2
The following table describes the full list of supported parameters for a certificate profile file.
| Parameter | Description | ||
|---|---|---|---|
|
The version must be set to |
||
|
Each entry specifies an external device or appliance on which the certificate will be installed. |
||
|
The domain name included in the certificate Common Name (CN) field. |
||
|
A list of subject alternative names (SAN) included in the certificate subjectAltName field. |
||
|
The key algorithm to use for certificate enrollment.
The possible values are |
||
|
The key size to use for certificate enrollment. The possible values are:
|
||
|
(Optional) The period of days prior to expiration that a certificate renewal process is initiated.
The default expiry window is |
||
|
(Optional) The enrollment profile from the |
||
|
(Optional) The protocol for communicating with the device: NOTE: Only |
||
|
(Optional) The port number for communicating with the device.
The default values are |
||
|
(Optional) Specifies whether the certificate chain will be verified by the device up to the root certificate.
For a certificate issued by a public CA, the possible values are
|
||
|
The IP address or domain name of the device on which the certificate will be installed. |
||
|
The username for authenticating to the device.
|
||
|
The password for authenticating to the device.
|
||
|
(Optional) Specifies a list of file paths to trusted CA certificates for certificate revocation list (CRL) validation. Useful for private CAs or custom trust anchors. |
||
|
(Optional) Determines what happens if revocation checks (OCSP/CRL) fail. The possible values are:
The default is |
||
|
(Optional) A list of load balancing virtual servers to protect with SSL/TLS certificates.
|
||
|
(Optional) A list of the gateway virtual servers to protect with SSL/TLS certificates.
|
||
|
(Optional) A list of content switching virtual servers to protect with SSL/TLS certificates.
|
||
|
(Optional) A list of authentication virtual servers to protect with SSL/TLS certificates.
|
External credentials file
Optionally, you may move your Citrix username and password from the <example_cert_config>.yaml file to a separate file (for example, <citrix_creds>.yaml) to avoid exposing the credentials on a version control system or similar infrastructure tool.
citrix_devices:
  - host: 12.345.67.89
    username: admin
    password: john_1234
  - host: 21.345.67.89
    username: admin
    password: john_jr_1234
Encrypting the credentials file
The connector can work with a plaintext or encrypted configuration files. If you prefer to store your SCM and Citrix credentials in an ecrypted form, you need to install the GPG command-line tool and sops editor of encrypted files.
| Encrypting the SCM secret and Citrix password is an optional but recommended step to protect your credentials from unauthorized access. |
| GPG keys with passphrase are not supported by the connector. |
Install GPG
Run the following commands to install GPG (GNU Privacy Guard). The last two commands let you generate some randomness required to generate a key.
|
To check whether GPG is installed on the system, run |
sudo apt install gnupg
sudo apt install rng-tools
sudo sed -i -e 's|#HRNGDEVICE=/dev/hwrng|HRNGDEVICE=/dev/urandom|' /etc/default/rng-tools
sudo service rng-tools start
GPG_TTY=$(tty)
export GPG_TTY
sudo yum install gnupg
sudo yum install rng-tools
sudo sed -i -e 's|#HRNGDEVICE=/dev/hwrng|HRNGDEVICE=/dev/urandom|' /etc/default/rng-tools
sudo service rng-tools start
GPG_TTY=$(tty)
export GPG_TTYInstall sops
Install the sops editor for encrypting and decrypting the credentials.
|
To check whether sops is installed on the system using the |
Encrypt the credentials file
-
Create a private key.
gpg --batch --passphrase '' --quick-gen-key $(whoami) default defaultThe
--quick-generate-key optionrequires you to specify the user ID field on the command line and optionally an algorithm, usage, and expire date. Default values are used for all other options.gpg --full-generate-keyThe
--generate-keyoption prompts for the real name and email fields before asking for a confirmation to proceed, and provides a dialog for all options. -
Retrieve the key fingerprint.
gpg --list-keys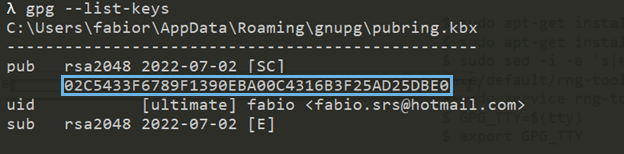
-
Encrypt your SCM credentials file and either your certificate configuration file or your external credentials file, depending on where you store the Citrix credentials.
This command encrypts the values of all parameters in the file.
sops --encrypt --in-place --pgp <fingerpint> scm.yaml
sops --encrypt --in-place --pgp <fingerpint> [<cert_config>.yaml] [<citrix_creds>.yaml]
If you’d like to encrypt specific values—for example, the client secret and password, you can use a regular expression.
sops --encrypt --encrypted-regex '^client_secret$' --in-place --pgp <fingerpint> scm.yaml
sops --encrypt --encrypted-regex '^password$' --in-place --pgp <fingerpint> [<cert_config>.yaml] [<citrix_creds>.yaml]